


Complete Layering System Guide for Nepal Trekking: Temperature-Rated Clothing Strategy
The layering system is the single most critical component of your trekking gear for Nepal. Understanding how to properly layer clothing can mean the difference between comfort and misery, safety and danger, especially when facing the Himalayas' extreme temperature swings of 20-30°C (36-54°F) within a single day. This comprehensive guide breaks down the science-backed three-layer system used by mountaineers worldwide and adapts it specifically for Nepal's unique trekking conditions across different altitudes and seasons.
Understanding the Three-Layer System: The Foundation of Mountain Clothing
The three-layer system is not just a clothing philosophy—it's a scientifically proven approach to thermoregulation in variable mountain environments. Developed and refined over decades of mountaineering expeditions, this system provides maximum versatility, allowing you to adapt to rapidly changing conditions without carrying excessive weight.
Why the Layering System Works: The Science Behind It
The three-layer system functions based on fundamental principles of thermodynamics and moisture management. Your body generates heat and moisture continuously, with output increasing dramatically during physical exertion. At moderate trekking pace, your body produces approximately 400-600 watts of heat energy and up to 1.5 liters of perspiration per hour.
The layering system addresses three critical functions simultaneously:
Moisture Transport (Base Layer): Moves perspiration away from skin through capillary action and hydrophobic/hydrophilic fiber properties. Quality base layers can transport moisture at rates of 200-400 grams per square meter per 24 hours, keeping your skin dry and preventing evaporative cooling that can lead to hypothermia.
Thermal Insulation (Mid Layer): Traps warm air in fiber structures or loft spaces. The insulating power is measured in CLO units (1 CLO = insulation needed to keep a resting person comfortable at 21°C/70°F). A 200-weight fleece provides approximately 1.5-2.0 CLO, while a light down jacket offers 2.5-3.5 CLO.
Environmental Protection (Outer Layer): Shields against wind, precipitation, and UV radiation while allowing moisture vapor to escape. Modern hardshells achieve waterproofing ratings of 20,000-30,000mm while maintaining breathability of 10,000-20,000 g/m²/24hrs.
The genius of the system lies in its modularity. By adding or removing layers, you can fine-tune your microclimate across a temperature range of -20°C to +30°C (-4°F to 86°F), covering virtually all conditions encountered on Nepal treks.
The Three Layers Defined: Quick Overview
Layer 1 - Base Layer (Next-to-Skin): Ultra-thin, moisture-wicking fabrics that pull sweat away from your body. Weight range: 150-250gsm. Materials: merino wool or synthetic polyester/nylon blends. Never cotton.
Layer 2 - Mid Layer (Insulation): Provides warmth by trapping air in fiber structures. Types: fleece (200-300 weight), softshell, or light insulated jackets. Breathable and quick-drying essential.
Layer 3 - Outer Layer (Shell): Waterproof, windproof protection from the elements. Types: hardshell rain jacket (mandatory) and insulated down/synthetic jacket for extreme cold and camp wear.
This guide will explore each layer in exhaustive detail, providing specific product recommendations, fabric specifications, temperature ratings, and altitude-specific layering strategies for Nepal trekking.
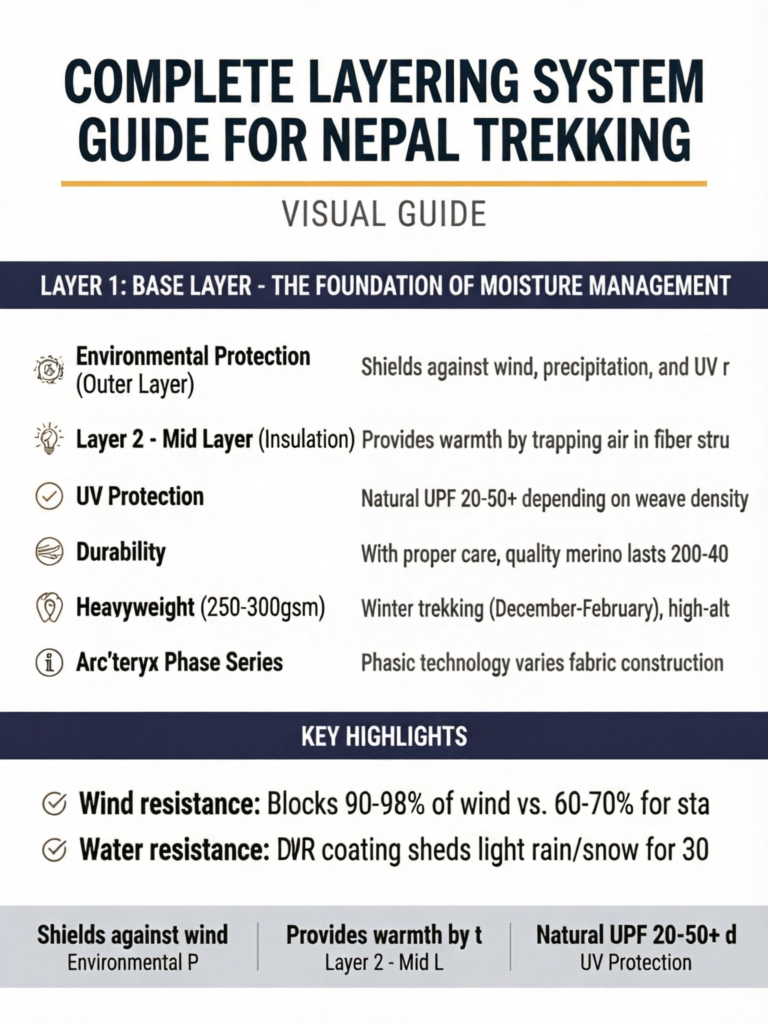
Layer 1: Base Layer - The Foundation of Moisture Management
The base layer is your first line of defense against both cold and heat. Its primary function is moisture management—moving perspiration away from your skin to prevent evaporative cooling. A quality base layer can improve thermal efficiency by 30-40% compared to cotton alternatives.
Why Cotton Kills: The Fatal Flaw
Before diving into proper base layer materials, you must understand why cotton is deadly in mountain environments. Cotton is a hydrophilic (water-loving) fiber that absorbs moisture readily—up to 27 times its weight in water. Once wet, cotton:
- Loses 90% of its insulating value
- Dries 10-20 times slower than synthetic or wool fabrics
- Conducts heat away from your body 25 times faster than dry fabric
- Creates perfect conditions for hypothermia even in moderate temperatures
In Nepal's mountains, where you'll sweat during uphill climbs and face rapid temperature drops when you stop or clouds roll in, wearing cotton can be life-threatening. Every year, trekkers suffer from hypothermia partially due to inadequate base layers. Never, under any circumstances, wear cotton t-shirts, cotton underwear, or cotton socks for trekking.
Merino Wool Base Layers: The Natural Choice
Merino wool has become the gold standard for base layers among serious trekkers and mountaineers. Unlike traditional wool, merino comes from a specific breed of sheep producing ultra-fine fibers (15-24 microns diameter vs 25-40+ for regular wool), making it soft, non-itchy, and comfortable against skin.
Technical Properties of Merino Wool:
- Moisture Management: Hydrophilic core absorbs up to 35% of its weight in moisture while maintaining insulating properties. Hydrophobic exterior repels water.
- Temperature Regulation: Natural crimp creates air pockets that insulate when cold and allow airflow when warm. Effective across 5-25°C (41-77°F) range.
- Odor Resistance: Lanolin and natural antimicrobial properties prevent bacterial growth. Can be worn 3-7 days without washing (crucial on treks).
- UV Protection: Natural UPF 20-50+ depending on weave density.
- Durability: With proper care, quality merino lasts 200-400 wear cycles. However, more delicate than synthetics.
Merino Weight Classifications for Nepal Trekking:
Lightweight (120-150gsm): Best for warm weather treks (pre-monsoon, post-monsoon below 3,500m), excellent for sleeping layer year-round. Examples: Icebreaker 150 Zone, Smartwool Merino 150.
Midweight (180-200gsm): The versatile all-season choice. Ideal for spring/fall trekking from 2,000-5,000m. Most popular option. Examples: Icebreaker 200 Oasis, Smartwool Merino 250 Base Layer (despite the name, it's closer to 200gsm).
Heavyweight (250-300gsm): Winter trekking (December-February), high-altitude sections above 4,500m, or for those who run cold. Can be too warm for active trekking at lower elevations. Examples: Icebreaker 260 Tech, Smartwool Merino 400 (for extreme cold only).
Top Merino Base Layer Recommendations:
-
Icebreaker Merino 200 Oasis Long Sleeve Crew ($80-100): Industry standard, 200gsm merino with flatlock seams, offset shoulder seams to prevent pack rub. Available in men's and women's specific fits. The most recommended base layer for Nepal trekking.
-
Smartwool Merino 250 Base Layer ($90-110): Slightly heavier construction, excellent for cold-sensitive individuals or winter treks. Interlock knit provides durability. Women's version features strategic ventilation zones.
-
Icebreaker 150 Zone ($70-90): Lightweight option with merino/nylon blend in high-output zones for enhanced durability and faster drying. Great for warm-weather treks or high-output activities.
-
Minus33 Merino Wool Midweight Crew ($60-75): Budget-friendly option with 100% merino construction. Less refined fit than premium brands but excellent performance-to-price ratio.
Synthetic Base Layers: The Durable Alternative
Synthetic base layers use polyester, nylon, or polypropylene fibers engineered to mimic wool's properties while offering superior durability and faster drying times. Modern synthetics have closed the performance gap significantly, though they still can't match merino's odor resistance and temperature regulation range.
Technical Properties of Synthetic Base Layers:
- Moisture Wicking: Hydrophobic fibers push moisture away through capillary action. Advanced fabrics feature hydrophilic treatments or dual-component yarns.
- Drying Speed: Dry 2-3 times faster than merino wool, critical in monsoon season or multi-day treks without washing facilities.
- Durability: Synthetic fibers are stronger and more abrasion-resistant. Typical lifespan: 400-600 wear cycles.
- Cost: Generally 20-40% less expensive than equivalent merino products.
- Odor Development: Major weakness—synthetics harbor bacteria and develop odor within 6-24 hours of wear. Some modern fabrics incorporate antimicrobial treatments.
Advanced Synthetic Technologies:
Polartec Power Dry: Two-surface fabric design—hydrophobic inner surface moves moisture away, hydrophilic outer surface spreads moisture for faster evaporation. Used by many premium brands.
Patagonia Capilene Cool Daily: Polygiene permanent odor control treatment significantly extends wear time. Lightweight (120-150gsm equivalent) with excellent breathability.
Arc'teryx Phase Series: Phasic technology varies fabric construction across garment for targeted moisture management. Heavier weight under arms, lighter on back.
Top Synthetic Base Layer Recommendations:
-
Patagonia Capilene Midweight Crew ($59-79): Excellent all-around performer with HeiQ Pure odor control. Burly fabric stands up to extended use. Recycled polyester construction.
-
Arc'teryx Phase SL Crew ($75-95): Premium lightweight base layer with exceptional moisture management. Ideal for high-output activities or warm conditions.
-
Smartwool Intraknit Merino 200 ($100-130): Hybrid design combining merino wool zones with synthetic panels in high-perspiration areas. Best of both worlds but at premium price.
-
Decathlon Forclaz Trek 500 Merino ($30-40): Budget option with merino/synthetic blend. 60% merino, 40% polyester. Surprising performance for the price point.
Base Layer Fit and Construction Details
Proper fit is crucial for base layer performance. Too tight restricts blood flow and movement; too loose creates air gaps that reduce insulation and moisture transfer.
Fit Guidelines:
- Snug but not restrictive—you should be able to pinch 1-2cm of fabric away from skin
- Crew neck sits comfortably without riding up
- Sleeves extend to wrist base, covering any gap when arms extended
- Torso length extends 5-10cm below waistband when arms raised
- Women's base layers should provide adequate chest coverage without compression
Construction Features to Look For:
- Flatlock or offset seams: Prevent chafing under pack straps and hipbelt
- Thumb loops: Keep sleeves in place and provide hand coverage
- Dropped tail: Prevents riding up during bending/reaching
- Zippered neck: Allows ventilation control (less common but useful)
- Strategic paneling: Varies fabric weight/type for different body zones
Lower Body Base Layers: When You Need Them
Base layer bottoms (leggings/long underwear) are optional for most Nepal treks but valuable in specific situations:
When to Bring Base Layer Bottoms:
- Winter trekking (December-February)
- High-altitude treks above 4,500m (Everest Base Camp, Annapurna Circuit high passes)
- Cold sleepers who want extra warmth in teahouses
- Early morning starts before sunrise
- Individuals with poor circulation or who run cold
When You Can Skip Them:
- Spring/Fall trekking below 4,000m
- Budget is extremely tight (prioritize upper body base layer)
- Minimize pack weight (trekking pants usually sufficient)
If you do bring base layer bottoms, follow the same merino vs. synthetic decision-making as upper body. Recommended options: Icebreaker 200 Oasis Leggings ($80-100), Smartwool Merino 250 Bottoms ($90-110), Patagonia Capilene Midweight Bottoms ($69-89).
The Two-Base-Layer Strategy for Extended Treks
Base Layer Care in the Field
Proper care extends base layer life and maintains performance:
Washing on Trek:
- Hand wash in cold/lukewarm water with biodegradable soap
- Wring gently (don't twist), roll in towel to remove excess water
- Hang to dry inside teahouse (never put in sun—UV degrades fibers)
- Merino can go 3-7 days between washes; synthetics need daily/every-other-day washing
Storage:
- Never store damp—promotes mildew and odor
- Fold rather than hang (prevents stretching)
- Keep away from sharp objects (merino is delicate)
Layer 2: Mid Layer - Insulation and Breathability Balance
The mid layer is where you control warmth. This layer's primary function is thermal insulation—trapping warm air while remaining breathable enough to prevent moisture buildup from perspiration. The mid layer is the most frequently adjusted layer during trekking as you respond to exertion levels and changing conditions.
Fleece Mid Layers: The Trekking Workhorse
Fleece has been the go-to mid layer for outdoor enthusiasts since its invention in 1979. Modern fleece fabrics offer exceptional warmth-to-weight ratios, breathability, and durability. Fleece maintains approximately 70% of its insulating value even when damp, a critical property for multi-day treks.
How Fleece Works:
Fleece is typically made from polyester fibers that are knitted, brushed to create a nap (raised fibers), and sometimes sheared for a uniform surface. The brushed nap creates millions of tiny air pockets that trap warm air. The synthetic fibers themselves are hollow or crimped to enhance insulation.
Fleece Weight Classifications:
Microfleece (100-weight): Ultra-lightweight, 200-250g for a men's large jacket. Minimal insulation (0.5-0.8 CLO). Best for high-output activities or as a barely-there layer under a shell. Generally too light for Nepal trekking unless used in combination with other layers.
Lightweight Fleece (200-weight): The sweet spot for trekking. 300-400g weight provides 1.0-1.5 CLO insulation. Excellent breathability. Can be worn during active trekking on cool mornings or under shell. Examples: Patagonia R1, Arc'teryx Kyanite.
Midweight Fleece (300-weight): Heavier insulation (1.5-2.0 CLO), 400-500g weight. Better for evening wear around teahouses or winter trekking. Often too warm for active trekking except in extreme cold. Examples: Patagonia R2, The North Face Denali.
Expedition Weight (400-weight): Rarely needed for standard Nepal treks. Reserved for high-altitude mountaineering or extreme cold weather.
Fleece Fabric Technologies:
Polartec Classic: Traditional fleece, reliable and affordable. Sheared surface resists pilling. Available in 100, 200, 300-weight.
Polartec Power Stretch: Four-way stretch fabric with nylon face for durability and polyester fleece back for warmth. Excellent fit and mobility. Used in technical fleeces like Patagonia R1.
Polartec Thermal Pro: Advanced high-loft fleece providing 20% more warmth than classic fleece at same weight. Faster drying and more compressible.
Polartec Power Grid: Grid-pattern backer reduces weight while maintaining warmth. Enhanced breathability and faster drying. Used in modern technical fleeces.
Top Fleece Mid Layer Recommendations for Nepal:
-
Patagonia R1 Fleece Hoody ($139-169): The industry benchmark. Polartec Power Grid construction provides exceptional warmth-to-weight and breathability. Stretchy, comfortable, durable. Hooded version offers extra warmth and sun protection. This is the #1 most recommended mid layer for Nepal trekking.
-
Arc'teryx Kyanite Hoody ($179-199): Premium fleece with Polartec Thermal Pro fabric. Excellent fit, micro-suede collar, and superior durability. More polished aesthetic than R1. Worth the premium for those who value refined design.
-
Patagonia Better Sweater Fleece Jacket ($119-139): Sweater-knit fleece with fleece interior. More casual appearance, works well off-trail. Slightly less breathable than technical fleeces but very comfortable. Good for teahouse wear.
-
Decathlon Forclaz Trek 100 Fleece ($20-30): Budget option that punches above its weight class. Basic 200-weight fleece without advanced technologies but provides solid warmth and reliability. Perfect for tight budgets.
-
The North Face TKA Glacier Full Zip ($40-60): Mid-range option with Polartec Classic fleece. Available worldwide, good warranty support. Solid performer without premium features.
Softshell Jackets: The Versatile Hybrid
Softshells bridge the gap between mid layer and outer layer, offering moderate weather resistance combined with breathability and stretch. They excel in dry, cold conditions or during high-output activities where a hardshell would cause overheating.
Softshell Construction:
Softshells typically feature 2-4 layers:
- Durable outer face fabric (often nylon with DWR coating)
- Windproof membrane or tight weave (blocks wind while allowing some breathability)
- Fleece or brushed interior for warmth
- Sometimes an additional membrane layer for enhanced weather resistance
Softshell Properties:
- Wind resistance: Blocks 90-98% of wind vs. 60-70% for standard fleece
- Water resistance: DWR coating sheds light rain/snow for 30-60 minutes
- Breathability: 15,000-25,000 g/m²/24hrs (much higher than hardshells)
- Stretch: 4-way mechanical stretch allows unrestricted movement
- Durability: Tougher face fabric resists abrasion better than fleece
When to Choose Softshell Over Fleece:
Softshells work best when:
- Weather is dry but cold and windy
- You're doing high-output activities (climbing steep sections)
- You want a single versatile layer instead of fleece + shell
- Teahouse temperatures are moderate (carrying less bulk)
Fleece works better when:
- You need maximum breathability (hot days)
- Layering flexibility is priority (can combine with base layer or down)
- Budget is limited (fleece costs 30-50% less)
- You have a good hardshell for rain protection
Top Softshell Recommendations:
-
Arc'teryx Gamma LT Hoody ($229-269): The softshell gold standard. Fortius 1.0 fabric balances weather resistance and breathability perfectly. Excellent fit, articulated construction, and bomber durability. Ideal for shoulder-season Nepal trekking.
-
Outdoor Research Ferrosi Hoody ($129-149): Best value in softshells. Surprisingly weather-resistant, very breathable, and extremely popular among trekkers. Weighs only 340g. Great all-around choice.
-
Patagonia Tough Puff Hoody ($249-279): Unique design with light insulation (60g PlumaFill synthetic). Acts as softshell and light puffy in one. Excellent for cold, dry conditions.
-
Mammut Ultimate VI SO Hoody ($180-220): Technical softshell with Gore Windstopper membrane. Maximum wind protection with good breathability. Best for very windy high-altitude sections.
Insulated Mid Layers: Light Down and Synthetic Puffies
Light insulated jackets serve as mid layers during rest breaks, mornings/evenings at teahouses, or while trekking in very cold conditions. These provide significantly more warmth than fleece but with less breathability, making them less suitable for constant wear during active trekking.
Down vs. Synthetic Insulation:
Down Insulation (Goose or Duck):
- Superior warmth-to-weight: 800-fill down provides ~2.5 CLO per 100g
- Highly compressible: Packs smaller than any synthetic alternative
- Longer lifespan: 10-15 years with proper care vs. 5-8 years for synthetic
- Moisture vulnerability: Loses 90% insulation when wet, very slow to dry
- Ethical considerations: Responsibly-sourced down (RDS certified) recommended
- Higher cost: Premium down jackets cost $200-400
Synthetic Insulation (PrimaLoft, Climashield, Coreloft):
- Maintains ~70% insulation when wet
- Dries much faster than down (2-4 hours vs. 12-24 hours)
- More consistent performance in damp conditions
- Heavier and bulkier: 20-40% more weight/volume for same warmth
- More affordable: $100-250 for quality jackets
- Better for active use (more breathable than down)
For Nepal Trekking, Which Insulation?
Choose Down If:
- Trekking in dry seasons (October-November, March-May)
- Primarily using as camp/teahouse layer (not wearing while active)
- Pack space is limited (down compresses smaller)
- You want maximum warmth for minimal weight
Choose Synthetic If:
- Trekking in monsoon (June-September) or winter (December-February)
- Planning active use (wearing while trekking in cold)
- Budget is tight
- You're less diligent about keeping insulation dry
Fill Power Explained:
Fill power measures down quality—specifically, how many cubic inches one ounce of down occupies. Higher fill power means warmer insulation for less weight:
- 500-600 fill: Budget down, heavier but still warm
- 650-750 fill: Standard quality, good warmth-to-weight
- 800-900 fill: Premium down, excellent warmth-to-weight
- 900+ fill: Ultra-premium, used in extreme mountaineering
For Nepal trekking mid layers, 650-800 fill provides the best balance of performance and cost.
Top Light Insulated Mid Layer Recommendations:
-
Patagonia Down Sweater ($229-279): Iconic 800-fill down jacket with excellent durability. 60g down insulation (100g in hooded version). Compressible, comfortable, and reliable. Best all-around down mid layer.
-
Arc'teryx Cerium LT Hoody ($379-429): Premium lightweight down (850-fill) with synthetic insulation in moisture-prone areas (underarms, collar). Strategic construction and superior fit. Worth the investment for serious trekkers.
-
Patagonia Nano Puff Jacket ($199-249): Synthetic insulation workhorse. 60g PrimaLoft Gold Eco insulation. Very breathable, packable, and durable. Ideal for active use or damp conditions.
-
Mountain Hardwear Ghost Whisperer/2 ($379-425): Ultra-lightweight down jacket (800-fill, 50g insulation). Weighs only 215g. Packs incredibly small. Best for weight-conscious trekkers who want backup warmth.
-
Decathlon Trek 100 Down Jacket ($60-80): Budget down option with 650-fill down. Heavier and less refined than premium options but provides solid warmth. Great value.
Mid Layer Comparison: Fleece vs. Softshell vs. Insulated
| Name | Warmth | Breathability | Weather Resistance | Weight | Pack Size | Best For | Price |
|---|---|---|---|---|---|---|---|
| 200-Weight Fleece (Patagonia R1) | Moderate (1.0-1.5 CLO) | Excellent | Minimal (wind only) | 320-380g | Medium-Large | Active trekking, layering flexibility | $139-169 |
| Softshell (OR Ferrosi) | Light-Moderate (0.8-1.2 CLO) | Very Good | Good (wind/light rain) | 340-400g | Medium | Dry, windy conditions, high output | $129-149 |
| Light Down (Patagonia Down Sweater) | High (2.0-2.5 CLO) | Low | Minimal (not waterproof) | 370-450g | Small | Evenings, breaks, very cold mornings | $229-279 |
| Light Synthetic (Nano Puff) | Moderate-High (1.5-2.0 CLO) | Moderate | Fair (DWR coating) | 340-410g | Medium | Active use in cold, damp conditions | $199-249 |
The Essential Mid Layer Choice for Nepal
If you can only bring one mid layer (budget or weight constraints), choose a 200-weight technical fleece like the Patagonia R1 or Arc'teryx Kyanite. This provides the best balance of warmth, breathability, versatility, and reliability across all conditions you'll encounter. You can regulate temperature by:
- Wearing just base + fleece on cool mornings (5-15°C / 41-59°F)
- Adding fleece under hardshell in rain/wind
- Removing fleece and wearing just base layer when warm (15-25°C / 59-77°F)
- Layering base + fleece + down for extreme cold (below 0°C / 32°F)
If you can bring two mid layers, the ideal combination is:
- Primary: 200-weight fleece (Patagonia R1, Arc'teryx Kyanite)
- Secondary: Light insulated jacket (down or synthetic based on season/conditions)
This combination covers the full temperature range from moderate to extreme cold while maintaining packability and reasonable weight.
Layer 3: Outer Layer - Weather Protection
The outer layer is your shield against the elements—rain, snow, wind, and intense UV radiation. In Nepal's mountains, weather can change from clear skies to torrential downpour in minutes. A quality hardshell rain jacket is absolutely mandatory equipment, while an insulated down/synthetic jacket provides critical warmth for high altitude and evening camp use.
Hardshell Rain Jackets: The Non-Negotiable Essential
A waterproof, breathable hardshell jacket is the single most important piece of gear for Nepal trekking. Caught in a multi-hour rainstorm without proper protection leads to rapid heat loss and potentially life-threatening hypothermia.
Waterproof-Breathable Membrane Technology:
Modern hardshells use microporous membranes or hydrophilic coatings to achieve the seemingly impossible: blocking water from outside while allowing moisture vapor from perspiration to escape from inside.
Gore-Tex Family (Industry Standard):
-
Gore-Tex Paclite: Lightweight, 2-layer construction. Durable enough for trekking but less breathable. Budget-friendly option. Breathability: ~10,000 g/m²/24hrs.
-
Gore-Tex Active: 3-layer construction optimized for high-output activities. Maximum breathability (~25,000 g/m²/24hrs). Lighter weight but less durable face fabric.
-
Gore-Tex Pro: Premium 3-layer construction with burliest face fabric. Maximum durability and breathability (~20,000 g/m²/24hrs). Heavier but bomb-proof. Used in mountaineering shells.
Alternative Membranes:
-
eVent: Extremely breathable (~30,000 g/m²/24hrs) but requires more careful maintenance. Used in some premium shells.
-
Pertex Shield: Budget-friendly alternative with 10,000-15,000mm waterproofing and good breathability. Found in brands like Rab, Montane.
-
Proprietary Membranes: Many brands use custom membranes (Arc'teryx N40p, Outdoor Research AscentShell) with performance rivaling Gore-Tex.
Critical Hardshell Features for Nepal Trekking:
-
Pit Zips (Ventilation Zippers): Non-negotiable. Pit zips allow dump massive amounts of heat and moisture, preventing the sweat-soaked sauna effect. Studies show pit zips reduce moisture buildup by 40% during high-output activities. Full-length zips (waist to armpit) provide maximum ventilation.
-
Hood Design: Helmet-compatible hoods are oversized for mountaineering helmets—unnecessary bulk for trekking. Look for adjustable hoods with single-pull cord adjustment and stiffened brim. Hood should fit over a warm beanie without being excessively large.
-
Pocket Placement: Two hand pockets should sit above hipbelt (not obscured when wearing backpack). Chest pocket sized for phone/GPS device. Internal pocket for valuables.
-
Hem Adjustment: Cinch cord at hem prevents jacket riding up and allows sealing out drafts.
-
Cuff Design: Hook-and-loop (Velcro) cuff closures allow adjustment over gloves. Avoid elastic cuffs (don't seal well).
-
YKK AquaGuard Zippers: Water-resistant zippers with storm flaps prevent leakage at zipper line.
-
Length: Jacket should extend 5-10cm below hipbelt when wearing backpack. Too short allows rain to soak pants/base layer.
Top Hardshell Rain Jacket Recommendations:
-
Arc'teryx Beta LT Jacket ($349-399): The gold standard. Gore-Tex 3L construction, perfect feature set including pit zips, excellent hood design, and exceptional durability. Superior fit and finish. The single best investment for serious trekkers.
-
Outdoor Research Helium Rain Jacket ($129-169): Budget-friendly option with Pertex Shield membrane. Ultralight (180g) but surprisingly durable. Includes pit zips. Best value for occasional trekkers.
-
Patagonia Torrentshell 3L Jacket ($149-179): Excellent mid-range option with H2No 3-layer membrane. Good breathability, reliable waterproofing, and ethical manufacturing. Slightly heavier but very durable.
-
Marmot Minimalist Jacket ($175-225): Gore-Tex Paclite shell with good feature set. Reliable, widely available, and proven performance. Safe choice at reasonable price.
-
Rab Downpour Plus 2.0 ($180-220): Pertex Shield+ membrane provides excellent weather protection. Full feature set including pit zips and adjustable hood. Great alternative to Gore-Tex at lower cost.
-
Decathlon Forclaz Trek 900 Jacket ($80-100): Surprising quality for the price. 20,000mm waterproofing, 15,000g breathability, pit zips, and good build quality. Perfect for tight budgets.
Hardshell Pants: Do You Need Them?
Hardshell rain pants are less critical than rain jackets for Nepal trekking because:
- Your pack's rain cover protects your lower body during most rainfall
- Lower body generates less perspiration (breathability less critical)
- Budget lightweight options work fine
However, they are still highly recommended for:
- Multi-day treks where long rain exposure is likely (monsoon season)
- Crossing high passes in bad weather (Thorong La, Cho La)
- Protection against wind chill at altitude
Recommended Rain Pants:
- Budget: Frogg Toggs Ultra-Lite2 ($20-30) - lightweight, packable, adequate protection
- Mid-Range: Marmot PreCip Eco Pants ($80-100) - durable, good breathability, side zips for ventilation
- Premium: Arc'teryx Beta LT Pant ($279-329) - full side zips, Gore-Tex Pro, articulated fit
Most trekkers are fine with budget options like Frogg Toggs or Marmot PreCip. Save your money for a premium jacket instead.
The Hardshell Break-In Period
Insulated Jackets: The High-Altitude Essential
While mid-layer insulated jackets (light down/synthetic) serve double duty, a heavier insulated jacket is essential for:
- High-altitude sections above 4,500m where temperatures drop to -10°C to -20°C (14°F to -4°F)
- Evening and morning teahouse wear (most teahouses lack heating above 3,500m)
- Emergency backup warmth if weather deteriorates
- Sleeping in cold teahouses (supplementing sleeping bag)
Down Insulated Jackets:
For dry season trekking (October-November, March-May), down provides maximum warmth with minimum weight. Look for:
- Fill Power: 700-800 fill provides best value. 800+ is lighter but more expensive.
- Fill Weight: 120-200g down for standard trekking, 200-300g for winter/high altitude
- Construction: Box-wall baffles prevent down migration and cold spots
- Shell Fabric: 20-30D nylon ripstop balances durability and light weight
- Water-Resistant Down: Treated down (DownTek, Q.Shield) maintains loft if dampened
Top Down Jacket Recommendations:
-
Patagonia Fitz Roy Down Parka ($379-449): Warm parka-length jacket with 700-fill down (200g fill weight). Excellent for teahouse wear and high altitude. Durable and reliable.
-
Mountain Hardwear Ghost Whisperer/2 Parka ($425-475): Lightweight option (800-fill, 280g total weight) with good warmth. More packable than Patagonia but less durable.
-
The North Face McMurdo Parka ($299-349): Budget-friendly option with 600-fill down. Heavier but provides excellent warmth. Good value.
Synthetic Insulated Jackets:
For monsoon, winter, or damp conditions, synthetic insulation maintains warmth when wet:
-
Patagonia Macro Puff Jacket ($299-349): 148g PlumaLift insulation mimics down's warmth with synthetic's wet-weather performance. Excellent all-around choice.
-
Arc'teryx Nuclei FL Jacket ($349-399): Coreloft synthetic insulation in articulated design. Very warm for weight, durable, and breathable enough for some active use.
Budget Strategy: Rent or Bring from Home?
Kathmandu and Pokhara have excellent gear rental shops offering down jackets for $1-2/day ($30-60 for typical 3-week trek). Consider renting if:
- This is your only Nepal trek (saves $200-400 purchase cost)
- You don't need insulated jacket at home
- Your budget is extremely tight
Bring your own if:
- You'll use the jacket for winter activities at home
- You want guaranteed fit, cleanliness, and quality
- You're very particular about gear
- You want to break in gear before the trek
Lower Body Layering: Pants and Leg Protection
While upper body layering gets most attention, proper lower body clothing is equally important. The layering principle applies, though with less complexity since your legs generate substantial heat during uphill trekking.
Trekking Pants: Your Daily Workhorse
Trekking pants serve as your primary lower body layer for 90% of the trek. Unlike upper body where you constantly add/remove layers, you'll typically wear the same pants all day, making choice particularly important.
Essential Properties of Trekking Pants:
- Stretch fabric: 4-way mechanical stretch allows unrestricted movement during high steps and scrambling. Look for 5-15% elastane content.
- Abrasion resistance: Nylon blend (nylon-polyester-elastane) provides durability against rock, pack friction, and vegetation.
- Quick-drying: Even in dry season, you'll cross streams and potentially get caught in rain. Pants should dry within 2-4 hours.
- Breathability: Trekking generates heat. Avoid waterproof pants (too hot) or heavy canvas (doesn't breathe).
- Articulated knees: Pre-shaped knees reduce fabric bunching and provide better range of motion.
- UPF rating: Sun protection (UPF 30-50) prevents UV damage during full-day exposure.
Trekking Pant Styles:
Full-Length Pants: Best for cooler weather, higher altitudes, or conservative dress in villages. Provide sun/vegetation protection and warmth.
Convertible Pants (Zip-Off): Zip-off legs convert to shorts for lower elevations. Added weight and bulk of zippers, plus potential failure point. Less popular among serious trekkers.
Shorts: Suitable for lower elevations (below 3,000m) in warm seasons but limited use on most treks. Better to bring one pair of lightweight shorts for teahouse wear rather than trekking in shorts.
Top Trekking Pant Recommendations:
-
Prana Stretch Zion Pants ($99-119): The most popular trekking pant worldwide. 97% nylon, 3% elastane provides perfect stretch, durability, and comfort. Quick-drying, articulated fit, and reinforced cuffs. Excellent value. Available in men's and women's cuts.
-
Arc'teryx Gamma LT Pant ($199-229): Premium option with Fortius 1.0 softshell fabric. Wind/water resistant, very durable, exceptional fit. Can double as softshell layer in cold/windy conditions. Worth the investment for frequent trekkers.
-
Outdoor Research Ferrosi Pants ($89-109): Lightweight (280g) with decent durability. Very breathable, good stretch, and excellent value. Slightly less durable than Prana Zion but lighter.
-
Patagonia Quandary Pants ($89-109): Nylon-elastane blend with DWR coating. Good all-around performance at reasonable price. Tapered leg prevents catching on vegetation.
-
Decathlon Forclaz Trek 500 Pants ($40-50): Budget option with surprising quality. Stretch fabric, reinforced knees, and adequate durability. Perfect for tight budgets or infrequent trekkers.
Women-Specific Recommendations:
- Prana Halle Pants ($99-119): Women's equivalent to Stretch Zion with female-specific fit
- Arc'teryx Gamma LT Pant - Women's ($199-229): Excellent fit and performance
- Outdoor Research Ferrosi Pants - Women's ($89-109): Great value with good fit
Fit Considerations:
- Waist: Should sit comfortably without belt when standing and bending. Allow room for base layer underneath if bringing them.
- Rise: Mid-rise prevents gap between shirt and pants when bending. High-rise works better under hipbelt.
- Leg length: Should reach top of boots/shoes without dragging on ground. Cuffs should be reinforced (high abrasion area).
- Thigh/Knee: Generous room for base layers and unrestricted movement. Too tight restricts blood flow.
Base Layer Bottoms: Optional but Valuable
As discussed in the base layer section, lower body base layers (long underwear/leggings) are optional for most treks but valuable in specific situations.
When to Wear Base Layer Bottoms:
- Morning starts: Pull on over trekking pants for first 1-2 hours before sun warms things up
- Evening teahouse wear: Layer under trekking pants for warmth in unheated dining areas
- Sleeping: Wear instead of trekking pants for cleaner, more comfortable sleep layer
- High altitude: Above 4,500m, temperatures may necessitate base layer + trekking pants during active trekking
Best Base Layer Bottom Options:
- Merino: Icebreaker 200 Oasis Leggings, Smartwool Merino 250 Bottoms (same rationale as upper body)
- Synthetic: Patagonia Capilene Midweight Bottoms, Arc'teryx Phase AR Bottom
Insulated Pants: High Camp and Sleeping Warmth
Insulated pants are rarely needed for active trekking (too hot) but serve specific purposes:
When You Need Insulated Pants:
- High-altitude base camps: If camping above 5,000m (not typical for standard treks)
- Winter trekking: December-February above 4,000m
- Cold sleepers: Teahouse sleeping in winter/shoulder season
- Evening camp wear: If you run very cold
Most standard treks (Everest Base Camp, Annapurna Circuit, Langtang) don't require insulated pants if you have base layer bottoms and good sleeping bag. However, they provide luxurious warmth for evening teahouse lounging.
Options:
- Western Mountaineering Flash Pants ($179-219): Lightweight down pants (850-fill, 85g down)
- Patagonia Nano Puff Pants ($149-179): Synthetic insulation, more versatile for active use
- Budget Alternative: Bring lightweight fleece pants ($30-50) for teahouse wear instead of technical insulated pants
The Lower Body Layering Kit for Nepal
Minimal Setup (Budget/Weight Conscious):
- 1x Trekking pants (Prana Stretch Zion or similar)
- 1x Lightweight shorts (for teahouse wear/sleeping)
- 1x Rain pants (budget option like Frogg Toggs)
Standard Setup (Recommended):
- 1x Trekking pants (Prana Stretch Zion or Arc'teryx Gamma LT)
- 1x Base layer bottoms (merino or synthetic)
- 1x Lightweight shorts
- 1x Rain pants (mid-range option)
Cold Weather/Winter Setup:
- 1x Trekking pants
- 2x Base layer bottoms (one for trekking, one clean for sleeping)
- 1x Insulated pants or fleece pants
- 1x Heavyweight rain pants with side zips
- 1x Lightweight shorts
Altitude-Specific Layering Strategies: Practical Application
Understanding gear is only half the battle—knowing how to use it effectively across different altitudes and conditions completes your preparation. Nepal's diverse elevation zones present drastically different temperature and weather conditions, requiring strategic layer management.
Temperature and Weather by Altitude Zone
Zone 1: 1,400-2,500m (4,600-8,200 ft) - Subtropical/Temperate
- Temperature Range: 15-25°C (59-77°F) daytime, 5-15°C (41-59°F) night
- Conditions: Humid, lush vegetation, possible rain any season
- Trekking: Kathmandu, Pokhara, lower Annapurna, lower Langtang
- Layering: Minimal. Base layer or trekking shirt + trekking pants usually sufficient during day.
Typical Layering 1,400-2,500m:
- Active Trekking: Lightweight trekking shirt or base layer (if cool morning) + trekking pants
- Morning/Evening: Base layer + fleece + trekking pants
- Rain: Base layer + rain jacket + rain pants
- Teahouse: Base layer + light fleece or casual shirt
Zone 2: 2,500-3,500m (8,200-11,500 ft) - Alpine Forest
- Temperature Range: 10-20°C (50-68°F) daytime, 0-10°C (32-50°F) night
- Conditions: Cooler, drier, pine/rhododendron forests, thinner air becomes noticeable
- Trekking: Namche Bazaar, Tengboche, Manang, Ghandruk, Langtang village
- Layering: Start using mid layers, especially mornings and evenings
Typical Layering 2,500-3,500m:
- Early Morning Start (5-7 AM): Base layer + fleece + trekking pants (possibly base layer bottoms)
- Active Trekking (Mid-Morning to Afternoon): Base layer + trekking pants (peel off fleece once warmed up)
- Breaks/Lunch: Add fleece back on (you cool down quickly when stopping)
- Evening Teahouse: Base layer + fleece + insulated jacket (if cold) + trekking pants or base layer bottoms
- Rain: Base layer + fleece (if cold) + rain jacket + rain pants
Zone 3: 3,500-4,500m (11,500-14,800 ft) - Sub-Alpine/High Alpine
- Temperature Range: 5-15°C (41-59°F) daytime, -5 to 5°C (23-41°F) night
- Conditions: Above treeline, rocky terrain, strong UV, significant temperature swings
- Trekking: Dingboche, Lobuche, Thorong Phedi, Kyanjin Gompa
- Layering: Full three-layer system comes into play
Typical Layering 3,500-4,500m:
- Early Morning Start: Base layer + fleece + light insulated jacket (or down jacket) + trekking pants + base layer bottoms
- Active Trekking (Warmed Up): Base layer + fleece (or just base if working hard uphill) + trekking pants
- Breaks: Add insulated jacket immediately (you lose heat fast at altitude)
- High Pass Crossing: Base layer + fleece + rain jacket (wind protection) or down jacket (if very cold) + trekking pants + base layer bottoms + rain pants (wind protection)
- Evening/Overnight: Base layer + fleece + insulated jacket + base layer bottoms + insulated pants (optional but nice)
Zone 4: 4,500-5,500m+ (14,800-18,000+ ft) - Alpine/Nival
- Temperature Range: 0-10°C (32-50°F) daytime, -10 to -5°C (14-23°F) night (colder in winter)
- Conditions: Barren, glacial, extreme UV, low oxygen, severe wind, rapid weather changes
- Trekking: Gorak Shep, Everest Base Camp, Thorong La pass, Cho La pass
- Layering: Maximum warmth, all layers available
Typical Layering 4,500-5,500m+:
- Early Morning Start: Base layer + fleece + insulated jacket + hardshell (wind) + base layer bottoms + trekking pants + possibly rain pants for wind
- Active Trekking: Base layer + fleece + trekking pants (possibly remove insulated jacket once warmed up, but keep accessible)
- Summit Push/Pass Crossing: Base layer + fleece + insulated jacket + hardshell + base layer bottoms + trekking pants + rain pants
- Evening/Overnight: ALL layers—base + fleece + insulated jacket + base layer bottoms + insulated/fleece pants
Altitude-Specific Layering Examples: Active Trekking
| Name | Morning | Midday | Evening | Rain | Temp |
|---|---|---|---|---|---|
| 2,000-3,000m (Moderate Zone) | Base layer + trekking pants | Trekking shirt + trekking pants | Base + fleece + trekking pants | Base + rain jacket + rain pants | 15-25°C day / 5-15°C night |
| 3,000-4,000m (Cool Zone) | Base + fleece + trekking pants | Base + trekking pants | Base + fleece + light down + pants | Base + fleece + rain jacket + pants | 10-20°C day / 0-10°C night |
| 4,000-5,000m (Cold Zone) | Base + fleece + down + trekking pants | Base + fleece + trekking pants | All layers + insulated pants | Base + fleece + shell + rain pants | 5-15°C day / -5 to 5°C night |
| 5,000m+ (Extreme Zone) | All layers available | Base + fleece + shell (wind) | Maximum insulation all layers | Full protection all shells | 0-10°C day / -10 to -5°C night |
Managing Temperature Swings: The 20-30°C Challenge
One of the biggest challenges in Himalayan trekking is managing temperature swings that can exceed 30°C (54°F) in a single day. Understanding when and how to adjust layers prevents both overheating (leading to excessive sweating and dehydration) and getting chilled (risking hypothermia).
The Morning Chill to Midday Heat Pattern:
Typical day in 3,500-4,500m zone:
- 6:00 AM: -5°C (23°F) - Start hiking in base + fleece + insulated jacket
- 7:30 AM: 0°C (32°F) - Sun hits valley, remove insulated jacket
- 9:00 AM: 5°C (41°F) - Warmed up from hiking, remove fleece
- 11:00 AM: 15°C (59°F) - Direct sun, hiking in just base layer
- 1:00 PM: 20°C (68°F) - Peak heat, possibly switch to trekking shirt
- 3:00 PM: 15°C (59°F) - Sun behind mountains, add base layer back
- 5:00 PM: 5°C (41°F) - Arrive at teahouse, add fleece
- 7:00 PM: 0°C (32°F) - Evening meal, add insulated jacket
Layer Management Strategies:
-
Pack Accessibility: Keep fleece and rain jacket in top compartment or lid of backpack for quick access without unpacking.
-
Stop to Layer: Resist urge to keep hiking while adding/removing layers. Stop, remove pack, make adjustment properly. Prevents dropped items and allows body temperature to stabilize.
-
Anticipate Changes: Add layer BEFORE you get cold. Remove layer BEFORE you overheat. Waiting until you're shivering or drenched in sweat makes recovery harder.
-
Breaks Cool You Down: Always add a layer when stopping for breaks. Your heat generation drops immediately when stopping movement, and altitude's thin air provides less insulation.
-
Morning Starts: Start hiking slightly cool (one layer less than comfortable standing still). You'll warm up within 10-15 minutes. Starting too warm leads to early sweating.
-
Afternoon Arrivals: Have fleece/insulated jacket accessible for arrival at teahouse. You'll stop moving and cool down quickly, especially if arrival coincides with sun leaving valley.
Wind and Rain: Weather-Driven Layering
Wind and precipitation dramatically alter layering needs beyond temperature alone.
Wind Chill Factor:
Wind accelerates heat loss through convection. At altitude with strong winds:
- 10°C (50°F) with 30 km/h wind feels like 4°C (39°F)
- 0°C (32°F) with 30 km/h wind feels like -7°C (19°F)
- -5°C (23°F) with 30 km/h wind feels like -13°C (9°F)
Wind Layering Strategy:
- Add hardshell or windproof layer (softshell) even if temperature seems moderate
- High passes are always windy—plan to add shell layer before reaching pass
- Wind protection allows removing one insulation layer (shell over fleece vs. fleece + down without shell)
Rain Layering Challenges:
Rain complicates layering because waterproof shells don't breathe as well as advertised during high exertion. You face a dilemma: get wet from rain or get wet from sweat.
Rain Layering Strategy:
- Light rain, warm temps: Base layer + rain jacket only. Let base layer manage moisture.
- Heavy rain, moderate temps: Base layer + light fleece + rain jacket. Balance warmth and moisture.
- Cold rain: Base layer + fleece + rain jacket. Accept some internal moisture buildup; warmth priority.
- Monsoon downpour: Consider stopping and waiting it out if possible. Hiking in hours of heavy rain leads to inevitable moisture buildup.
Post-Rain Actions:
- Remove rain shell immediately when rain stops to dump trapped moisture
- Change into dry base layer if current one is soaked (why you bring two)
- Hang wet layers inside teahouse to dry (never in direct sun)
Seasonal Variations: Adjusting Your Layering System
Nepal's trekking seasons present different challenges requiring layering system adjustments.
Spring Season (March-May): Moderate Temps, Afternoon Clouds
Conditions:
- Warming temperatures, especially in April-May
- Clear mornings, clouds building afternoon (sometimes rain/snow)
- Rhododendron bloom at mid-elevations
- Increasing crowds as peak season progresses
Layering Adjustments:
- Can go lighter on insulation (single light insulated jacket usually sufficient)
- Afternoon rain common—keep rain jacket accessible
- Lower elevations may be quite warm (15-25°C / 59-77°F)
- UV protection crucial (stronger UV with clearer skies)
Recommended Spring Kit:
- Base layer: 150-200gsm merino or synthetic
- Mid layer: 200-weight fleece (primary)
- Insulation: Light down or synthetic jacket (60-100g insulation)
- Outer: Hardshell rain jacket + rain pants
- Lower: Trekking pants + optional base layer bottoms + shorts for teahouse
Pre-Monsoon/Summer (Late May-June): Warm, Building Storms
Conditions:
- Warmest temperatures of year
- Increasing humidity and cloud cover
- Afternoon thunderstorms more frequent
- Fewer trekkers (shoulder season)
Layering Adjustments:
- Lightest insulation needed
- Rain protection becomes priority
- Synthetic fabrics dry faster (consider over merino)
- Lower elevations can be hot and humid
Recommended Pre-Monsoon Kit:
- Base layer: 120-150gsm lightweight, synthetic preferred for fast drying
- Mid layer: Lightweight fleece or softshell
- Insulation: Synthetic insulated jacket (maintains warmth if wet)
- Outer: Hardshell rain jacket + rain pants (both essential)
- Lower: Lightweight trekking pants + shorts
Monsoon (July-August-Early September): Wet, Warm, Challenging
Conditions:
- Heavy rain, especially afternoons/evenings
- Leeches at lower elevations
- Landslides possible (some routes close)
- Warmest temperatures but constant dampness
- Few trekkers (off-season)
Layering Adjustments:
- All synthetic (dries faster than merino)
- Prioritize rain protection
- Bring extra base layers (rotation while others dry)
- Accept that everything will be damp
Recommended Monsoon Kit:
- Base layers: 2-3 synthetic base layers for rotation
- Mid layer: Synthetic fleece (dries faster than wool blends)
- Insulation: Synthetic insulated jacket mandatory (down useless when wet)
- Outer: High-quality hardshell + rain pants + waterproof pack cover
- Lower: Quick-dry trekking pants + synthetic base layer bottoms
Monsoon Special Considerations:
- Rain shadow areas (Mustang, Upper Dolpo) remain drier—better monsoon trekking
- Morning starts beat afternoon storms
- Have dry clothes sealed in waterproof bags for evening/sleeping
Fall/Autumn (October-November): Perfect Trekking Weather
Conditions:
- Stable weather, clear skies
- Moderate temperatures (ideal conditions)
- Peak trekking season (crowds)
- Stunning mountain views
Layering Adjustments:
- Standard layering system works perfectly
- Versatility key as temperatures vary by altitude
- Less rain concern but always carry rain jacket
- Mornings/evenings cool, especially late November
Recommended Fall Kit (Standard Setup):
- Base layer: 150-200gsm merino (odor control for multi-day wear)
- Mid layer: 200-weight fleece + light insulated jacket
- Outer: Hardshell rain jacket (insurance) + down jacket for evenings
- Lower: Trekking pants + base layer bottoms + rain pants
Winter (December-February): Cold, Clear, Challenging
Conditions:
- Cold temperatures, especially at altitude (-10 to -20°C / 14 to -4°F at high camps)
- Crystal clear skies and views
- Fewer trekkers (off-season)
- Some high passes may be closed due to snow
- Lower teahouses close for season
Layering Adjustments:
- Maximum insulation needed
- Multiple mid layers instead of single
- Heavier insulated jacket (150-200g down or equivalent synthetic)
- Base layer bottoms mandatory
- Consider insulated pants for high altitude/sleeping
Recommended Winter Kit:
- Base layer: 200-250gsm merino wool (heavier weight)
- Mid layers: 200-weight fleece + additional fleece or softshell
- Insulation: Heavier down jacket (150-200g fill) or expedition-weight synthetic
- Outer: Hardshell for wind protection + rain pants for wind on legs
- Lower: Trekking pants + base layer bottoms (mandatory) + insulated pants or fleece pants
- Additional: Warmer gloves, balaclava, insulated booties for evening
Winter Special Considerations:
- Water bottles freeze overnight (bring wide-mouth bottles you can break ice in)
- Electronics lose charge faster in cold
- Clothing takes longer to dry
- Shorter daylight hours (earlier starts/arrivals needed)
Seasonal Layering Investment Strategy
Layering System Mistakes: What to Avoid
Learning from common mistakes saves discomfort and potential danger:
Mistake #1: Cotton Clothing
The Error: Wearing cotton t-shirts, underwear, or socks because they're comfortable at home.
Why It's Dangerous: Cotton retains moisture, loses insulating value when wet, and dries extremely slowly. In mountains with temperature swings, this creates hypothermia risk.
The Fix: Eliminate all cotton from trekking wardrobe. Check tags—"100% cotton" has no place in your pack. Acceptable: cotton items for wearing around Kathmandu before/after trek.
Mistake #2: Overdressing at Start
The Error: Starting morning trek wearing all layers because standing at teahouse you feel cold.
Why It's Problematic: Within 15 minutes of uphill trekking, you'll overheat and soak your base layer in sweat. Wet base layer loses effectiveness for rest of day.
The Fix: Start hiking slightly cool—just warm enough that you're not shivering. You'll warm up quickly. Better to be slightly cool for 10 minutes than sweat-soaked for 8 hours.
Mistake #3: Not Removing Layers Soon Enough
The Error: Continuing to hike while feeling hot because you don't want to stop and remove pack.
Why It's Problematic: Excessive sweating leads to dehydration, salt loss, and soaks your layers. You lose more body heat from wet insulation than you gain from the extra layer.
The Fix: Stop and adjust layers at first sign of overheating. Takes 2 minutes. Prevents hours of discomfort.
Mistake #4: Keeping Rain Jacket On After Rain Stops
The Error: Leaving hardshell on because "it might rain again" or you don't want to stop.
Why It's Problematic: Hardshells trap moisture even with best breathability. Keeping on after rain creates internal moisture buildup equivalent to light rain from outside.
The Fix: Remove hardshell immediately when rain stops. If rain looks imminent, you can put it back on in 30 seconds.
Mistake #5: Bringing Only One Base Layer
The Error: Packing single base layer to save weight/space.
Why It's Problematic: If base layer gets soaked (rain, excessive sweat, stream crossing), you have nothing dry for evening or next day. Base layer is your most critical piece.
The Fix: Bring minimum two base layers (one lightweight, one midweight ideal). Rotate them: one for trekking, one clean/dry for sleeping.
Mistake #6: Inadequate Insulation for Altitude
The Error: Bringing only fleece for insulation, skipping insulated jacket to save weight/money.
Why It's Problematic: Above 4,000m, evening temperatures drop to -5 to -15°C (23 to 5°F). Fleece alone won't keep you warm during 2-3 hours of stationary evening time.
The Fix: Budget for light insulated jacket minimum. Can be synthetic budget option or rented, but you need it.
Mistake #7: Ignoring Pit Zips
The Error: Buying rain jacket without pit zips to save money or weight.
Why It's Problematic: Without pit zips, you can't dump heat/moisture during active use. Rain jacket becomes sweat sauna.
The Fix: Pit zips are non-negotiable feature. Worth extra $30-50. Full-length zips provide maximum ventilation.
Mistake #8: Too-Heavy Layering System
The Error: Bringing multiple fleeces, two down jackets, heavy softshell, etc. "Just in case."
Why It's Problematic: Unnecessary weight makes trekking harder, slows pace, increases fatigue. Most redundant items never get used.
The Fix: Stick to recommended system: 1-2 base layers, 1 fleece, 1 light insulated jacket, rain jacket, down jacket for high altitude. Trust the system—it's proven over decades.
Fabric Care and Maintenance on Trek
Proper care extends gear life and maintains performance:
Daily Care Practices
Base Layers:
- Rinse with water after each wear to remove salt/sweat (even if not fully washing)
- Wash every 3-4 days for synthetic, can go longer with merino
- Use biodegradable soap sparingly (excess soap reduces wicking)
- Never wring violently (damages fibers)—roll in towel to extract water
Fleece:
- Spot clean dirt/stains rather than full washing
- Full wash every 7-10 days or as needed
- Shake out to restore loft after drying
- Check for tears at seams (early repair prevents larger damage)
Hardshells:
- Wipe down exterior after rain to remove dirt (clogs DWR coating)
- Hang inside-out to air dry and release internal moisture
- Don't fold when wet (creates mildew risk)
- Spot clean mud/dirt with damp cloth
Insulated Jackets:
- Never compress when wet (damages insulation)
- Shake and fluff down jackets daily to restore loft
- Keep away from sparks/flames (synthetic melts, down burns)
- Store fully lofted, not compressed
Drying Strategies at Teahouses
Indoor Drying:
- Most teahouses have central common area with wood stove
- Hang items on lines/racks away from direct heat (6+ feet from stove)
- Turn items periodically for even drying
- Never put directly on stove or radiator (melts synthetics, scorches wool)
Overnight Drying:
- Hang in sleeping room if it has small heater
- Drape over chair/table with good air circulation
- Use body heat: sleep with slightly damp base layer in sleeping bag (your body heat dries it)
Sun Drying (Limited):
- UV damages technical fabrics over time
- OK for occasional full-sun drying of trekking pants, socks
- Keep base layers, fleece, shells out of direct sun
- Never dry down jackets in sun (UV breaks down shell fabric)
DWR (Durable Water Repellent) Restoration
The DWR coating on rain jackets and trekking pants makes water bead and roll off. Over time, dirt, body oils, and abrasion degrade DWR.
Signs DWR Needs Restoration:
- Water soaks into fabric surface instead of beading
- Jacket feels "wet" even though it's not leaking
- Fabric seems heavy after rain
Field DWR Restoration: Not really possible on trek—requires washing and heat treatment. However:
- Keep shell clean by wiping down after use
- Don't apply sunscreen then put on jacket (oils kill DWR)
- Minimize compression (constant folding damages coating)
Post-Trek DWR Restoration:
- Wash shell with technical fabric wash (Nikwax, Grangers)
- Rinse thoroughly (soap residue blocks DWR)
- Apply DWR treatment (spray-on or wash-in)
- Tumble dry on low heat or iron on low (heat activates DWR)
Proper DWR maintenance extends rain jacket life from 3-5 years to 7-10 years.
Budget Layering Systems: Minimum Investment for Safety
Quality layering systems aren't cheap—premium setups cost $800-1500. But you can build functional, safe systems for much less.
Ultra-Budget System ($200-300 Total)
Strategy: Prioritize critical items (base layer, rain jacket), go budget on everything else, rent down jacket in Nepal.
- Base Layer: Decathlon Forclaz Trek 500 Merino ($30-40) - 60% merino blend
- Mid Layer: Decathlon Trek 100 Fleece ($20-30) - basic but functional
- Rain Jacket: Outdoor Research Helium ($129-169) - ultralight but pit zips included
- Trekking Pants: Decathlon Forclaz Trek 500 ($40-50) - stretch, durable enough
- Rain Pants: Frogg Toggs Ultra-Lite2 ($20-30) - delicate but works
- Down Jacket: RENT in Kathmandu ($1-2/day, ~$40 for 3-week trek)
Total: $279-359 including rental
Compromises: Less durable, less refined fit, heavier than premium, but functionally safe and adequate.
Mid-Range System ($500-700 Total)
Strategy: Invest in items you'll use at home (rain jacket, fleece), go mid-range on Nepal-specific items.
- Base Layers: Minus33 Merino Midweight x2 ($120-150) - quality merino at reasonable price
- Mid Layer: Patagonia R1 Hoody ($139-169) - worth investment, multi-use
- Rain Jacket: Marmot Minimalist ($175-225) - Gore-Tex, reliable
- Trekking Pants: Prana Stretch Zion ($99-119) - excellent value
- Rain Pants: Marmot PreCip Eco ($80-100) - durable, breathable
- Insulated Jacket: Patagonia Nano Puff ($199-249) - synthetic, multi-use
Total: $812-1012 (slightly over $700 but could substitute Outdoor Research Ferrosi pants at $89 to get under)
Compromises: Few—this is solid mid-range gear that performs well and lasts.
Premium System ($1200-1800 Total)
Strategy: Buy once, cry once. Premium gear that lasts decades and performs flawlessly.
- Base Layers: Icebreaker 200 Oasis x2 + Icebreaker 150 Zone ($250-280) - multiple options
- Mid Layers: Patagonia R1 Hoody ($169) + Arc'teryx Gamma LT Hoody ($229-269) - versatility
- Rain Jacket: Arc'teryx Beta LT ($349-399) - best in class
- Trekking Pants: Arc'teryx Gamma LT Pant ($199-229) - premium softshell pant
- Rain Pants: Arc'teryx Beta LT Pant ($279-329) - full side zips, articulated
- Insulated Jacket: Patagonia Down Sweater ($229-279) + Arc'teryx Cerium LT ($379-429) - light and heavy options
- Base Layer Bottoms: Icebreaker 200 Oasis Leggings ($80-100)
Total: $2162-2724 (well over but represents top-tier system)
Advantages: Maximum durability (10+ year lifespan), best performance, resale value, multi-season versatility.
Budget vs. Mid-Range vs. Premium Layering Systems
| Name | Total Cost | Base Layer | Mid Layer | Rain Jacket | Insulation | Lifespan | Best For |
|---|---|---|---|---|---|---|---|
| Ultra-Budget System | $200-300 | Decathlon merino blend | Decathlon fleece | OR Helium | Rental down jacket | 2-3 seasons | One-time trekkers, tight budgets |
| Mid-Range System | $500-700 | Minus33 or Smartwool | Patagonia R1 | Marmot Minimalist | Patagonia Nano Puff | 5-7 seasons | Regular trekkers, best value |
| Premium System | $1200-1800 | Icebreaker merino | Arc'teryx + Patagonia | Arc'teryx Beta LT | Multiple down/synthetic | 10+ seasons | Serious mountaineers, multi-use |
Budget Optimization Strategies
Priority Ranking (if you must choose where to spend):
- Base Layer (highest priority): Affects comfort every minute of every day. Worth investing.
- Rain Jacket (critical safety): Can't compromise on waterproofing and breathability. Get good pit zips.
- Fleece (high versatility): Most-worn mid layer. Quality fleece lasts forever.
- Trekking Pants (daily use): Stretch and durability matter.
- Insulated Jacket (rental option available): Can rent in Nepal to save $200-400.
- Rain Pants (less critical): Budget options work fine; you mostly use pack rain cover.
- Base Layer Bottoms (optional): Can skip entirely on budget treks.
Where to Find Deals:
- End of Season Sales: 30-50% off previous season colors (March/April and September/October)
- Outlet Stores: Patagonia, Arc'teryx, REI outlets offer 40-60% off
- Used Gear: REI Used Gear, GearTrade, local consignment shops (inspect carefully)
- Generic Brands: Decathlon, Amazon Essentials merino (risky quality but cheap)
- Pro Deals: Industry discounts if you work in outdoor industry (30-50% off)
Packing Your Layering System: Organization and Access
How you pack your layering system affects your ability to adapt quickly to changing conditions.
Pack Organization Strategy
Top Compartment/Lid (Frequent Access):
- Rain jacket (most frequently accessed)
- Light insulated jacket or fleece (second-most accessed)
- Rain pants
- Warm hat and gloves
Main Compartment Upper Third (Daily Access):
- Second base layer (for evening/changing)
- Spare socks and underwear
- Down jacket if not wearing
Main Compartment Middle (Overnight Access):
- Trekking pants (if wearing different pants)
- Base layer bottoms
- Insulated pants if bringing
Main Compartment Bottom (Least Access):
- Items not needed until overnight: sleeping bag, sleep clothes, electronics
Packing Cubes/Stuff Sacks: Use different colored stuff sacks for easy identification:
- Red Sack: Active layers (fleece, current base layer)
- Blue Sack: Sleep/clean clothes
- Yellow Sack: Rain gear (high visibility in pack)
Weight Distribution
Proper weight distribution prevents back pain and makes hiking easier:
Heavy Items (close to back, high in pack):
- Water bladder/bottles
- Insulated jacket (when packed)
- Electronics
Medium Items (surrounding heavy core):
- Clothing layers
- Food
Light/Bulky Items (away from back, bottom of pack):
- Sleeping bag
- Puffy jacket (very light but bulky)
Compression Wisdom:
- Compress sleeping bag tightly (saves space)
- Don't over-compress insulated jackets (damages loft)—light compression only
- Fleece can be compressed without damage
- Base layers roll rather than fold (prevents creases)
Daily Access Routine
Develop a routine for layer access:
Morning Preparation:
- Pull out all layers you'll need for start (base + fleece + insulated jacket)
- Dress inside sleeping bag to retain warmth
- Pack insulated jacket in top compartment or wear
- Keep rain jacket accessible even if clear (weather changes fast)
During Trekking:
- Stop at first sign of overheating/chilling
- Remove pack completely (don't try to access while wearing)
- Make layer adjustment
- Re-pack properly before continuing
Afternoon Arrival:
- Immediately put on all necessary layers (you cool down fast when stopping)
- Hang any damp items to dry
- Put tomorrow's trekking layers in accessible location
- Sleep layers separate
FAQ: Layering System for Nepal Trekking
General Layering Questions
Q1: How many layers do I really need for Nepal trekking?
A: The minimum functional system includes: 1-2 base layers (tops), 1 mid layer (fleece), 1 insulated jacket, 1 hardshell rain jacket, 1 pair trekking pants, 1 rain pants. Optional but recommended: base layer bottoms, second mid layer. This 6-8 item system covers all conditions on standard Nepal treks (Everest Base Camp, Annapurna Circuit, Langtang).
Q2: Can I use my regular athletic/gym clothes for trekking?
A: Partially. Modern athletic clothes often use synthetic moisture-wicking fabrics similar to base layers. However, check that they're: (1) Not cotton, (2) Designed for extended wear (flatlock seams prevent chafing), (3) Durable enough for multi-day use. Athletic shorts/tights work fine for base layers, but invest in proper trekking pants—gym pants lack durability and weather resistance.
Q3: What's the single most important layer to invest in?
A: The base layer. You wear it every single day, all day long, against your skin. Quality base layer prevents chafing, manages moisture, regulates temperature, and resists odor. It's the foundation of your entire system. Second priority: hardshell rain jacket. Third: fleece mid layer.
Q4: Is the three-layer system the same for summer and winter?
A: The three-layer principle remains the same (base + mid + outer), but you adjust the weight/warmth of each layer. Summer: lightweight base (120-150gsm), single light fleece, light insulated jacket. Winter: heavyweight base (200-250gsm), possibly two mid layers (fleece + softshell), heavier insulated jacket (150-200g down). The system is modular—that's its strength.
Q5: How do I know what temperature rating I need for my layers?
A: Match to your trek's altitude and season. General guide: Below 3,500m in spring/fall needs light-moderate insulation (comfortable in 5-20°C / 41-68°F). 3,500-4,500m needs moderate insulation (comfortable in -5 to 15°C / 23-59°F). Above 4,500m or winter needs maximum insulation (comfortable in -15 to 10°C / 5-50°F). Remember, you adjust by adding/removing layers rather than relying on single heavy jacket.
Base Layer Questions
Q6: Merino wool or synthetic—which is actually better?
A: No absolute winner—depends on your priorities. Merino wins for: temperature regulation, odor resistance (3-7 day wear), comfort, and multi-day wear without washing. Synthetic wins for: durability, faster drying (2-3x faster), lower cost (20-40% cheaper), and moisture wicking in very high-output activities. For Nepal trekking, slight edge to merino due to multi-day wear capability (fewer washing opportunities) unless you're trekking in monsoon (synthetic dries faster).
Q7: What GSM weight should I choose for my base layer?
A: 150gsm (lightweight): Spring/fall below 3,500m, summer all altitudes, sleeping layer. 200gsm (midweight): All-season workhorse, ideal for spring/fall 2,000-5,000m. Most versatile choice. 250gsm+ (heavyweight): Winter only or for people who run very cold. Often too warm for active trekking. If choosing only one base layer, get 200gsm.
Q8: Can I wear sports bras or regular underwear, or do I need special ones?
A: Sports bras work fine if they're moisture-wicking synthetic (not cotton). Same for underwear—synthetic or merino boxer briefs/underwear work perfectly. The key is avoiding cotton. ExOfficio Give-N-Go underwear and merino alternatives are popular but regular synthetic athletic underwear from Target/Amazon work equally well at 1/3 the price.
Q9: How many base layers should I bring?
A: Minimum two upper body base layers: one for wearing during trek, one clean/dry for sleeping and backup. If doing 15+ day trek or monsoon trekking, consider three base layers for rotation. Lower body base layer: one pair sufficient if bringing at all (mostly for sleeping/very cold mornings).
Q10: Should I size up or down for base layers?
A: Size for snug but not restrictive fit. If between sizes, slight preference for smaller size (base layers work best with close contact to skin). However, if larger size still provides close fit, it allows layering underneath in extreme cold. Try on with hiking motions: bend, reach overhead, squat—fabric shouldn't ride up or bind.
Mid Layer Questions
Q11: Do I need both a fleece and a softshell, or will one do?
A: One mid layer is minimum; most trekkers bring just fleece (more versatile, cheaper, more breathable). Softshells excel in specific conditions (dry, cold, windy) and can partially replace hardshell in fair weather. If choosing only one: go with 200-weight fleece. If bringing two mid layers: fleece + light insulated jacket (down/synthetic) provides better versatility than fleece + softshell.
Q12: Hooded or non-hooded fleece?
A: Hooded offers more versatility: extra warmth for head/neck, sun protection, emergency warmth if you lose/forget beanie. However, adds 50-100g weight and doesn't fit under hardshell hood well. For Nepal trekking, slight preference for hooded fleece (or buy separate warm hat). If your insulated jacket has a hood, non-hooded fleece is fine.
Q13: What's the difference between 100, 200, and 300-weight fleece?
A: Weight refers to grams per square meter of fabric: 100-weight (~100gsm) is ultra-light, minimal insulation, mostly for high-output activities or layering under shell. 200-weight (~200gsm) is ideal trekking weight: good warmth, excellent breathability, can wear while active. 300-weight (~300gsm) is warmer but too hot for active trekking except extreme cold; better for evening camp wear. For Nepal, 200-weight is the sweet spot.
Q14: Is a down vest useful for trekking?
A: Down/synthetic vests (sleeveless insulated jackets) provide core warmth without bulk on arms, making them excellent for active use. More breathable than full jacket, packable, and versatile for layering. However, if budget/weight allows only one insulated layer, choose full jacket (arms get cold too). Vests work best as second insulated layer for cold-sensitive trekkers.
Q15: What insulation weight do I need in a puffy jacket?
A: For light insulated jacket (worn while active or early evening): 50-100g down (800-fill) or 60-100g synthetic. For heavy insulated jacket (high altitude, sleeping, extreme cold): 150-250g down or 150-200g synthetic. Most trekkers bring one light insulated jacket (60-100g) and rent heavier down jacket in Kathmandu if doing winter trek or high passes.
Outer Layer Questions
Q16: What's the difference between 2-layer, 2.5-layer, and 3-layer hardshells?
A: Refers to construction: 2-layer has waterproof membrane laminated to outer fabric with separate hanging lining—most affordable but heavier. 2.5-layer has membrane with protective coating instead of full lining—lighter but less durable. 3-layer has membrane sandwiched between outer fabric and inner fabric—most durable, best breathability, most expensive. For Nepal trekking, all work, but 3-layer offers best performance and longevity.
Q17: How important are pit zips really?
A: Absolutely critical. Pit zips allow 40%+ more moisture escape than even the most breathable hardshell fabric alone. During uphill trekking in rain, you can open pit zips to dump heat/moisture while staying protected. Without pit zips, you're forced to choose between getting wet from rain (unzip jacket) or wet from sweat (keep jacket zipped). Pit zips are non-negotiable feature.
Q18: Can I use a cheap poncho instead of a rain jacket?
A: Ponchos work for light rain or emergency use but have serious limitations: poor fit (flap in wind), don't seal at wrists/waist (water gets in), restrict arm movement, catch on vegetation, and useless in wind. For budget trekking, better to get inexpensive rain jacket with pit zips ($80-120 range) than rely on poncho. Ponchos can supplement as pack cover but not primary rain protection.
Q19: Do I need rain pants or is rain jacket enough?
A: Rain jacket is mandatory; rain pants are highly recommended but slightly less critical. Your backpack's rain cover protects lower body during much rainfall. However, in sustained rain (1+ hours), crossing streams, or windy conditions, you'll want rain pants. They also provide wind protection at high altitude and extra warmth layer when needed. Budget priority: jacket first, pants second—but bring both if possible.
Q20: What does breathability rating mean, and what should I look for?
A: Breathability measures moisture vapor transmission in grams per square meter per 24 hours (g/m²/24hrs). Higher = more breathable: 5,000-10,000 = basic (adequate for low output), 10,000-20,000 = good (fine for trekking), 20,000-30,000 = excellent (high output, mountaineering). For Nepal trekking, minimum 10,000 g/m²/24hrs breathability. Premium shells (Arc'teryx Beta, Gore-Tex Pro) typically 15,000-25,000 range.
Lower Body Questions
Q21: Can I trek in jeans or regular pants?
A: Absolutely not. Jeans are cotton (hypothermia risk when wet), don't stretch (restricts movement), take forever to dry (12-24+ hours), and offer no weather resistance. You'll be miserable within hours. Invest in proper trekking pants with stretch fabric—they're worth every penny for comfort and safety. This is one area where budget compromises are unwise.
Q22: Convertible zip-off pants or regular trekking pants?
A: Regular trekking pants are better. Convertible pants have extra weight and bulk from zippers, potential failure point at zipper, and often fit poorly (bunching at zip line). Most Nepal treks don't get hot enough to justify shorts except at lowest elevations, and you can bring separate lightweight shorts for teahouse wear. Trekking pants with good ventilation and roll-up legs provide enough cooling for warm sections.
Q23: Do I really need base layer bottoms/long underwear?
A: Not mandatory for spring/fall treks below 4,000m or if you're warm-blooded. Definitely bring for: winter trekking, high-altitude treks (Everest Base Camp, Thorong La), if you sleep cold, or you run cold generally. They add minimal weight (~200g) and provide excellent warmth-to-weight value. If unsure, bring one pair—you can always not wear them, but can't add them if you don't have them.
Q24: What about shorts for trekking?
A: Shorts work for lower elevation warm-weather sections (below 3,000m in spring/summer) but have limited use on most Nepal treks. Better strategy: bring lightweight shorts ($20-30) for wearing around teahouses in evening/sleeping rather than trekking in shorts. Trekking pants provide sun protection, vegetation protection, and versatility. However, if doing low-elevation, warm-season trek, shorts + base layer bottoms combo can replace trekking pants.
Q25: Should I bring gaiters?
A: Not typically necessary for standard Nepal treks on established trails. Gaiters prevent debris, snow, and water entering boots—useful for: off-trail trekking, deep snow (winter high passes), very muddy monsoon trekking, or crossing scree fields. Most October/November Everest Base Camp or Annapurna Circuit trekkers don't need gaiters. If doing winter trek or off-season route, consider them.
Practical Application Questions
Q26: How do I know when to add or remove a layer?
A: Add layer when: you first feel chilled (don't wait until shivering), stopping for breaks (heat generation drops immediately), clouds obscure sun, wind picks up, rain begins. Remove layer when: you first notice overheating/sweating (don't wait until drenched), sun comes out, wind stops, rain ends, starting strenuous uphill. Pro tip: slight coolness when starting hike is perfect—you'll warm up in 10-15 minutes.
Q27: What should I wear for a typical day trekking at 3,500m in October?
A: 6 AM start (cold, dark): Base layer + fleece + light insulated jacket + trekking pants (possibly base layer bottoms). 9 AM (warmed up, sun out): Base layer + trekking pants (fleece and jacket packed). Noon (full sun, uphill): Possibly just base layer + trekking pants or even switch to trekking shirt if very warm. 3 PM (sun behind mountain): Base layer back on. 5 PM arrival: Base layer + fleece. 7 PM dinner: Base layer + fleece + insulated jacket. Sleep: Base layer (possibly fresh one) + base layer bottoms + insulated jacket if cold.
Q28: How much should my entire layering system weigh?
A: Complete system (all layers for shoulder season trek): Base layers (2): 300-500g. Mid layer (fleece): 350-450g. Insulated jacket: 300-500g. Rain jacket: 250-450g. Rain pants: 200-350g. Trekking pants: 300-450g. Base layer bottoms: 150-250g. Total: ~2,000-3,000g (4.4-6.6 lbs). Winter adds ~500-1000g more. This is very reasonable weight for complete protection against all conditions.
Q29: Can I wash my clothes during the trek, or should I just wear them dirty?
A: Washing is possible and recommended at regular intervals: Hand wash base layers every 3-7 days (merino can go longer, synthetics need more frequent washing). Wash fleece every 10-14 days or as needed for odor/dirt. Trekking pants: spot clean as needed, full wash every 7-10 days. Most teahouses provide buckets and area for hand washing. Use biodegradable soap sparingly. Hang to dry inside (not in sun). Plan washing for rest days or early arrival days (more drying time).
Q30: What if my layers get wet from rain or washing and won't dry?
A: Happens occasionally, especially in monsoon or if washing at high altitude (colder temps slow drying). Strategies: Wear slightly damp base layer (your body heat will finish drying it—uncomfortable for first 30 minutes but works). Sleep with damp layer in sleeping bag to dry it (use your body heat). Wring out thoroughly and wear rain jacket over damp fleece (prevents wind chill). Bring second base layer as backup (why you pack two). Hand warmers in pockets can provide drying heat.
Altitude and Season Questions
Q31: Does layering change significantly above 4,500m?
A: Yes. Above 4,500m: Temperatures drop 10-15°C colder than 3,000m. Wind is stronger and more constant. Atmospheric insulation is thinner (altitude). You'll wear more layers more often: base + fleece during active trekking (vs just base at lower altitude). Add insulated jacket + shell for any stops or wind. Evening requires all layers: base + fleece + down + potentially base layer bottoms + insulated pants. Less layer removal during day (stays cold).
Q32: What's different about winter trekking layering?
A: Winter (December-February): Need heavier versions of everything. Base layer: 200-250gsm (vs 150-200gsm other seasons). Mid layer: Consider two (fleece + softshell or two fleeces). Insulated jacket: Heavier fill weight (150-200g vs 60-100g). Add base layer bottoms (mandatory vs optional). Consider insulated pants for sleeping/evening. Colder morning starts (more initial layers). Less layer removal during day (doesn't warm up as much). More time spent in all layers (longer cold mornings/evenings).
Q33: What about monsoon season—is layering totally different?
A: Not totally different but shifted priorities: Waterproofing becomes critical (quality rain jacket/pants mandatory). Synthetic everything (dries faster than merino). Bring extra base layers for rotation while others dry. Accept that everything will be damp (pack things in dry bags). Less insulation needed (warmer temps) but synthetic insulation critical (maintains warmth when damp). More focus on quick-dry materials. Avoid down insulation (useless when wet).
Q34: For Everest Base Camp trek specifically, what layers do I need?
A: Spring/Fall EBC (standard season): 2x base layers (200gsm merino), 1x fleece (200-weight), 1x light insulated jacket (60-100g synthetic or down), 1x hardshell rain jacket, 1x rain pants, 1x trekking pants, 1x base layer bottoms, 1x heavier down jacket (150g+ fill, can rent in Kathmandu). This covers you from Lukla (2,860m, warm) to Gorak Shep (5,164m, cold) across 12-15 day trek.
Q35: What if I'm trekking across seasons (starting warm, ending cold)?
A: Bring full layering system for coldest conditions you'll encounter and adjust by not wearing layers in warm sections. Pack insulated jacket deep in bag until you reach colder altitudes. Start trek in just base/trekking pants at low elevation, add layers as you climb. This is better than bringing inadequate gear for cold sections—you can always not wear a layer, but can't add warmth you don't have.
Budget and Rental Questions
Q36: What layers can I rent in Nepal instead of buying?
A: Kathmandu and Pokhara rental shops offer: Down jackets (most common rental, $1-2/day), sleeping bags ($1-2/day), trekking poles ($1/day), and various other gear. Quality varies widely. Inspect carefully for: cleanliness, broken zippers, down escaping from baffles, adequate warmth rating. Rental saves $200-400 on down jacket purchase. Not recommended for base layers (hygiene), rain jacket (critical gear, size/fit crucial), or fleece (inexpensive to own).
Q37: How can I build a layering system for under $300?
A: Decathlon strategy: Base layer: Forclaz Trek 500 Merino ($35). Mid layer: Trek 100 Fleece ($25). Rain jacket: Budget option like OR Helium ($130) or Decathlon Trek 900 ($80). Trekking pants: Decathlon Forclaz ($40). Rain pants: Frogg Toggs ($25). Insulated jacket: Rent in Nepal ($40 for 3-week trek). Total: $295-355. Requires shopping at budget brands but functionally works.
Q38: Which layers are worth splurging on vs. going budget?
A: Splurge priority order: 1) Rain jacket (Gore-Tex quality matters, breathability critical, lasts 10+ years). 2) Base layer (comfort every single day). 3) Fleece (use for years in multiple activities). 4) Trekking pants (stretch and durability matter). Budget-friendly options: Rain pants (cheap ones work fine), insulated jacket (or rent), base layer bottoms (if bringing at all), shorts/casual clothes.
Q39: Is buying used gear a good option for layering system?
A: Can be excellent value if you inspect carefully. Check: Base layers: armpit/crotch areas for holes, odor (may not wash out). Fleece: pilling (cosmetic but indicates wear), zipper function, no holes. Rain jacket: waterproof coating (spray test or ask), zipper function, no delamination (membrane peeling from fabric). Down jackets: no down leaking, no broken baffles, still lofts well. Good sources: REI Used Gear, GearTrade, local consignment shops, Craigslist/Facebook Marketplace.
Q40: How much can I save shopping end-of-season sales?
A: Significant savings possible: REI Labor Day/Anniversary sales: 20-30% off. Backcountry.com: Regular 20-40% sales. Steep & Cheap (Backcountry's outlet): 40-60% off. Patagonia Web Specials: 30-50% off previous season colors. Arc'teryx outlet stores: 30-50% off. Best timing: March/April (clearing winter gear) and September/October (clearing summer gear). If planning October trek, shop in spring for winter gear prices. Plan ahead and save 30-40% vs. buying right before trip.
- Complete Nepal Trekking Gear Guide
- Everest Base Camp Trek Complete Guide
- Annapurna Circuit Trek Guide
- Langtang Valley Trek Guide
- Nepal Trekking Seasons Guide
- Altitude Sickness Prevention and Treatment
- Trekking Boots Guide for Nepal
- Sleeping Bag Guide for Himalayan Trekking
- Backpack Selection Guide
- Water Purification for Nepal Trekking
- Trekking Permits and Regulations
- Physical Training for Nepal Treks
- Teahouse Trekking Guide
- Photography Gear for Trekking
- Nepal Trekking Packing List
- Budget Guide for Nepal Trekking
- Solo Trekking in Nepal Guide
- Women's Trekking Safety Guide
- First Aid for Trekking
- Environmental Responsibility on Trek
- Cultural Etiquette for Nepal Trekking
- Food and Nutrition on Trek
- Trekking Insurance Guide
- Kathmandu Arrival Guide
- Acclimatization Strategies
- Wildlife in Nepal's Mountains
Conclusion: Master the Layering System for Safe, Comfortable Trekking
The three-layer system—base layer for moisture management, mid layer for insulation, outer layer for weather protection—provides the foundation for comfortable and safe trekking in Nepal's diverse mountain environments. By understanding the properties of different fabrics, knowing when to add or remove layers, and investing strategically in quality gear, you'll be prepared for temperature swings from -15°C to +25°C (5°F to 77°F) and weather conditions from brilliant sunshine to torrential rain.
The most important takeaways:
- Never wear cotton—it's the number one clothing mistake that leads to hypothermia
- Invest in quality base layers—you wear them every day, all day
- Get a rain jacket with pit zips—non-negotiable for breathability during active use
- Bring versatile mid layers—200-weight fleece provides the best balance
- Layer strategically for altitude—more layers needed as you climb higher
- Adjust before you're uncomfortable—add layers before you're cold, remove before you're overheated
- Pack for the coldest conditions—you can always not wear a layer
Whether you're investing in a premium Arc'teryx system for lifetime use or building a budget Decathlon setup for a one-time trek, the principles remain the same. Master the layering system, and you'll handle whatever the Himalayas throw at you—from the subtropical forests below Namche to the frozen landscapes above Gorak Shep.
Your layering system is your first line of defense against the mountain environment. Choose wisely, layer strategically, and trek safely.
Last updated: February 2026. Gear recommendations and prices subject to change. Always verify current product specifications and availability before purchase.