


The Complete Guide to Gloves for Nepal Trekking: Layering Systems, Altitude Requirements & Expert Recommendations
Your hands are among the first body parts to suffer in Nepal's high-altitude cold. While trekkers often obsess over boots and sleeping bags, gloves frequently become an afterthought—until fingers go numb at 4,500 meters while fumbling with camera settings or struggling to zip a tent.
The reality is stark: inadequate hand protection can ruin your trek, force early descent, or in extreme cases, lead to frostbite. But the solution isn't simply buying the warmest gloves you can find. Nepal trekking demands a sophisticated approach—a three-glove layering system that adapts to wildly varying conditions, from sweaty 25°C afternoons in Lukla to -20°C pre-dawn starts at Everest Base Camp.
This comprehensive guide decodes the glove system used by professional guides and experienced trekkers. You'll learn exactly which gloves to pack for your specific trek, how to layer them effectively, when mittens trump gloves, what touchscreen compatibility really means at altitude, and how to avoid the common mistakes that leave trekkers with frozen fingers.
Whether you're budgeting $50 or $500 for hand protection, heading to Poon Hill or Island Peak, this guide provides the definitive framework for keeping your hands warm, functional, and protected throughout your Himalayan adventure.
Three pairs: liner + mid-weight + insulated/mittens
-25°C to +25°C (varies by altitude and season)
$60-$250 for complete system (all three pairs)
$1-2/day for insulated gloves/mittens in Kathmandu and Namche
Layering compatibility, touchscreen tips, waterproof shells
Bringing only one pair or skipping liner gloves
Insulated gloves or mittens rated to -20°C minimum
Always size by measurements—women's gloves run smaller and narrower
Understanding the Three-Glove Layering System
The cornerstone of effective hand protection in Nepal is the three-glove system. This isn't marketing hype—it's a practical framework developed through decades of Himalayan experience. Unlike a single pair of expedition gloves, a layering system provides the flexibility Nepal's diverse conditions demand.
Why Three Pairs?
Nepal trekking isn't monolithic. On a typical Everest Base Camp trek, you'll experience:
- Morning in Lukla (2,860m): 15°C, sunny, ascending through rhododendron forest. Hands sweat in anything beyond liner gloves.
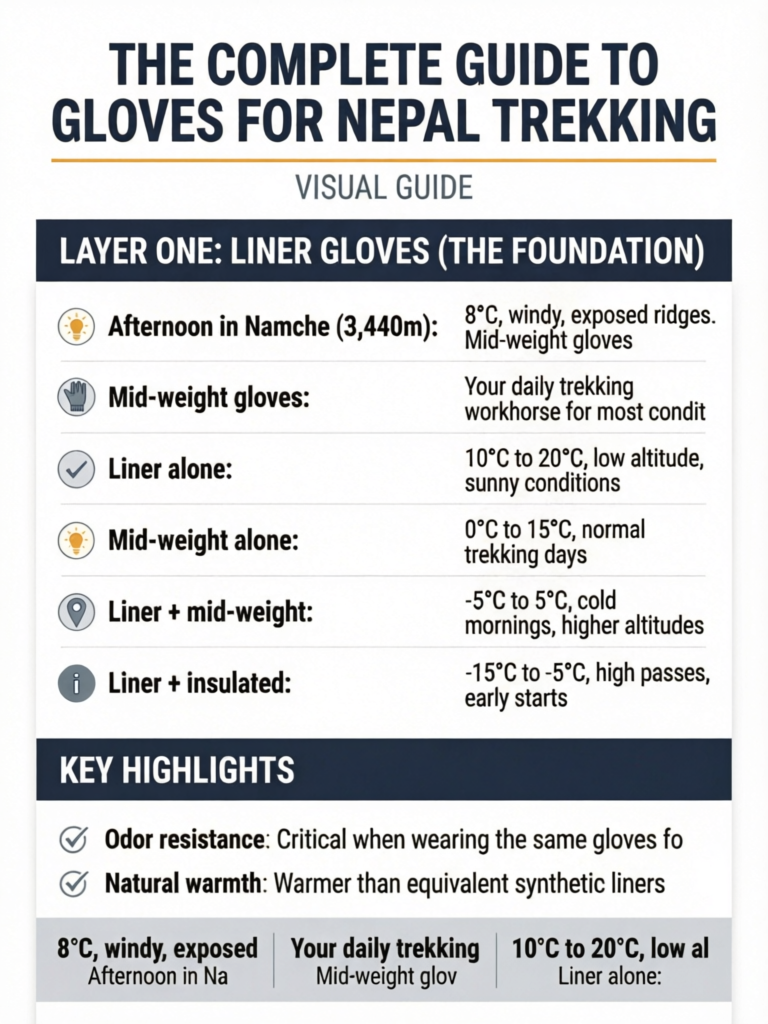
- Afternoon in Namche (3,440m): 8°C, windy, exposed ridges. Mid-weight gloves feel perfect.
- Pre-dawn Kala Patthar (5,545m): -18°C, fierce wind, darkness. Only insulated mittens keep fingers functional.
One pair can't handle this range. Two pairs create gaps. Three pairs provide complete coverage:
- Liner gloves: Your base layer, worn alone in mild conditions or under other gloves when cold
- Mid-weight gloves: Your daily trekking workhorse for most conditions
- Insulated gloves or mittens: Your high-altitude insurance for extreme cold and high camps
This system weighs roughly 300-500 grams total—less than a water bottle—but dramatically outperforms any single-glove solution.
The Layering Principle
The magic happens when you combine layers:
- Liner alone: 10°C to 20°C, low altitude, sunny conditions
- Mid-weight alone: 0°C to 15°C, normal trekking days
- Liner + mid-weight: -5°C to 5°C, cold mornings, higher altitudes
- Liner + insulated: -15°C to -5°C, high passes, early starts
- All three layers: -25°C to -15°C, extreme conditions (rare)
Some trekkers question whether they need liners if they have warm mittens. The answer is yes—absolutely. Here's why:
When you stop for lunch, you need to remove your insulated mittens to eat, handle your phone, or adjust gear. If it's 5°C outside, bare hands get cold quickly. Liner gloves keep hands comfortable during these transitions without the bulk of mid-weight gloves. They're also essential for photography, where you need dexterity but still want basic warmth.
The 'Gloves Off' Temperature Test
Layer One: Liner Gloves (The Foundation)
Liner gloves are thin, form-fitting gloves that serve multiple critical functions in your hand protection system. Despite their minimal appearance, they're arguably the most-used gloves on your trek.
Primary Functions
1. Stand-Alone Warmth in Mild Conditions
In the first days of most treks—walking through lower valleys around 2,000-3,000 meters—temperatures often sit in the 10-20°C range during the day. Your hands generate heat while gripping trekking poles, but cool quickly during breaks. Liner gloves provide just enough insulation to stay comfortable without causing sweaty hands.
2. Base Layer Under Other Gloves
At higher altitudes and colder temperatures, liner gloves become the foundation of your layering system. They create a microclimate next to your skin, wick moisture away from your hands, and add an extra insulation layer without bulk.
3. Camp and Photo Gloves
During camp stops, when you need to handle tent stakes, adjust backpack straps, operate cameras, or use your phone, liner gloves provide the best dexterity while maintaining warmth. Professional photographers in the Himalayas rarely shoot with bare hands—liner gloves are their secret weapon.
Material Choices
Merino Wool Liners
Merino wool liners offer several advantages for Nepal trekking:
- Temperature regulation: Merino maintains comfort across a wider range than synthetics
- Odor resistance: Critical when wearing the same gloves for 12+ days
- Moisture management: Merino absorbs up to 30% of its weight in moisture while still feeling dry
- Natural warmth: Warmer than equivalent synthetic liners when damp
The downsides: Merino liners dry slower than synthetic, cost more ($25-45 vs. $15-30), and wear out faster with heavy use.
Top merino liner options:
- Icebreaker Oasis Glove Liners ($35): Classic 200-weight merino, touchscreen compatible, excellent durability
- Smartwool Liner Gloves ($30): Slightly lighter than Icebreaker, good for smaller hands
- REI Co-op Merino Wool Liner Gloves ($20): Budget option with decent performance
Synthetic Liners
Modern synthetic liners use polyester or nylon blends that prioritize quick-drying and durability:
- Faster drying: Crucial if gloves get wet from rain or sweat
- Better durability: Synthetic fibers resist wear from repeated use
- Lower cost: Usually $10-20 cheaper than merino equivalents
- Consistent performance: Synthetic doesn't degrade when wet like cotton
The tradeoffs: Less temperature regulation, more odor after multi-day use, slightly less comfortable feel.
Top synthetic liner options:
- Outdoor Research Vigor Lightweight Sensor Gloves ($29): Excellent stretch, great touchscreen sensitivity, popular with guides
- Black Diamond Lightweight Screentap Gloves ($25): Durable, good fit, reliable touchscreen function
- Decathlon Forclaz Trek 500 Liner Gloves ($12): Budget-friendly, surprisingly good performance
Silk Liners
Silk liners are lightweight, packable, and provide surprising warmth for their weight. However, they're fragile and lack touchscreen compatibility. Unless you already own silk liners, skip them for Nepal—merino or synthetic offer better value.
Critical Features
Touchscreen Compatibility
This isn't optional in 2026. You'll use your phone constantly for photos, GPS navigation with offline maps, communicating with your guide, and checking weather. Removing gloves repeatedly leads to cold hands and eventually, leaving gloves off when you shouldn't.
Quality touchscreen gloves use conductive material woven into the fingertips—usually thumb, index, and middle fingers. Test this feature before your trek; cheap touchscreen gloves often require excessive pressure or only work intermittently.
Proper Fit
Liner gloves should fit snugly without being tight. You should be able to:
- Make a complete fist without fabric bunching
- Touch your thumb to pinky finger without restriction
- Pinch small objects between thumb and forefinger
- Feel almost no excess material at fingertips
Loose liner gloves bunch under outer gloves, creating pressure points and cold spots. Too-tight liners restrict circulation—a serious concern at altitude.
Adequate Length
Liner glove cuffs should extend at least 3-4 cm past your wrist bones. This allows them to tuck under mid-weight gloves or jacket sleeves, preventing gaps. Short cuffs create a cold bridge where skin is exposed.
How Many Liner Gloves?
Bring two pairs. Here's why:
One pair will inevitably get wet—from sweat, washing hands, or accidental snow contact. Having a dry backup means you can rotate pairs, allowing one to dry while wearing the other. Two pairs of $25 liners ($50 total) provide better overall performance than one pair of $50 liners.
Pack one pair in your day pack and keep the backup in your duffel or main pack. If one pair gets soaked or lost, you're not trekking with bare hands under your mid-weight gloves.
Layer Two: Mid-Weight Gloves (The Workhorse)
Mid-weight gloves are your primary hand protection for 60-70% of trekking days in Nepal. These are the gloves you'll wear most often—during morning ascents, afternoon descents, windy ridges, and cloudy days when temperatures hover between -5°C and 15°C.
Why Gloves Instead of Mittens?
At the mid-weight layer, gloves decisively beat mittens for several reasons:
Dexterity Requirements
Throughout the day, you'll constantly need your fingers for:
- Gripping trekking poles with proper hand position
- Adjusting backpack straps and hip belts
- Opening and closing water bottle caps
- Handling trail snacks and energy bars
- Using phone cameras for photos
- Operating GPS devices or paper maps
- Zipping and unzipping jacket pockets
Mid-weight mittens make all these tasks frustratingly difficult. You end up removing them repeatedly, which defeats their purpose.
Temperature Range
The conditions where you need mid-weight gloves (roughly -5°C to 15°C) aren't cold enough to justify mittens' warmth advantage. Within this range, well-designed gloves with liner gloves underneath provide ample warmth while maintaining functionality.
Pole Grip Compatibility
Trekking poles save your knees tremendous stress on Nepal's relentless descents. Proper pole technique requires wrapping your hand around the grip with your thumb and fingers in specific positions. Mid-weight gloves allow natural pole use; mittens force awkward grips that reduce effectiveness and increase hand fatigue.
Material and Construction Types
Fleece Gloves
Fleece gloves offer excellent warmth-to-weight ratio and good moisture management:
- Warmth: Polyester fleece traps air effectively, providing good insulation
- Breathability: Fleece moves moisture away from hands during exertion
- Weight: Typically 60-90 grams per pair—barely noticeable
- Comfort: Soft, flexible, non-restrictive fit
The main weakness: fleece offers zero water resistance. In wet snow or rain, fleece gloves saturate quickly and lose most of their insulating value. However, if you're trekking during dry season (October-November, March-May), this is rarely an issue.
Top fleece options:
- Patagonia Better Sweater Gloves ($49): Excellent warmth, durable, good fit
- The North Face TKA Glacier Gloves ($35): Lighter than Patagonia, still warm, budget-friendly
- Arc'teryx Delta Glove ($45): Premium fleece, exceptionally comfortable
Softshell Gloves
Softshell gloves combine a fleece interior with a weather-resistant outer shell:
- Weather protection: DWR-treated outer fabric sheds light rain and snow
- Wind resistance: Woven outer layer blocks wind significantly better than fleece
- Durability: Tougher construction withstands abrasion from poles and rocks
- Versatility: Performs well across wider conditions than fleece
The tradeoffs: heavier (90-130 grams), less breathable during intense exertion, typically more expensive ($50-80).
Top softshell options:
- Outdoor Research Stormtracker Sensor Gloves ($60): Industry standard for trekking guides, excellent weather protection, reliable touchscreen
- Black Diamond MidWeight Softshell Gloves ($50): Great fit, good durability, popular with mountaineers
- Marmot Spring Gloves ($45): Budget softshell, decent performance, wider sizing
Insulated Synthetic Gloves
Some mid-weight gloves use thin synthetic insulation (40-60g PrimaLoft or similar) between a shell and liner:
- Warmth: Warmer than fleece or basic softshell
- Water resistance: Usually includes waterproof insert (Gore-Tex or similar)
- All-conditions capability: Handles light snow and rain well
The downsides: bulkier than fleece, less dexterous, often too warm for active trekking until you reach 3,500m+.
These work better as a "hybrid" between mid-weight and insulated gloves for trekkers doing lower-altitude routes like Poon Hill or Ghorepani where you might not need heavy insulated gloves.
Top insulated options:
- Outdoor Research Flurry Sensor Gloves ($70): 100g PrimaLoft, Gore-Tex insert, warm but still functional
- Mountain Hardwear Cloud Bank Gore-Tex Gloves ($80): Similar to OR Flurry, slightly better fit for larger hands
Essential Features
Grip Reinforcements
Quality mid-weight gloves include reinforced synthetic leather or silicone on palms and fingers. This serves two purposes:
- Durability: Prevents wear-through from constant pole use and rock scrambling
- Grip: Textured surfaces maintain pole control even when wet
Check that reinforcements cover the entire palm and extend onto the index and middle fingers where you grip poles.
Wrist Closure
Mid-weight gloves should have adjustable wrist closures—either elastic with a toggle or velcro cuff straps. This allows you to:
- Tighten gloves to keep out spindrift and cold air
- Loosen them for better circulation during rest stops
- Secure them over or under jacket cuffs depending on conditions
Gloves without wrist adjustment often slide down during use or allow cold air to enter at the wrists.
Leash Attachment Points
Small loops or clips at the wrist allow you to attach glove leashes. While not essential, leashes prevent dropped gloves from falling off ridges or into streams—a disaster scenario that ends treks.
Reflective Details
Some gloves include small reflective patches or logos. While not critical, these help with visibility if you're doing early morning or late evening hiking, and make dropped gloves easier to spot.
Fleece vs. Softshell: Which to Choose?
This depends on your trek timing and personal preferences:
Choose fleece if:
- Trekking during dry season (October-November, March-May)
- You run warm and sweat easily
- Budget is tight (fleece costs $10-20 less)
- You prioritize light weight
- Your trek stays mostly below 4,000m
Choose softshell if:
- Trekking during shoulder seasons (September, December, February)
- You'll encounter wet snow or rain
- Your trek includes high passes or exposed ridges
- You prefer "one glove" simplicity over layering
- You run cold or have poor circulation
For classic Everest Base Camp treks in October-November, most experienced trekkers choose fleece mid-weight gloves. The weather is typically dry, and fleece's breathability becomes more valuable than softshell's weather protection. For Annapurna Circuit with its more variable weather, softshell edges ahead.
The Backup Mid-Weight Strategy
Layer Three: Insulated Gloves and Mittens (High-Altitude Protection)
Your third layer—insulated gloves or mittens—is your insurance policy against Nepal's serious cold. These are the gloves that keep your fingers from frostbite at Everest Base Camp, on the Thorong La Pass, or during pre-dawn summit attempts on trekking peaks like Island Peak.
The Glove vs. Mitten Decision
This is the most consequential choice in your glove system. The decision isn't binary—some trekkers bring both insulated gloves AND mittens—but understanding the tradeoffs is critical.
Mittens: Maximum Warmth
Mittens are significantly warmer than gloves at the same insulation level because they group four fingers together, allowing them to share heat. Your fingers have less surface area exposed to cold, and blood circulation isn't divided into individual finger channels.
The warmth advantage is substantial—roughly equivalent to 30-50% more insulation. A mitten with 200g insulation often matches a glove with 300g insulation in real-world warmth.
Mittens are superior when:
- Standing still in extreme cold (summit attempts, sunrise viewpoints)
- Temperatures drop below -15°C
- You have poor circulation or cold-sensitive hands
- Your primary concern is preventing frostbite, not performing tasks
Mittens' limitations:
- Nearly impossible to grip trekking poles effectively
- Can't operate phone cameras even with touchscreen compatibility
- Difficult to handle tent zippers, backpack buckles, food packages
- Must remove them for any dexterity task
Gloves: Maximum Functionality
Insulated gloves sacrifice some warmth for finger independence. Quality expedition gloves still provide serious cold protection—typically adequate down to -20°C or even -25°C—while allowing you to:
- Use trekking poles with proper grip
- Operate camera controls for photography
- Adjust gear without removing gloves
- Handle basic camp tasks
- Maintain touchscreen phone use (if touchscreen-compatible)
Gloves are superior when:
- You're actively trekking, not standing still
- Temperatures stay above -20°C
- You need to frequently handle equipment
- Photography is important to your trek
- You're using trekking poles extensively
The Hybrid Solution
Many experienced trekkers use this approach:
- Primary insulation: Insulated gloves for versatility and pole use
- Emergency backup: Lightweight insulated mittens for extreme cold or emergencies
Total weight penalty: approximately 150-200g for basic backup mittens. This system provides maximum flexibility—gloves for 90% of situations, mittens when temperature or wind makes gloves insufficient.
Insulation Types
Down Insulation
Down offers the best warmth-to-weight ratio of any insulation, making it popular for high-altitude gloves and mittens:
- Warmth: 700-fill down provides exceptional insulation—200g of down matches 300g+ of synthetic
- Compressibility: Down gloves pack smaller than synthetic equivalents
- Weight: Down gloves weigh 20-30% less than equally warm synthetic gloves
- Durability: Quality down maintains loft for many years
Down's critical weakness: Complete loss of insulation when wet. If down gloves get soaked, they become useless until completely dried—which can take days in cold, humid Himalayan conditions. You cannot rely on down gloves if there's any significant chance of wet snow or rain.
Best for: Dry, cold conditions at high altitude (EBC in October-November, December-February high-altitude treks)
Top down options:
- Mountain Hardwear Absolute Zero Down Mitts ($150): Expedition-grade, 800-fill down, good to -30°C
- Black Diamond Super Light Mitts ($80): Lighter option, 850-fill down, adequate to -20°C
- Outdoor Research Alti Gloves ($129): Down gloves (not mittens), good compromise, touchscreen compatible
Synthetic Insulation
Modern synthetic insulations (PrimaLoft, Thinsulate, proprietary blends) provide reliable warmth even when damp:
- Wet performance: Maintains 70-80% of insulation when wet, critical safety factor
- Reliability: Performs consistently regardless of humidity
- Faster drying: Synthetic fibers dry in hours rather than days
- Lower cost: Usually $20-50 less than comparable down
Synthetic's limitations: Heavier and bulkier than down at equivalent warmth, compresses less effectively over time.
Best for: Treks with variable weather, shoulder seasons, or any time wet snow is possible
Top synthetic options:
- Outdoor Research Alti Gloves (Synthetic Version) ($100): 200g PrimaLoft, waterproof, touchscreen, highly versatile
- Black Diamond Guide Gloves ($90): Popular with guides, reliable, good fit range
- Mountain Hardwear Compressor Gloves ($75): Budget synthetic option, adequate warmth
Hybrid Insulation
Some premium gloves use down in low-wear areas (back of hand) and synthetic in high-wear or moisture-prone areas (palm, fingers). This optimizes both warmth and reliability.
Examples:
- Arc'teryx Fission SV Gloves ($180): Down/synthetic hybrid, expedition-grade, excellent but expensive
Construction Features
Waterproof/Breathable Membranes
Most serious insulated gloves include waterproof-breathable inserts (Gore-Tex, OutDry, proprietary membranes):
- Weather protection: Keeps snow and rain from saturating insulation
- Moisture management: Allows some sweat vapor to escape
- Durability: Protects insulation from abrasion
Waterproof membranes add cost ($30-50) and reduce breathability, but they're essential for high-altitude trekking where you can't afford wet gloves.
Gauntlet Cuffs
Insulated gloves should have long cuffs (gauntlets) that extend well past your wrists—typically 10-15 cm. These serve multiple purposes:
- Snow protection: Keep spindrift from entering gloves
- Coverage: Overlap with jacket sleeves to eliminate gaps
- Adjustment: Drawcords cinch cuffs tight over or under jacket cuffs
Gauntlet cuffs should have drawcord closures with easy-to-use cord locks that you can operate with one gloved hand.
Removable Liners
Some expedition gloves feature removable insulated liners. This provides flexibility:
- Drying: Remove liners to dry separately from shells
- Versatility: Use shells as waterproof over-gloves with other gloves
- Layering options: Adjust warmth by adding/removing liners
The downside: removable liners create one more item to lose and add complexity. For most trekkers, fixed insulation is simpler and adequate.
Wrist Leashes
Insulated gloves typically include integrated wrist leashes or attachment points. Use these religiously at high altitude—dropping a glove above 5,000m can be dangerous. The leash allows you to remove gloves for brief tasks without setting them down or stuffing them in pockets.
Sizing Considerations
Insulated gloves require careful sizing because they need to accommodate liner gloves underneath. When trying on insulated gloves:
- Wear your liner gloves during fitting
- Check finger length: There should be 0.5-1 cm of space beyond your fingertips
- Test dexterity: Can you make a fist? Grip a pole? Pinch fingers together?
- Verify wrist coverage: Cuffs should extend past wrist bones onto forearms
- Assess bulk: Too loose = cold spots and lost dexterity; too tight = restricted circulation
Many trekkers size up one size for insulated gloves compared to their normal glove size. This accommodates layers without restricting movement.
How Much Insulation?
For lower-altitude treks (under 4,000m maximum):
For standard high-altitude treks (4,000-5,500m):
- 200g synthetic or 150g down (700+ fill)
- Examples: Everest Base Camp, Annapurna Circuit
For extreme altitude or winter treks (5,500m+):
- 300g+ synthetic or 200g+ down (800+ fill)
- Examples: Winter EBC, Cho La Pass, trekking peak summits
These are guidelines—adjust based on personal cold tolerance, circulation, and whether you're using gloves or mittens (mittens can go lighter on insulation).
Insulated Gloves vs. Mittens: Feature Comparison
| Name | Insulated Gloves | Insulated Mittens |
|---|---|---|
| Warmth (Same Insulation) | Good to -20°C | Good to -30°C |
| Trekking Pole Use | Excellent - proper grip possible | Poor - awkward grip, reduced control |
| Camera Operation | Good - can operate most controls | Very Poor - must remove for most tasks |
| Touchscreen Use | Possible if touchscreen-compatible | Not practical even with touchscreen fabric |
| Camp Tasks | Most tasks possible without removal | Must remove for detailed tasks |
| Weight (200g Insulation) | 280-350g | 220-280g |
| Best Use Case | Active trekking with gear handling | Stationary cold exposure, summit attempts |
| Typical Cost Range | $80-180 | $60-150 |
Altitude-Specific Glove Requirements
Not all Nepal treks are created equal when it comes to hand protection. A Poon Hill trek maxing out at 3,210m has radically different requirements than Everest Base Camp reaching 5,364m. Here's what different altitude ranges demand:
Lower Altitude Treks (2,000-3,500m)
Examples: Poon Hill, lower Langtang Valley, Ghorepani
Temperature range: 5°C to 20°C typical daytime, 0°C to 10°C nighttime
Minimum glove system:
- Liner gloves (merino or synthetic)
- Mid-weight fleece or softshell gloves
- Optional: Light insulated gloves (100g) for early mornings
At these altitudes, you'll spend most trekking time in liner gloves or mid-weight gloves. Many trekkers complete these routes without ever needing insulated gloves, especially during prime season.
Cost to outfit: $40-80 (liner + mid-weight)
Mid-Altitude Treks (3,500-4,500m)
Examples: Langtang Valley to Kyanjin Gompa, lower sections of Everest Base Camp, Annapurna Base Camp
Temperature range: -5°C to 15°C daytime, -10°C to 5°C nighttime
Recommended glove system:
- Liner gloves (merino preferred for warmth)
- Mid-weight softshell gloves (weather protection becomes important)
- Insulated gloves (150-200g) or light mittens
This is where the three-glove system proves its value. You'll rotate through all three layers depending on conditions, altitude, and activity level.
Cost to outfit: $90-150 (complete three-glove system)
High Altitude Treks (4,500-5,500m)
Examples: Everest Base Camp upper sections, Annapurna Circuit including Thorong La, Gokyo Lakes, Everest Three Passes
Temperature range: -15°C to 10°C daytime, -25°C to -5°C nighttime
Recommended glove system:
- Liner gloves (2 pairs recommended)
- Mid-weight softshell gloves
- Serious insulated gloves (200g+) or mittens
- Optional: Backup lightweight mittens for extreme cold
At these altitudes, insulated gloves transition from "nice to have" to "essential safety equipment." Pre-dawn starts to reach viewpoints like Kala Patthar or crossing high passes demand serious hand protection.
Cost to outfit: $110-220 (complete system with backup mittens)
Extreme Altitude and Winter (5,500m+, Dec-Feb)
Examples: Island Peak, Mera Peak, winter Everest Base Camp, Lobuche Peak
Temperature range: -25°C to 5°C daytime, -35°C to -15°C nighttime
Recommended glove system:
- Liner gloves (2 pairs, merino preferred)
- Mid-weight softshell gloves
- Expedition-grade insulated mittens (300g+ or 200g+ down)
- Insulated gloves (200g) as secondary option
- Hand warmers (chemical heat packets)
At extreme altitude, especially for trekking peaks requiring glacier travel and summit attempts, mittens become mandatory. The combination of altitude, wind, and stationary periods (belaying, waiting) creates conditions where only mittens provide adequate protection.
Cost to outfit: $150-300 (complete expedition system)
Altitude Adaptation Timeline
Touchscreen Compatibility: What Actually Works
Touchscreen gloves have evolved dramatically since early versions that barely worked. Understanding what makes modern touchscreen gloves functional—or frustrating—at altitude can save significant aggravation.
The Technology
Touchscreen-compatible gloves use conductive material (usually metal-infused fibers or conductive polymers) woven into fingertips. These materials mimic the electrical conductivity of skin, allowing capacitive touchscreens to register touches through the glove.
Quality matters enormously. Cheap touchscreen gloves often:
- Require excessive pressure to register touches
- Work inconsistently, registering 60-70% of intended touches
- Stop functioning when wet or cold
- Wear out quickly, losing conductivity after repeated use
Premium touchscreen gloves provide:
- Light-touch responsiveness similar to bare fingers
- 95%+ registration of intended touches
- Consistent performance in cold and dry conditions
- Durable conductive materials that last for years
Which Fingers Need Touchscreen?
Most touchscreen gloves equip three fingertips with conductive material:
- Thumb: Essential for scrolling and single-hand operation
- Index finger: Primary touch input for most users
- Middle finger: Backup and two-finger gestures
Some gloves add conductive material to all five fingers. This provides more options but doesn't significantly improve functionality—you rarely use ring and pinky fingers for phone operation.
Real-World Performance at Altitude
Several factors affect touchscreen performance in Nepal's mountains:
Cold reduces screen sensitivity: Phone screens become less responsive below 5°C, requiring firmer touches. The best touchscreen gloves compensate with higher-conductivity materials, but all gloves work somewhat less reliably in extreme cold.
Dry air affects conductivity: Nepal's low humidity, especially at altitude, reduces both skin and glove conductivity. You may need to breathe on your gloved fingertips to add moisture before using your phone.
Screen protectors matter: Heavy-duty screen protectors reduce touchscreen sensitivity, compounding the challenge of using gloves. If you're serious about gloved phone use, choose a thin, high-quality screen protector.
Phone placement: In extreme cold, keep your phone inside your jacket in an inside pocket. The 5-second delay reaching for your phone is far better than a dead phone battery (cold kills batteries quickly).
Best Touchscreen-Compatible Gloves for Nepal
Liner Gloves:
- Outdoor Research Vigor Lightweight Sensor Gloves ($29): Best touchscreen performance in liner category, reliable in cold
- Icebreaker Quantum Gloves ($40): Merino with excellent touchscreen, warmer than OR but slightly less responsive
Mid-Weight Gloves:
- Outdoor Research Stormtracker Sensor Gloves ($60): Industry standard, excellent touchscreen even in cold
- Black Diamond MidWeight ScreenTap ($50): Very good touchscreen, slightly better warmth than OR
Insulated Gloves:
- Outdoor Research Alti Gloves ($129): Best touchscreen in an insulated glove, highly recommended for photographers
- Black Diamond Guide Gloves ($90): Good touchscreen for an insulated glove, better value than OR
Reality check: Even the best touchscreen gloves aren't as good as bare fingers. For critical phone use—complex GPS navigation, detailed photography settings, typing messages—you'll still remove gloves. Touchscreen compatibility's value is enabling quick tasks: checking the time, taking photos with one-button press, simple map checks, basic camera adjustments.
The Photography Problem
Serious photography in cold conditions requires a different approach than touchscreen gloves alone:
Photographer's glove strategy:
- Primary: Liner gloves with good touchscreen for basic camera operation
- For shooting: Remove one liner glove, keep hand warm in jacket pocket between shots
- Extreme cold: Photography mitts with fold-back finger covers or trigger finger
Photography-specific gloves worth considering:
- Vallerret Markhof Pro ($90): Photography gloves with fold-back index and thumb, serious but bulky
- Freehands Photography Gloves ($35): Simpler flip-back design, less warm but more packable
Most trekkers find liner gloves plus periodic bare-hand shooting more practical than specialized photography gloves, but if photography is your primary trek focus, dedicated photo gloves earn their weight.
Waterproof Considerations
Water is the enemy of glove insulation. Wet gloves lose 70-90% of their insulating value, take days to dry in cold mountain air, and can contribute to frostbite risk. Understanding waterproofing options is critical.
When Waterproofing Matters
High priority for waterproofing:
- Treks during monsoon shoulder season (September, early October, May)
- Routes with extensive snow exposure (Annapurna Circuit, high passes)
- Winter treks with powder snow
- Any trek where wet gloves would be dangerous (high altitude, extreme cold)
Lower priority for waterproofing:
- Dry season treks (late October-November, March-April)
- Lower altitude routes with limited snow
- Treks where quick drying is possible (warmer, lower routes)
Waterproofing Approaches
Built-in Waterproof Membranes
Many insulated gloves and some mid-weight gloves include waterproof-breathable membranes:
- Gore-Tex: Industry standard, excellent waterproofing and breathability
- OutDry: Columbia's proprietary membrane, very waterproof but less breathable
- Proprietary membranes: Many brands use their own (TNF HyVent, Marmot MemBrain), performance varies
Pros:
- Integrated protection, no extra layers needed
- Usually breathable, allowing some moisture escape
- Can't forget them at home
Cons:
- Adds cost ($30-60)
- Reduces breathability compared to non-waterproof gloves
- If membrane fails, the entire glove becomes less useful
Separate Waterproof Shells
An alternative approach uses thin waterproof shell mittens or gloves over your regular gloves:
- Lightweight (70-120g)
- Pack separately, use only when needed
- Maintain breathability of underlayers during dry conditions
- Cost-effective ($25-50 vs. $50-80 premium for waterproof gloves)
Best waterproof shell options:
- Outdoor Research Helium Rain Gloves ($35): Ultralight, pack tiny, adequate waterproofing
- Showa 282 Temres Gloves ($25): Budget favorite, surprisingly good performance
- Black Diamond Waterproof Overmitts ($45): More durable than OR Helium
Pros:
- Flexibility—use only when wet conditions occur
- Lighter system overall
- Less expensive than waterproof gloves
- Can protect any glove combination
Cons:
- One more item to pack and manage
- Less dexterous than integrated waterproof gloves
- Can be forgotten when actually needed
DWR Treatments
Many softshell and insulated gloves use DWR (Durable Water Repellent) coatings instead of waterproof membranes. These cause water to bead and roll off rather than soaking in.
Reality: DWR is water-resistant, not waterproof. It handles:
- Light snow for 30-60 minutes
- Brief rain showers
- Melting snow contact
DWR does not handle:
- Extended snow travel
- Moderate to heavy rain
- Wet snow (the worst for soaking through)
DWR wears off with use but can be refreshed with spray-on or wash-in treatments (Nikwax, ReviveX). Plan to reapply DWR before your trek if your gloves are more than a year old.
The Dry Season Reality
During Nepal's prime trekking season (October-November, March-April), precipitation is rare and usually brief. Most experienced trekkers skip waterproof gloves entirely, relying on:
- Quick drying of their glove systems
- Keeping backup dry gloves accessible
- Avoiding glove contact with wet snow
If you do encounter wet conditions, fleece or thin gloves dry reasonably quickly if you:
- Wring out excess water immediately
- Keep them inside your jacket or sleeping bag
- Rotate to backup gloves while the wet pair dries
However, if there's any real chance of sustained wet conditions on your trek, waterproof protection—whether built-in or via shells—transitions from luxury to necessity.
The Bread Bag Emergency Backup
Budget Recommendations: From $60 to $250
Quality glove systems exist at multiple price points. Here's how to build effective protection at different budgets.
Budget System ($60-90)
Goal: Adequate protection for standard treks without premium features
Liner Gloves:
- REI Co-op Merino Wool Liner Gloves ($20) or
- Black Diamond Lightweight Screentap ($25)
Mid-Weight Gloves:
- The North Face TKA Glacier Gloves ($35) or
- Marmot Spring Gloves ($45)
Insulated Layer:
- Outdoor Research Flurry Sensor Gloves ($70) or
- Consider rental for insulated layer ($15-20 total for 12-day trek)
Total: $60-90 (depending on whether you rent or buy insulated gloves)
Tradeoffs: Fewer features, less durability, reduced touchscreen reliability, but adequate performance for most standard treks. This system will keep your hands warm on Everest Base Camp if you layer properly.
Mid-Range System ($120-170)
Goal: Balance of performance, features, and cost for serious trekkers
Liner Gloves:
- Icebreaker Oasis Glove Liners ($35) × 2 pairs = $70
- Outdoor Research Vigor Sensor Gloves ($29) + backup synthetic pair ($15) = $44
Mid-Weight Gloves:
- Outdoor Research Stormtracker Sensor Gloves ($60) or
- Black Diamond MidWeight Softshell ($50)
Insulated Layer:
- Black Diamond Guide Gloves ($90) or
- Outdoor Research Alti Gloves ($129)
Total: $160-169 (complete three-pair system)
Benefits: Reliable touchscreen, proven durability, good weather protection, trusted by guides and experienced trekkers. This is the "sweet spot" for most people doing serious Nepal trekking.
Premium System ($200-250+)
Goal: Maximum performance, comfort, and features for demanding treks
Liner Gloves:
- Icebreaker Quantum Gloves ($40) × 2 pairs = $80
Mid-Weight Gloves:
- Outdoor Research Stormtracker Sensor Gloves ($60)
Insulated Layer:
- Outdoor Research Alti Gloves ($129) or
- Mountain Hardwear Absolute Zero Down Mitts ($150) + OR Alti as backup ($129) = $279
Optional additions:
- Backup waterproof shells ($35)
- Photography-specific gloves ($90)
Total: $209-269 (standard premium system) Total with all options: $334
Benefits: Best touchscreen performance, maximum durability, premium materials, excellent fit and finish, often lighter weight for equivalent warmth. Worth it for frequent trekkers or those doing extreme altitude/winter expeditions.
The Rental Alternative
For budget-conscious trekkers doing a one-time trek, strategic rental makes sense:
What to rent:
- Insulated gloves or mittens: $1-2/day in Kathmandu, Namche Bazaar, Pokhara
What to buy:
- Liner gloves (too personal for rental comfort)
- Mid-weight gloves (build your own system)
Sample budget rental approach:
- Buy liner gloves: $20-35
- Buy mid-weight gloves: $35-60
- Rent insulated gloves: $15-20 for 12-day trek
- Total: $70-115
Rental pros:
- Lower upfront cost
- Don't have to store specialized gear after trek
- Try before you buy (if you love trekking, purchase system for next time)
Rental cons:
- Unknown fit until arrival
- Used equipment, variable condition
- Can't test system before trek
- Less selection of sizes and styles
Rental strategy: Buy your liner and mid-weight gloves before arrival (these are affordable and useful beyond Nepal). Rent insulated gloves upon arrival, trying several options to find the best fit. If you can't find good-fitting rentals, purchase options exist in Kathmandu—though selection diminishes during peak season.
Budget vs. Mid-Range vs. Premium Glove Systems
| Name | Budget | Mid Range | Premium |
|---|---|---|---|
| Total Cost (3-Pair System) | $60-90 | $120-170 | $200-270 |
| Liner Touchscreen Quality | Basic - 70% reliability | Good - 90% reliability | Excellent - 95%+ reliability |
| Expected Lifespan | 1-2 treks / 1-2 years | 3-5 treks / 3-5 years | 5+ treks / 5-10 years |
| Weather Protection | Basic DWR | Good water resistance or waterproof | Waterproof with excellent breathability |
| Weight (Complete System) | 450-550g | 380-450g | 320-400g |
| Best For | First-time trekkers, single trek | Serious trekkers, regular use | Frequent trekkers, extreme conditions |
Women-Specific Sizing and Considerations
Women's gloves aren't simply smaller versions of men's gloves—they're designed with different proportions and physiological considerations.
Sizing Differences
Proportional variations:
- Palm width: Women's gloves have narrower palms relative to finger length
- Finger length: Women's gloves often have proportionally longer fingers
- Wrist sizing: Women's gloves have smaller wrist openings
A woman wearing a size medium men's glove might find adequate finger length but excessive palm width, creating bunching, reduced dexterity, and cold spots from poor insulation contact.
Always size by measurements, not gender labels:
- Measure hand circumference at knuckles (excluding thumb)
- Measure hand length from wrist to middle fingertip
- Compare to manufacturer's sizing charts—both men's and women's
- Try both if measurements fall between categories
Some women with larger hands get better fits from men's small or extra-small gloves. Some men with smaller hands fit better in women's large. Gender labels are guidelines, not rules.
Circulation and Cold Sensitivity
Women generally have:
- Lower extremity blood flow in cold conditions (evolutionary adaptation to protect core/reproductive organs)
- Higher sensitivity to cold in fingers and toes
- More pronounced circulation reduction at altitude
Practical implications:
- Size up slightly: Tight gloves restrict circulation; women especially benefit from slightly looser fit
- Prioritize layering: The three-glove system is even more critical for cold-sensitive hands
- Consider mittens: Women may need mittens in conditions where men are fine with gloves
- Pack hand warmers: Chemical heat packets provide security blanket for circulation-challenged hands
This isn't universal—many women have better circulation than many men—but if you know you have cold-sensitive hands, plan accordingly.
Recommended Women-Specific Models
Many manufacturers offer women's versions of popular gloves with adjusted sizing and proportions:
Liner Gloves:
- Smartwool Liner Gloves ($30): Excellent proportions for smaller hands
- Icebreaker Quantum Gloves - Women's ($40): Available in XXS for very small hands
Mid-Weight:
- Outdoor Research Stormtracker Sensor Gloves - Women's ($60): Same features as men's, better fit for most women
- Black Diamond MidWeight ScreenTap - Women's ($50): Good palm-to-finger proportions
Insulated:
- Outdoor Research Alti Gloves - Women's ($129): Narrower palm, adjusted finger proportions
- Black Diamond Guide Gloves - Women's ($90): Available down to size XS
When women's versions aren't available: Try men's sizes but prioritize fit over gender labels. A well-fitting men's small beats a poorly-fitting women's medium.
The Circulation Warm-Up Technique
Hand Warmers and Emergency Backup Systems
Even the best glove system can be overwhelmed by extreme conditions, unexpected weather, or individual physiology. Hand warmers and backup strategies provide critical safety margins.
Chemical Hand Warmers
Disposable chemical hand warmers (HeatMax, HotHands, Grabber brands) generate heat through iron oxidation when exposed to air:
- Heat duration: 6-10 hours depending on brand and conditions
- Temperature: Typically 50-60°C maximum, averaging 40°C
- Weight: 30-40g per pair
- Cost: $1-2 per pair ($15-25 for 12-day trek supply)
When to Use Hand Warmers
Strategic situations:
- Pre-dawn summit attempts or high pass crossings
- Emergency backup if gloves get wet
- During unexpected cold snaps
- For individuals with poor circulation
- Stationary periods (waiting for sunrise, photography sessions)
How to use effectively:
- Inside gloves, not against skin: Place warmers on back of hand, between liner gloves and insulated gloves
- Activate before cold: Start warmers 10-15 minutes before you need heat—they take time to reach full temperature
- Insulate them: Warmers need oxygen to work but produce more heat when insulated (inside gloves) than in open air
- Keep backup activated: If one set runs out, having a fresh set already warming saves time
How many to bring:
- Low-altitude treks: 0-2 pairs (emergency only)
- Standard high-altitude treks: 4-8 pairs
- Extreme altitude/winter: 10-15 pairs
- Cold-sensitive individuals: Add 50% to above numbers
Where to buy in Nepal:
- Kathmandu trekking shops: Available but expensive ($3-4 per pair)
- Pharmacies in Kathmandu: Sometimes available, better prices
- Better strategy: Bring from home where prices are lower and selection guaranteed
Backup Glove Strategies
The Two-Pair Minimum:
Never trek with only one pair of any critical glove layer. At minimum:
- Two pairs liner gloves: One to wear, one to dry/backup
- One pair mid-weight gloves: Acceptable if budget constrained
- One pair insulated gloves OR mittens: Acceptable for standard treks
The Full Redundancy System:
For extreme treks, winter expeditions, or maximum safety:
- Two pairs liner gloves
- Two pairs mid-weight gloves (or one + waterproof shells)
- Insulated gloves AND insulated mittens
Weight penalty: Approximately 200-300g Cost penalty: $50-100 Safety benefit: Significant
Backup locations:
- Primary gloves: Day pack, easily accessible
- Backup liners: Main pack or duffel, inside waterproof stuff sack
- Backup mid-weight: Day pack if carrying two, otherwise main pack
Emergency Hand Protection
If disaster strikes and you're left with inadequate hand protection:
Improvised solutions:
- Sock gloves: Wool socks over hands provide surprising insulation
- Vapor barrier: Plastic bags inside thin gloves trap warmth
- Layered clothing: Wrap hands in spare buff/neck gaiter, secure with rubber bands
- Pocket warming: Alternate hands in jacket pockets, carry trekking poles one-handed
- Body heat: Hands in armpits (classic survival technique)
When to descend:
If hands cannot be kept warm despite all efforts, descend immediately. Frostbite risk isn't worth reaching your goal. Early signs:
- Fingers go numb and white (frostnip - reversible)
- Fingers feel wooden, don't respond to warming
- Pain when rewarming (actually a good sign—means tissue is alive)
Rental and Purchase in Nepal
Rental options:
- Kathmandu: Dozens of shops in Thamel offer glove rentals, $1-2/day for insulated gloves/mittens
- Namche Bazaar: Limited rental selection but available
- Lukla: Very limited options, don't count on it
Rental quality varies enormously:
- Inspect carefully for: tears, broken zippers, compressed insulation, excessive wear
- Try on with liner gloves to ensure proper fit
- Negotiate based on condition—worn gloves should rent for less
- Get written rental agreement with return terms
Purchase options in Nepal:
If you arrive without gloves or your gloves fail:
- Kathmandu (Thamel): Good selection of mid-range gear, some premium brands, expect 20-40% markup over US/Europe prices
- Namche Bazaar: Limited selection, higher prices, but adequate emergency options
- Counterfeit warning: Fake North Face, Arc'teryx, and other brands are common—inspect carefully and assume lower performance
Budget for Nepal purchase:
- Liner gloves: $15-30
- Mid-weight: $40-70
- Insulated: $80-150
Buying in Nepal works for emergencies but isn't ideal—you can't properly test the system before your trek begins.
Trek-Specific Glove Recommendations
Different treks demand different glove systems based on altitude, duration, season, and conditions. Here's what works for Nepal's most popular routes.
Everest Base Camp (5,364m)
Season: October-November
- Liner: 2 pairs touchscreen-compatible (merino preferred)
- Mid-weight: Softshell gloves (weather protection valuable)
- Insulated: 200g synthetic gloves or 150g down mittens
- Optional: Lightweight backup mittens, hand warmers (4-6 pairs)
Critical days: Lobuche to Gorak Shep, Kala Patthar summit (pre-dawn, -15 to -20°C)
Season: March-April
Similar to Oct-Nov but slightly warmer. Can potentially skip insulated gloves if you run warm, but bring them for safety—Kala Patthar pre-dawn is still brutal.
Season: December-February
- Add serious insulated mittens (250g+ or 180g+ down)
- Increase hand warmers to 8-10 pairs
- Consider waterproof shell over-mitts for snow protection
Full guide: Everest Base Camp Trek
Annapurna Circuit with Thorong La (5,416m)
Season: October-November
- Liner: 2 pairs touchscreen-compatible
- Mid-weight: Softshell gloves (weather changes rapidly)
- Insulated: 200g synthetic gloves (Thorong La can be windy and -15°C)
- Essential: Hand warmers (6-8 pairs) for Thorong La crossing
Thorong La strategy: Start crossing at 3-4am with insulated gloves over liners, hand warmers activated. Switch to mid-weight gloves after reaching Muktinath side where it warms up.
Season: March-April
Similar requirements, though Thorong La can have heavy snow in March—waterproof shells valuable.
Full guide: Annapurna Circuit Trek
Langtang Valley (4,984m to Tserko Ri)
Season: October-November, March-April
- Liner: 1-2 pairs
- Mid-weight: Fleece or softshell gloves
- Insulated: Light insulated gloves (100-150g) sufficient unless doing Tserko Ri
If summiting Tserko Ri: Upgrade to 200g insulated gloves or bring mittens—summit is 4,984m with exposed ridges.
Full guide: Langtang Valley Trek
Annapurna Base Camp (4,130m)
Season: October-November
- Liner: 1-2 pairs
- Mid-weight: Softshell gloves (variable weather in the Sanctuary)
- Insulated: Light insulated gloves (100-150g)
ABC is lower than EBC but the Annapurna Sanctuary funnels wind, making it feel colder than altitude suggests.
Monsoon season (June-August): Waterproof protection essential—heavy rain transitions to snow above 3,500m.
Full guide: Annapurna Base Camp Trek
Poon Hill (3,210m)
Season: October-April
- Liner: 1 pair
- Mid-weight: Fleece gloves
- Insulated: Optional (only if very cold-sensitive)
Poon Hill is the easiest trek on this list. Most trekkers only need liner and mid-weight gloves. The pre-dawn Poon Hill sunrise hike is chilly (around 0-5°C) but mid-weight gloves with liners underneath handle it fine.
Full guide: Poon Hill Trek
Gokyo Lakes and Gokyo Ri (5,357m)
Requirements nearly identical to Everest Base Camp: Same altitude range, similar conditions. See EBC recommendations above.
The Cho La Pass crossing (if combining with EBC) adds exposure—having backup mittens worthwhile.
Full guide: Gokyo Lakes Trek
Island Peak (6,189m)
Mountaineering expedition, not trekking:
- Liner: 2 pairs high-quality merino
- Mid-weight: Softshell gloves
- Insulated: Expedition mittens (300g synthetic or 200g down) required
- Also bring: Insulated gloves as backup
- Essential: Hand warmers (10+ pairs), backup mittens
Summit attempts involve hours of stationary rope work, belaying, and exposure above 6,000m. Only serious mountaineering mittens suffice.
Full guide: Island Peak Climbing
Glove Requirements by Popular Trek
| Name | Max Altitude | Liner Gloves | Mid Weight | Insulated | Minimum Budget |
|---|---|---|---|---|---|
| Everest Base Camp | 5,545m (Kala Patthar) | 2 pairs required | Softshell recommended | 200g gloves or mittens | $120-170 |
| Annapurna Circuit | 5,416m (Thorong La) | 2 pairs required | Softshell recommended | 200g gloves required | $120-170 |
| Langtang Valley | 4,984m (Tserko Ri optional) | 1-2 pairs | Fleece or softshell | 100-150g gloves | $80-120 |
| Annapurna Base Camp | 4,130m | 1-2 pairs | Softshell (weather protection) | 100-150g gloves | $80-120 |
| Poon Hill | 3,210m | 1 pair sufficient | Fleece gloves | Optional (cold-sensitive only) | $50-80 |
| Island Peak | 6,189m (summit) | 2 pairs required | Softshell required | Expedition mittens 300g+ | $180-250+ |
Glove Care, Maintenance, and Packing
Proper care extends glove life and maintains performance throughout your trek.
Pre-Trek Preparation
Reapply DWR treatment:
If your gloves are more than 6-12 months old and have DWR coating:
- Wash gloves according to manufacturer instructions
- Apply spray-on or wash-in DWR treatment (Nikwax, Granger's, ReviveX)
- Heat-activate per product instructions (usually low-heat dryer or iron through cloth)
Break in new gloves:
Wear gloves for several days before your trek:
- Check for hot spots or pressure points
- Confirm touchscreen function with your specific phone
- Practice dexterity tasks: zipping zippers, handling poles, operating cameras
Test layering combinations:
Try different layer combinations in cold conditions:
- Liner alone
- Liner + mid-weight
- Liner + insulated
- All three layers
Confirm each combination fits properly without excessive tightness.
Packing Strategy
Day pack (easily accessible):
- Primary liner gloves
- Mid-weight gloves
- Insulated gloves (if in high-altitude zone)
- Hand warmers (2-4 pairs)
Main pack or duffel:
- Backup liner gloves (in waterproof stuff sack)
- Backup mid-weight gloves (if carrying)
- Extra hand warmers
- Waterproof shells (if using separate shells)
Important: Keep backup gloves in waterproof storage. If your day pack gets soaked or you drop it crossing a stream, having dry backup gloves in your duffel could save your trek.
On-Trail Care
Drying wet gloves:
If gloves get damp from sweat or wet from snow:
- Wring out excess moisture immediately
- Place inside jacket against body heat (not next to skin—use a layer between)
- At teahouses, hang near (not on) stove or heater—monitor constantly to prevent scorching
- Stuff with dry socks or clothing to help absorb moisture
- Never place directly on hot stoves or radiators—this damages insulation and waterproof membranes
Preventing loss:
- Use wrist leashes, especially with insulated gloves
- Develop habit of storing gloves in same pocket/place every time
- At camps, clip gloves together before storing
- Never set gloves down on exposed rocks or snow—always secure them
Managing odor:
Gloves, especially liners, get smelly during multi-day treks:
- Turn liners inside-out and air them every night
- If washing, allow 2-3 days drying time (longer at altitude)
- Merino wool manages odor better than synthetic
- Bring two pairs of liners to rotate
Post-Trek Care
Washing:
- Follow manufacturer instructions carefully
- Use technical gear wash (Nikwax Tech Wash, Granger's) for waterproof gloves
- Avoid fabric softener—damages DWR and insulation
- Air dry or low-heat tumble dry (check labels)
Storage:
- Store completely dry to prevent mildew
- Don't compress insulated gloves—store loosely to maintain loft
- Keep out of direct sunlight (UV degrades materials)
- Cedar or lavender sachets prevent musty odors in long-term storage
Inspection:
After each trek, inspect for:
- Worn areas on palms or fingers
- Separated seams
- Compressed insulation
- Damaged waterproof membranes (indicated by water absorption)
- Failing touchscreen conductivity
Address issues before your next trek—field repairs are much harder than home repairs.
Common Mistakes and How to Avoid Them
After outfitting hundreds of trekkers, patterns emerge in glove mistakes. Here are the most common errors and their solutions.
Mistake 1: Bringing Only One Pair of Gloves
The error: "I have really warm gloves, so I just brought those."
Why it fails: A single pair can't handle Nepal's temperature range. Those "really warm" gloves cause sweaty hands at lower altitudes, leading to removing them frequently, losing them, or developing aversion to wearing them.
Solution: Commit to the three-glove system. The minimal weight (300-500g total) is insurance against misery.
Mistake 2: Gloves Too Tight
The error: Buying gloves that fit snugly without liner gloves underneath.
Why it fails: Tight gloves restrict circulation (worsened at altitude), prevent proper layering, and create cold spots. Insulation works by trapping air—compression reduces this air space.
Solution: Always size gloves while wearing the layers you'll use underneath. Insulated gloves should fit with liner gloves on.
Mistake 3: Skipping Liner Gloves
The error: "I have mid-weight gloves and warm mittens. Why do I need liners?"
Why it fails: Without liners, you have no option for mild cold or for layering. You end up with bare hands or excessive bulk for moderate temperatures. Liners fill critical gaps.
Solution: Liner gloves cost $20-40. Just buy them. They're the most versatile layer in the system.
Mistake 4: Cotton Gloves
The error: Bringing cotton gloves or cotton-blend gloves for "liner" use.
Why it fails: Cotton absorbs moisture, dries slowly, and loses all insulation when wet. In cold conditions, cotton against skin can contribute to frostbite risk.
Solution: Only merino wool or synthetic liner gloves. Never cotton. Check labels—some "wool" gloves are actually cotton-wool blends.
Mistake 5: No Backup Gloves
The error: Packing exactly one of each glove layer with no redundancy.
Why it fails: If any glove gets lost, wet, or damaged, you're left with a dangerous gap in your system. Gloves are light and small enough that backups cost minimal weight.
Solution: At minimum, bring two pairs of liner gloves. Ideally, bring backup mid-weight gloves or waterproof shells that can substitute.
Mistake 6: Untested Touchscreen Function
The error: Assuming "touchscreen compatible" gloves will work with your phone.
Why it fails: Touchscreen quality varies enormously. Some gloves barely work; some require screen protector removal; some fail in cold temperatures.
Solution: Test touchscreen gloves with your actual phone (with screen protector if you use one) before departure. Try in cold if possible—refrigerator works for basic testing.
Mistake 7: Gloves Too Large
The error: "I sized up for layering and they feel roomy—perfect!"
Why it fails: Excessive space means loose fabric bunching, reduced dexterity, fingers sliding around in gloves, and cold air pockets. Bulky gloves also make trekking pole use awkward.
Solution: Gloves should fit with just enough room for intended layers—no more. Fingertips should have 0.5-1 cm extra space, not 2-3 cm.
Mistake 8: Planning to Buy Everything in Nepal
The error: "I'll just buy gloves in Kathmandu—it's cheaper there."
Why it fails: Selection is limited, sizing unpredictable, quality variable (many counterfeits), and you arrive mid-trek if anything doesn't work. Peak season depletes inventory.
Solution: Buy critical gloves before arrival. Nepal purchases work for emergencies or upgrades, not primary systems.
Mistake 9: Forgetting Hand Warmers
The error: "My gloves are warm enough. I don't need chemical warmers."
Why it fails: Even the best gloves can be overwhelmed by extreme cold, wind, or poor circulation. Hand warmers provide safety margin that can prevent early descent or frostbite.
Solution: Pack 4-8 pairs of hand warmers for high-altitude treks. Weight is ~250g total. They're insurance you hope not to use.
Mistake 10: No Waterproof Protection
The error: "It's dry season. Rain won't be an issue."
Why it fails: Weather is unpredictable. Even dry season gets occasional snow storms. Wet gloves at altitude are dangerous.
Solution: Either choose gloves with waterproof membranes or pack lightweight waterproof shell gloves/mittens ($35-45, 80-100g). Minimal cost and weight for significant security.
The Pre-Trek Glove Checklist
Frequently Asked Questions
Glove Packing List and Final Checklist
Here's a complete packing checklist for your glove system, organized by trek type:
Standard High-Altitude Trek (EBC, Annapurna Circuit)
Essential items:
- Liner gloves, pair 1 (touchscreen-compatible, merino or synthetic)
- Liner gloves, pair 2 (backup)
- Mid-weight gloves (softshell or fleece)
- Insulated gloves or mittens (200g synthetic or 150g down)
- Hand warmers (6-8 pairs)
- Glove leashes attached to insulated gloves
Optional but recommended:
- Waterproof shell mitts (lightweight, 80-100g)
- Backup lightweight mittens
- Additional hand warmers (4-6 more pairs)
Total weight: 400-600g Total cost: $120-200
Lower-Altitude Trek (Poon Hill, Lower Langtang)
Essential items:
- Liner gloves, pair 1 (touchscreen-compatible)
- Mid-weight gloves (fleece or softshell)
Optional:
- Liner gloves, pair 2 (backup)
- Light insulated gloves (100g) if cold-sensitive
- Hand warmers (2-4 pairs)
Total weight: 200-350g Total cost: $50-100
Extreme Altitude/Winter (Island Peak, Winter EBC)
Essential items:
- Liner gloves, pair 1 (high-quality merino, touchscreen)
- Liner gloves, pair 2 (backup)
- Mid-weight softshell gloves
- Insulated gloves (200g+)
- Expedition mittens (300g synthetic or 200g down)
- Waterproof shell over-mitts
- Hand warmers (12-15 pairs)
- Glove leashes on all insulated layers
Total weight: 600-800g Total cost: $200-350
Pre-Departure Verification Checklist
Complete this checklist 1 week before departure:
- All gloves tested with intended layers—fit confirmed
- Touchscreen function tested with your phone (with screen protector)
- DWR treatment refreshed on any gloves older than 1 year
- Wrist leashes attached to insulated gloves
- Hand warmers purchased and packed
- Backup gloves packed in waterproof storage
- Glove repair kit assembled (needle, thread, duct tape, superglue)
- Trekking pole grip tested with mid-weight gloves
- Camera operation tested with liner gloves
- Glove care instructions reviewed (drying, storage)
Related Links and Additional Resources
- The Complete Guide to Trekking Poles for Nepal
- Layering System Guide: Clothing for Nepal Trekking
- Nepal Trekking Boots: Selection, Fit, and Break-In Guide
- Sleeping Bags for Nepal: Temperature Ratings and Choices
- Backpack Guide: Choosing the Right Pack for Nepal Trekking
- Best Time to Trek in Nepal: Month-by-Month Guide
- Complete Nepal Trekking Packing List
- Offline Maps and Navigation for Nepal Trekking
- Daypack Essentials for Nepal Trekking
- Altitude Sickness Prevention and Treatment Guide
- Teahouse Trekking in Nepal: Complete Guide
- Trekking Permits for Nepal: Types, Costs, and How to Obtain
- Everest Base Camp Trek: Complete Guide
- Annapurna Circuit Trek: The Complete Guide
- Langtang Valley Trek: Guide and Itinerary
- Poon Hill Trek: Easy Himalayan Introduction
- Gokyo Lakes Trek: Turquoise Lakes and Gokyo Ri
- Island Peak Climbing: Trekking Peak Guide
- Annapurna Base Camp Trek: Sanctuary Circuit
- Photography Tips for Nepal Trekking
Conclusion: Hands That Work, Treks That Succeed
Your hands are your primary tools in the Himalayas. They grip trekking poles that save your knees on endless descents, operate cameras capturing once-in-a-lifetime views, adjust layers as conditions change, handle food and water, and manage gear through weeks of mountain travel.
Cold, numb, or frostbitten hands don't just create discomfort—they can end treks prematurely, prevent photography, make simple tasks frustrating, and in extreme cases, result in permanent injury. Yet many trekkers treat glove selection as an afterthought, grabbing whatever looks warmest or cheapest without understanding how Nepal's unique conditions demand a systematic approach.
The three-glove layering system outlined in this guide isn't theoretical—it's the proven framework used by guides, experienced trekkers, and mountaineers throughout the Himalayas. Liner gloves, mid-weight gloves, and insulated gloves or mittens provide complete coverage from Kathmandu's warm valleys to Everest Base Camp's frozen heights. The system is adaptable, lightweight, and far more effective than any single-glove solution.
The core principles to remember:
- Layer for flexibility: Three gloves handle Nepal's extreme temperature range better than one
- Prioritize fit: Gloves should accommodate layers without restricting circulation
- Plan for backups: Two pairs of liners minimum; consider backup mid-weight gloves
- Test touchscreen: Don't assume—verify function with your specific phone
- Match to your trek: Poon Hill needs less than Everest Base Camp; adjust accordingly
- Waterproof matters: Either built-in or via shells, protect against wet conditions
- Don't cheap out entirely: $60 budget systems work, but $120-170 mid-range systems provide much better reliability
Whether you're investing $80 or $250, buying or renting, the difference between cold hands and comfortable hands often comes down to knowledge rather than budget. Understanding which gloves to use when, how to layer them effectively, and what your specific trek demands puts you ahead of 90% of trekkers.
Your glove system weighs less than a kilogram but provides protection that can make the difference between reaching your goal and turning back early, between cherishing your trek and enduring it, between hands that work and hands that hinder.
Choose wisely, layer strategically, and your hands will serve you well through every step, every pass, every sunrise, and every summit of your Himalayan adventure.