


6-8 kg daypack + 15-20 kg porter duffel
$400-1,200 depending on quality tier
Down jackets, sleeping bags, base layers (40-60% cheaper)
Boots (fit-critical), technical layers, electronics
Available in Kathmandu/Pokhara for $2-5/day per item
20-25 kg total (including porter's gear)
Essential Items for Nepal Trekking
The essential items for Nepal trekking are broken-in waterproof boots, a three-layer clothing system (base, insulating, and shell), a down jacket, a sleeping bag rated to -15°C, sun protection, water purification, a headlamp, and a basic first-aid kit with Diamox. Everything else is comfort. Get these right and you are trek-ready for Everest Base Camp, Annapurna, or any major Himalayan route.
Essential Items for Nepal Trekking: Quick List
If you read nothing else, pack these non-negotiable essentials for trekking in Nepal:
- Broken-in waterproof trekking boots — mid to high-cut, with 50-100 km of break-in walking.
- Three-layer clothing system — moisture-wicking base layers, an insulating fleece, and a down jacket (600+ fill for altitude).
- Waterproof shell — rain jacket with hood, plus rain pants.
- Sleeping bag — comfort-rated to -15°C for autumn/spring at altitude (warmer for winter).
- Sun protection — category 3-4 sunglasses, SPF 50+ sunscreen, SPF lip balm.
- Water purification — tablets, filter, or UV (UV exposure and waterborne illness are both real risks).
- Headlamp with spare batteries — for 4-5 AM summit starts and unlit teahouses.
- First-aid kit with altitude meds — Diamox, ibuprofen, blister care, and personal prescriptions.
- Power bank (20,000+ mAh) — charging is limited and expensive above 4,000m.
- Trekking poles — they cut knee strain on descents by 25-30%.
Down jackets, sleeping bags, and accessories are 40-60% cheaper in Kathmandu, so you do not need to buy everything before you fly. See our rent vs buy gear in Kathmandu guide for the smart split.
Every year, thousands of trekkers in Nepal make the same packing mistakes: bringing too much gear they never use, leaving behind essentials they desperately need, or carrying expensive equipment when affordable alternatives exist in Kathmandu. After analyzing feedback from over 500 trekkers and consulting with veteran Himalayan guides, this comprehensive guide to the essential items for Nepal trekking eliminates the guesswork.
Whether you're heading to Everest Base Camp, the Annapurna Circuit, or any other Nepali trek, this guide provides season-specific recommendations, altitude-based adjustments, and practical advice on what to buy at home versus what to purchase or rent in Nepal.
What makes this guide different:
- Real-world tested gear recommendations across three budget tiers
- Season-specific packing variations for spring, autumn, winter, and monsoon
- Altitude-specific additions for treks above 5,000m
- Women-specific considerations often overlooked in generic guides
- Honest assessments of what you actually need versus marketing hype
- Weight optimization strategies that don't compromise safety
The goal isn't to pack the lightest bag or the most expensive gear. It's to pack smart—bringing everything you need for safety and comfort, nothing you don't, and understanding when cheaper alternatives work just fine.
Table of Contents
- The Packing Philosophy: Less Is More
- Understanding the Layering System
- Complete Clothing Checklist
- Footwear: Boots, Shoes, and Socks
- Backpack and Bags
- Sleeping System
- Trekking Poles and Accessories
- Electronics and Power
- Navigation, Tools and Repair Essentials
- Toiletries and Personal Care
- First Aid and Medications
- Altitude-Specific Gear (Above 5,000m)
- Season-Specific Packing Variations
- Weight Optimization Strategies
- Buying vs Renting in Nepal
- Budget Gear Recommendations
- Women-Specific Considerations
- Photography Gear
- What NOT to Bring
- Final Printable Checklist
- Frequently Asked Questions
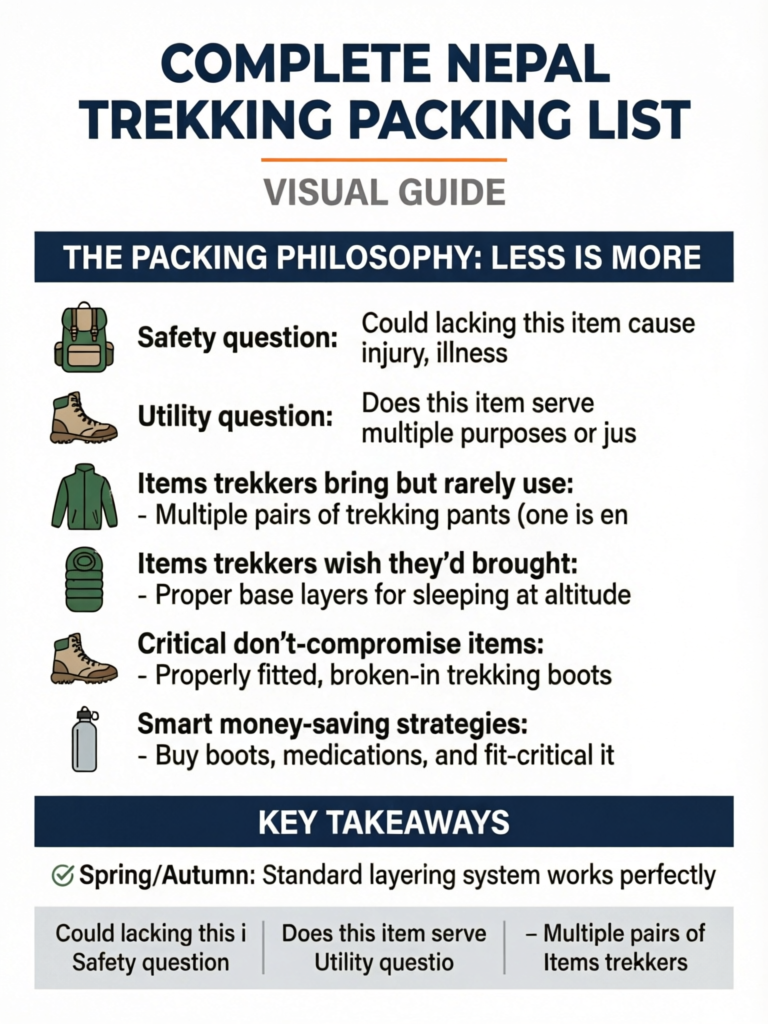
The Packing Philosophy: Less Is More
Before diving into specific gear lists, understand the fundamental principle of smart packing for Nepal treks: bring only what serves multiple purposes or addresses critical safety needs.
The Reality of Trekking in Nepal
You'll have porter support on most organized treks. Porters carry your main duffel bag (15-20 kg maximum), while you carry only a daypack (6-8 kg) with essentials like water, snacks, camera, rain gear, and warm layers. This isn't a wilderness backpacking trip where you carry everything—it's a supported trek with nightly teahouse accommodation.
Laundry facilities exist along most routes. Tea houses offer hand-washing facilities, and some provide laundry services (paid). You don't need 14 days of clothing for a 14-day trek. Three to four outfit rotations are sufficient.
The weather changes constantly at altitude. Rather than packing for every possible scenario, you'll use a proven layering system that adapts to changing conditions throughout each day. One good layering system beats a dozen specialized garments.
The Three-Question Test
Before packing any item, ask yourself:
- Safety question: Could lacking this item cause injury, illness, or emergency evacuation?
- Comfort question: Will this item significantly improve my daily comfort for its weight cost?
- Utility question: Does this item serve multiple purposes or just one?
If an item fails all three questions, leave it at home.
Common Over-Packing Mistakes
Items trekkers bring but rarely use:
- Multiple pairs of trekking pants (one is enough)
- Heavy cotton clothing (useless at altitude)
- Excessive electronics and charging cables
- Full-size toiletries (decant into small containers)
- Books and entertainment (you'll be too tired to read most nights)
- Fashion items for Instagram photos (the mountains provide the backdrop)
- Excessive "just in case" items for unlikely scenarios
Items trekkers wish they'd brought:
- Proper base layers for sleeping at altitude
- Adequate blister prevention supplies
- Portable power bank (charging is expensive and limited)
- Water purification beyond just tablets
- Proper headlamp with spare batteries
- Adequate sun protection (lips, skin)
Pro Tip
The experienced trekker's secret: test your complete packing list on a weekend overnight hike near home. You'll immediately discover what you actually use, what stays in your pack, and what you're glad to have "just in case." That's your real packing list.
Understanding the Layering System
The layering system is your primary defense against Nepal's variable mountain weather. Understanding how it works is more important than owning expensive gear.
Why Layering Works
At altitude, you might experience temperature swings of 20-30°C in a single day. You'll start a morning in -10°C cold, work up a sweat climbing steep sections by midday, get hit by sudden afternoon wind, and settle into -15°C nights. No single jacket handles all these scenarios—but a smart layering system does.
The Three-Layer System Explained
Layer 1: Base Layer (Next to Skin)
Purpose: Moisture management and warmth foundation
The base layer wicks sweat away from your skin to prevent the cooling effect of wet clothing. At altitude, staying dry isn't comfort—it's safety. Wet clothing leads to hypothermia, even at temperatures above freezing.
Materials that work:
- Merino wool (natural odor resistance, warm when wet)
- Synthetic technical fabrics (Capilene, polyester blends)
- Silk (lightweight, surprisingly warm)
Materials that fail:
- Cotton (absorbs moisture, stays wet, makes you cold—avoid completely)
What you need:
- 2-3 lightweight tops (long-sleeve, crew or zip-neck)
- 2-3 bottoms (full-length thermal leggings)
- Both for active trekking and sleeping
Temperature guide:
- Lightweight base (above 3,000m, spring/autumn): 150-200 gsm
- Midweight base (above 4,000m, any season): 200-260 gsm
- Heavyweight base (above 5,000m or winter trekking): 260+ gsm
Base Layer Reality Check
You don't need different base layers for every day. Merino wool naturally resists odor for 3-5 days of wear. Two sets is sufficient—wear one, wash one, rotate. Many trekkers successfully complete 14-day EBC treks with just two base layer sets.
Layer 2: Insulation Layer (Mid-Layer)
Purpose: Trap warm air and provide adjustable warmth
Your mid-layer creates dead air space that your body heat warms. It's your primary temperature regulation tool—add it when you're cold, remove it when you're warm, adjust throughout the day.
What you need:
- Light fleece or synthetic jacket (200-300 weight): For moderate temperatures, active trekking, teahouse evenings
- Down or synthetic puffy jacket (300-600 fill power down or equivalent synthetic): For cold mornings, high camps, summit days, nighttime
Down vs Synthetic debate:
- Down: Warmer for weight, more compressible, lasts longer, costs more, useless when wet
- Synthetic: Works when wet, dries faster, cheaper, slightly heavier, less compressible
For Nepal teahouse treks, down is the better choice because you're sleeping indoors nightly and can keep it dry. Save synthetic for monsoon trekking or climbing expeditions.
How much insulation:
- Moderate altitude treks (below 4,000m): 200-400 fill down or equivalent
- High altitude (4,000-5,000m): 400-600 fill down or equivalent
- Extreme altitude (above 5,000m or winter): 600-800 fill down or expedition-weight synthetic
Layer 3: Outer Shell Layer
Purpose: Wind and weather protection
Your shell blocks wind, rain, and snow while allowing moisture from inside layers to escape (breathability). At high altitude, wind chill can drop effective temperature by 15-20°C—your shell is critical.
What you need:
- Waterproof rain jacket with hood (Gore-Tex or equivalent): Your primary weather protection
- Waterproof rain pants: For heavy rain, snow, or wind protection
- Soft-shell pants (optional but useful): Water-resistant trekking pants for dry conditions
Shell specifications:
- Waterproof rating: minimum 10,000mm (15,000mm+ better)
- Breathability rating: minimum 10,000g/m²/24hr
- Features: Pit zips (ventilation), adjustable hood, storm flaps, packable
The Nepal Shell Reality
Many expensive technical shells are overkill for Nepal teahouse treks. You're not on a multi-day alpine climb—you're trekking lodge to lodge, often in stable weather seasons. A mid-range waterproof jacket ($80-150) performs fine for most trekkers. Save expedition shells for the Three Passes or winter expeditions.
Layering in Practice: A Typical EBC Day
Morning (5:00 AM, -10°C):
- Base layer + fleece + down jacket + shell + beanie + gloves
- All layers on while having breakfast
Trekking uphill (8:00 AM, warming to 0°C):
- Remove down jacket (pack it away)
- Base layer + fleece + shell if windy
- Remove shell if no wind, too warm
Midday (12:00 PM, sunny, 10°C):
- Base layer only, or light fleece if windy
- Sun hat instead of beanie
- Sunglasses essential
Afternoon at camp (3:00 PM, temperature dropping to 5°C):
- Add fleece back on
- Down jacket for sitting around teahouse
Evening (6:00 PM, -5°C):
- All layers back on: base + fleece + down
- Hat and gloves when outside
Sleeping (10:00 PM, -10°C in unheated room):
- Clean base layers for sleeping
- Possibly light fleece if extremely cold
- Inside sleeping bag
This constant adjustment is normal and essential. Trekkers who keep all layers on during uphill climbs overheat, sweat excessively, soak their clothing, and then freeze when they stop. Master the layering dance.
Complete Clothing Checklist
This comprehensive list covers all trekking scenarios. Specific quantities and items can be adjusted based on season and altitude (see Season-Specific Packing).
Upper Body
Base layers:
- 2-3 long-sleeve technical shirts (merino wool or synthetic)
- 1 short-sleeve technical shirt (optional, for lower elevations)
Mid-layers:
- 1 lightweight fleece jacket or synthetic insulated jacket
- 1 down jacket or heavyweight synthetic puffy (600+ fill for high altitude)
- 1 long-sleeve casual shirt or light sweater (for teahouse evenings)
Outer layers:
- 1 waterproof rain jacket with hood (essential)
- 1 down vest (optional, useful layering piece)
Underwear:
- 3-4 technical underwear (not cotton)
- 1-2 sports bras (for women, non-cotton)
Lower Body
Base layers:
- 2-3 thermal base layer bottoms (full length)
Trekking pants:
- 1-2 lightweight trekking pants (quick-dry, stretch fabric)
- 1 convertible zip-off pants to shorts (optional but versatile)
- 1 waterproof rain pants or gaiters
Alternatives:
- Soft-shell trekking pants (water-resistant, warmer than regular trekking pants)
- Insulated pants (for extreme cold or winter treks above 5,000m)
Note on trekking pants: One good pair is sufficient for most treks. You'll wear the same pants daily—they're designed for it. Bring a second pair only if you want a backup while washing.
Head and Neck
Sun protection:
- 1 wide-brim sun hat or baseball cap with neck flap
- 1 buff or neck gaiter (multipurpose: sun protection, warmth, dust filter)
Cold protection:
- 1 warm beanie or winter hat (essential for all seasons)
- 1 balaclava or face mask (optional, useful above 5,000m or winter)
Hands
Glove system:
- 1 pair lightweight liner gloves (for moderate cold, camera operation)
- 1 pair insulated waterproof gloves or mittens (for high altitude, cold mornings)
- 1 pair down mittens (optional, only for extreme cold above 5,500m or winter)
Gloves vs mittens debate:
- Gloves: Better dexterity for camera work, zippers, trekking poles
- Mittens: Warmer in extreme cold
- Compromise: Insulated gloves for most days, mittens for summit day or winter treks
Accessories
Sleep clothing:
- 1 set clean base layers reserved for sleeping (hygiene and warmth)
- 1 lightweight down booties or thick wool socks for sleeping
Sun protection:
- 1 pair high-quality sunglasses (100% UV protection, category 3-4)
- 1 pair ski goggles (optional, for high passes in snow or winter)
Pro Tip
Pack one complete outfit (base layer, fleece, trekking pants) in your daypack instead of your porter duffel. If your duffel goes missing or gets delayed, you'll have a change of clothes. This happens more often than you'd think on flights to Lukla.
Clothing Materials Guide
| Material | Best For | Pros | Cons | Cost |
|---|---|---|---|---|
| Merino Wool | Base layers, socks | Odor-resistant, warm when wet, natural comfort | Expensive, can be delicate | $$$ |
| Synthetic (Polyester) | Base layers, insulation | Dries fast, durable, affordable | Retains odor faster | $ |
| Down (Duck/Goose) | Insulation jackets | Warmest for weight, very compressible | Useless when wet, expensive | $$$ |
| Synthetic Insulation | Insulation jackets | Works when wet, affordable | Heavier, less compressible | $$ |
| Fleece | Mid-layers | Breathable, dries fast, affordable | Not windproof, bulky | $ |
| Gore-Tex / eVent | Rain shells | Waterproof + breathable | Expensive, requires care | $$$ |
| Cotton | AVOID | Cheap | Absorbs moisture, cold when wet, dangerous at altitude | $ |
Footwear: Boots, Shoes, and Socks
Footwear is the single most important gear investment for trekking. Poor boots cause blisters, foot pain, ankle injuries, and can end your trek prematurely. Unlike jackets or pants, boots must fit your specific feet perfectly—this is why you should buy boots at home, not in Nepal.
Trekking Boots
What you need: Mid to high-cut trekking boots with ankle support
Critical features:
- Waterproof (Gore-Tex or similar membrane)
- Ankle support (mid or high cut)
- Stiff sole with good tread (Vibram or equivalent)
- Broken in before your trek (minimum 50-100 km of walking)
- Room for thick socks without tightness
- Toe box space (your toes shouldn't touch the front when walking downhill)
Boot categories for Nepal:
| Boot Type | Best For | Terrain | Altitude | Weight | Cost |
|---|---|---|---|---|---|
| Light hiking shoes | Poon Hill, low altitude | Easy trails | Below 3,000m | 500-700g | $80-150 |
| Mid-cut trekking boots | ABC, Langtang, lower EBC | Moderate trails | Up to 4,500m | 700-900g | $120-250 |
| High-cut trekking boots | EBC, Manaslu, Three Passes | Rocky, steep | Up to 5,500m | 900-1,200g | $180-350 |
| Mountaineering boots | Technical climbing only | Ice, snow | Above 5,500m | 1,200g+ | $300+ |
For standard Nepal treks (EBC, ABC, Annapurna Circuit, Manaslu): Mid to high-cut waterproof trekking boots are ideal. You don't need mountaineering boots unless you're adding technical peaks like Island Peak.
Critical Boot Fitting Advice
Never, ever start a multi-week Himalayan trek in brand-new boots. Your feet will blister catastrophically, and you'll be evacuating by day 3. Buy boots 2-3 months before your trek, break them in thoroughly with 50-100 km of walking with a loaded pack, and verify they don't cause hot spots or blisters.
Breaking in boots:
- Wear them around home for a week
- Short day hikes (5-10 km) for 2-3 weeks
- Longer hikes with your actual pack weight (15-25 km)
- Multi-day hike if possible
- Monitor for any pressure points or blisters—address immediately
Camp Shoes or Sandals
What you need: Lightweight shoes for around teahouses after trekking
After 6-8 hours in heavy boots, your feet need relief. Camp shoes also allow you to navigate teahouse bathrooms at night without putting boots on.
Options:
- Lightweight trail runners or sneakers (400-500g)
- Trekking sandals like Tevas or Chacos (300-400g)
- Crocs or similar clogs (200-300g, popular among trekkers)
- Lightweight down booties (for sleeping warmth at high altitude)
Recommendation: Bring one pair that can serve double duty. Crocs are popular because they're light, work in bathrooms, and can be worn with socks in cold weather. Sandals work but are cold at higher elevations.
Socks System
Your sock system is as important as your boots. Good socks prevent blisters, manage moisture, and provide warmth.
What you need:
- 4-5 pairs trekking socks (merino wool or synthetic blend)
- 2-3 pairs liner socks (thin synthetic or silk, worn under trekking socks)
- 1-2 pairs thick thermal socks (for sleeping at altitude)
Sock strategy:
- Double-sock system: Liner sock (thin) + trekking sock (thick) reduces friction and prevents blisters
- Rotation: Wear one pair per day, wash and dry (takes 1-2 days in dry weather)
- Sleeping socks: Keep one pair clean for sleeping only
Sock materials:
- Merino wool: Best overall—warm, moisture-wicking, odor-resistant
- Synthetic blends: Cheaper, dries faster, less odor resistance
- Cotton: Absolutely avoid—causes blisters and cold feet
Pro Tip
Bring a few safety pins to clip wet socks to the outside of your pack while trekking. They'll dry throughout the day in the sun and mountain breeze, ready to wear the next morning.
Gaiters
What they are: Waterproof fabric that extends from your boot to your shin/knee
When you need them:
- Trekking in snow or winter conditions
- Monsoon season (keeping legs dry)
- Dusty trails (keeping dirt out of boots)
- High passes where snow is likely
When you don't:
- Standard autumn or spring treks in dry conditions
Recommendation: Optional for most treks. Consider bringing lightweight gaiters if trekking October-March or if weather is unpredictable. Can be purchased in Kathmandu if needed.
Backpack and Bags
You'll need two bags: a small daypack you carry daily, and a larger duffel bag that porters carry.
Daypack (Daily Carry)
Capacity: 20-35 liters
What goes in your daypack:
- Water (2-3 liters)
- Snacks and lunch
- Camera and electronics
- Rain jacket
- Warm layer (fleece or down jacket)
- Sun protection (sunscreen, hat, sunglasses)
- First aid kit
- Toilet paper and hand sanitizer
- Headlamp
- Important documents (passport, permits)
Target weight: 6-8 kg when fully loaded
Essential features:
- Comfortable padded shoulder straps
- Hip belt (transfers weight to hips, essential for comfort)
- Chest strap (stability)
- External attachment points (for trekking poles, jacket)
- Hydration bladder compatible (optional but convenient)
- Rain cover included or available separately
- Easy-access pockets for snacks, phone, camera
Recommended capacity by trek:
- Short treks (Poon Hill, lower Langtang): 20-25L
- Standard treks (EBC, ABC, Annapurna Circuit): 25-30L
- Extended or winter treks: 30-35L
Daypack Reality
Your daypack is your constant companion. It should fit comfortably, not bounce around when you walk, and allow easy access to water and snacks without stopping. Try it on with 8 kg of weight before buying. Many trekkers make the mistake of buying too large a daypack and then overpacking it—stay in the 25-30L range.
Porter Duffel Bag
Capacity: 60-90 liters
What goes in your duffel:
- Sleeping bag
- Main clothing (except one change in your daypack)
- Toiletries
- Extra shoes
- Anything you don't need during the day
Weight limit: 20-25 kg maximum (includes porter's own gear, typically 5 kg)
Critical features:
- Durable material (porters throw these bags around)
- Waterproof or with waterproof cover
- Lockable zippers (basic security)
- Padded shoulder straps (you'll carry it to/from hotels)
- Compression straps (secure load)
Duffel vs backpack for porter bag:
- Duffel: Easier for porters to carry, more durable, cheaper, recommended
- Backpack: More organized, easier for you to carry when needed, slightly heavier
Recommendation: Bring a duffel bag. They're what porters prefer and what's standard in Nepal. You can buy excellent quality North Face or knockoff duffels in Kathmandu for $20-50.
Bag Organization
Stuff sacks and dry bags:
- 2-3 waterproof stuff sacks (for organizing clothes by type)
- 1-2 dry bags (for electronics, documents, anything that must stay dry)
- 1 compression sack (for sleeping bag)
- Ziplock bags (multiple sizes, for toiletries, snacks, waste)
Color-coding system: Many experienced trekkers use different colored stuff sacks:
- Red: warm layers (fleece, down jacket)
- Blue: base layers and underwear
- Green: sleeping clothes
- Yellow: electronics and valuables
This allows you to find items quickly without unpacking your entire duffel each night.
Sleeping System
While teahouses provide blankets, they're often insufficient at high altitude. A proper sleeping system ensures warm, restful nights—critical for acclimatization and daily performance.
Sleeping Bag
Temperature rating needed:
| Trek Maximum Altitude | Season | Recommended Rating | Notes |
|---|---|---|---|
| Below 3,500m | Spring/Autumn | +5°C to -5°C | Light 3-season bag sufficient |
| 3,500-4,500m | Spring/Autumn | -5°C to -20°C (23°F to -4°F) comfort rating for spring/autumn, -15°C to -20°C for winter | Standard 4-season bag |
| Above 4,500m | Spring/Autumn | -15°C to -20°C | Expedition-weight bag |
| Any altitude | Winter (Dec-Feb) | -20°C to -30°C | Expedition or down-filled |
Comfort vs limit ratings:
- Comfort rating: Temperature at which an average person sleeps comfortably
- Limit rating: Temperature at which you'll survive but be cold
- Always choose bags based on comfort rating, not limit rating
Down vs synthetic sleeping bags:
| Feature | Down | Synthetic |
|---|---|---|
| Warmth-to-weight | Excellent | Good |
| Compressibility | Excellent | Fair |
| Durability | Excellent (15+ years) | Good (5-10 years) |
| Wet performance | Poor | Good |
| Drying time | Slow (1-2 days) | Fast (hours) |
| Cost | High ($250-500) | Low ($80-200) |
Recommendation: For Nepal teahouse treks, down is superior because you sleep indoors nightly and can keep it dry. The weight and space savings matter when packing. Synthetic makes sense for monsoon trekking or camping expeditions.
Sleeping Bag Buy vs Rent Decision
Sleeping bags are among the most rented items in Kathmandu ($3-5 per day, $40-70 for two weeks). If you don't trek frequently, renting makes financial sense. However, rental bags are well-used, may not be cleaned thoroughly between users, and you can't verify the temperature rating matches what you need. If you plan multiple treks or value hygiene, buying your own is worth it.
Sleeping Bag Liner
What it is: A lightweight fabric inner layer for your sleeping bag
Benefits:
- Adds 5-10°C warmth to your sleeping bag
- Keeps rental sleeping bags off your skin (hygiene)
- Easy to wash (sleeping bags are hard to clean)
- Can be used alone at lower altitudes
Types:
- Silk liners: Lightest, most compact, adds ~5°C warmth
- Fleece liners: Warmer, adds ~10°C, but bulkier
- Cotton liners: Cheapest, heaviest, avoid for trekking
Recommendation: Bring a silk or lightweight synthetic liner for any trek. It's especially valuable if renting a sleeping bag in Nepal.
Sleeping Pad (Optional)
Standard situation: Teahouses provide mattresses (foam pads). They're thin and firm but adequate for most trekkers.
When to bring your own:
- You have back problems and need extra padding
- You're trekking in winter when teahouses may be cold
- You're a side sleeper who needs extra cushioning
- You're camping instead of staying in teahouses
Types:
- Inflatable: Comfortable, compact, can puncture (bring patch kit)
- Foam: Durable, cheaper, bulkier
- Self-inflating: Combination of both, good middle ground
Recommendation: Most trekkers don't need a sleeping pad for standard teahouse treks. If you want extra comfort, bring a lightweight inflatable (400-600g).
Pillow
Standard situation: Teahouses provide pillows (often flat and lumpy).
Options:
- Use your down jacket stuffed in a stuff sack (works surprisingly well, zero extra weight)
- Bring an inflatable camping pillow (100-200g, compresses tiny)
- Accept the teahouse pillow
Recommendation: The down-jacket-in-stuff-sack method works for most trekkers and adds zero weight. If you're a light sleeper, bring a small inflatable pillow.
Trekking Poles and Accessories
Trekking Poles
Why they matter: Trekking poles reduce knee strain by 25-30% on descents, improve balance on uneven terrain, help with river crossings, and can serve as tent poles in emergencies. They're especially valuable on the long descents from high camps.
What you need:
- Adjustable poles (to change height for uphill vs downhill)
- Comfortable grips (cork or foam, avoid plastic)
- Wrist straps (reduce hand fatigue)
- Interchangeable baskets (small for hard trails, large for snow)
- Carbide or rubber tips
Pole types:
- Telescoping (twist-lock): Traditional, reliable, easier to adjust on the go
- Telescoping (lever-lock): Fast adjustment, more durable, heavier
- Folding (Z-pole): Ultra-compact, lightweight, fixed length (less versatile)
Single vs double poles:
- Single pole: Useful for balance, minimal knee relief
- Double poles: Industry standard, maximum knee protection, recommended
Do you need them? For high-altitude Nepal treks, the answer is yes, strongly recommended. The descents from Gorak Shep, Thorong La, or Larkya La are brutal on knees. Poles make a massive difference.
Cost savings: Trekking poles can be rented in Kathmandu for $1-2 per day ($15-30 for two weeks). If you don't plan to trek regularly, renting is fine. Quality varies, but basic poles work adequately.
Pro Tip
On long descents, set your poles slightly longer than on flat terrain. Your arms naturally extend more when descending, and longer poles reduce back strain. Conversely, shorten them for steep uphill sections.
Water Bottles and Hydration
What you need: 2-3 liters of water carrying capacity
Options:
| Type | Pros | Cons | Best For |
|---|---|---|---|
| Nalgene bottles (2x 1L) | Durable, works at freezing temps, can hold hot water | Heavy, takes pack space | Cold weather, nighttime warmth |
| Hydration bladder (2-3L) | Hands-free drinking, efficient | Freezes in cold, hard to clean, can leak | Moderate temps only |
| Collapsible bottles | Lightweight, compact when empty | Less durable | Weight-conscious trekkers |
| Insulated bottles | Keeps water from freezing | Heavy, expensive | Extreme cold |
Recommendation: Bring one 1L Nalgene bottle and one hydration bladder (2L). Use the bladder during moderate weather for convenient hydration. Switch to Nalgene bottles at high altitude where freezing is a concern. The Nalgene can also be filled with hot water at night and used as a bed warmer.
Water purification:
- Water purification tablets (Aquatabs, chlorine dioxide)
- UV purifier (SteriPEN)
- Water filter (Sawyer Squeeze or similar)
- Boiled water from teahouses (safest, available everywhere, paid)
Most trekkers use a combination: buy boiled water from teahouses when convenient ($1-3 per liter at altitude), and purify stream water when needed with tablets or filters.
Headlamp
Essential: Absolutely critical gear. You'll need it for:
- Early morning starts (4-5 AM summit days)
- Nighttime bathroom trips (often outside)
- Power outages in teahouses (common)
- Emergency situations
Required features:
- Bright main beam (minimum 200 lumens)
- Red light mode (preserves night vision, doesn't blind others)
- Long battery life (minimum 20 hours on low)
- Water-resistant (IPX4 minimum)
- Comfortable headband
Batteries:
- Bring spare batteries (lithium batteries perform better in cold)
- LED bulbs last effectively forever (don't need spare bulbs)
Recommendation: A basic Petzl or Black Diamond headlamp ($25-60) is perfect. You don't need an ultra-bright climbing headlamp. Bring one full set of spare batteries.
Sunglasses
Critical at altitude: UV radiation increases 10-12% per 1,000m altitude gain. At EBC (5,364m), UV exposure is 50% higher than at sea level. Snow reflection doubles the intensity.
Required specifications:
- 100% UVA and UVB protection
- Category 3 or 4 lens darkness
- Wraparound design (side protection)
- Polarized lenses (reduce glare from snow, water)
Backup: Bring a second cheaper pair in case your primary glasses break or get lost. Trekking without eye protection at altitude causes snow blindness (photokeratitis)—extremely painful and potentially vision-threatening.
Dry Bags and Waterproofing
Essential waterproofing:
- 1-2 dry bags for electronics and documents (10-20L)
- Waterproof phone case or ziplock bag
- Pack rain cover (usually included with backpack)
- Trash compactor bags as pack liner (cheaper alternative to dry bags)
What must stay dry:
- Electronics (camera, phone, batteries)
- Important documents (passport, permits, insurance info)
- Sleeping bag (wet bag = miserable cold nights)
- One complete change of clothes
Electronics and Power
Essential Electronics
Smartphone:
- Navigation (offline maps via Maps.me or similar)
- Photos and videos
- Emergency communication (limited cell service exists)
- Entertainment during rest hours
Camera (optional): The smartphone vs camera debate is personal. Modern smartphones (iPhone 13+, flagship Android phones) take excellent photos. Bring a dedicated camera only if you're serious about photography.
See Photography Gear section for camera-specific recommendations.
Power Management
The altitude power reality:
- Below 3,000m: Electricity usually reliable, free or cheap charging ($0.50-1)
- 3,000-4,000m: Electricity available but limited hours, paid charging ($1-2 per device)
- Above 4,000m: Expensive charging ($2-5 per device), solar-dependent
- Above 5,000m: Very limited, expensive ($5-10), may be unavailable
Power bank (essential):
- Capacity: Minimum 20,000 mAh (enough for 4-5 full smartphone charges)
- Two devices: Consider 30,000 mAh if charging camera + phone
- Cold weather performance: Lithium batteries lose capacity in cold—keep warm
- Airlines: Maximum 27,000 mAh (100 Wh) allowed in carry-on
Charging strategy:
- Charge power bank fully before trek starts
- Charge devices from power bank nightly
- Recharge power bank at lower-altitude villages where charging is cheaper
- Keep power bank warm (inside sleeping bag) at high altitude
- Ration power above 4,500m
Charging cables and adapters:
- USB charging cables for all devices (bring backups)
- Multi-device charging hub (charge several devices from one outlet)
- Nepal adapter (Type C, D, and M plugs—bring a universal adapter)
- Solar charger (optional, marginal value in mountain shadows)
Solar Charger Reality Check
Solar chargers sound great in theory but have limited practical value in Nepal's mountain environments. Trails are often in valley shadows, weather is unpredictable, and you're trekking during prime sun hours (meaning your panels are in your pack). Most experienced trekkers skip solar chargers and rely on power banks + occasional teahouse charging.
Data and Connectivity
Cell service:
- Ncell and Nepal Telecom provide coverage on major trekking routes
- Service available in Namche Bazaar, Dingboche, some other villages
- Speeds are slow (2G/3G), unreliable
- SIM cards available in Kathmandu ($5-15 with data package)
WiFi at teahouses:
- Available at most teahouses along major routes
- Speeds: Very slow (email/messaging works, video doesn't)
- Cost: $3-10 per day depending on altitude
- Reliability: Frequent outages, weather-dependent
Recommendation: Buy a local SIM card for emergency communication. Don't rely on internet for daily updates—embrace the digital detox. Download offline maps and resources before the trek.
Navigation, Tools and Repair Essentials
Most teahouse trails in Nepal are well-marked and busy, but a few small tools turn minor mishaps into non-events. These are the easy-to-forget essentials that experienced trekkers never leave behind.
Navigation
What you need:
- Offline maps downloaded to your phone (Maps.me or a dedicated offline trekking app)
- Paper trekking map as backup (buy in Kathmandu's Thamel district for $3-8)
- Compass (lightweight, optional on busy routes, useful on high passes and in fog)
On major routes like Everest Base Camp and the Annapurna Circuit the trail is obvious and you will rarely need a map. But white-outs on the Three Passes, Larkya La, or Thorong La can erase the trail in minutes—a downloaded map and a basic compass are cheap insurance. Always download your route offline before leaving cell coverage, and book with a verified local guide if you are crossing technical passes for the first time.
Multitool and Knife
What you need:
- Small multitool or pocket knife (scissors, pliers, blade, screwdriver)
A compact multitool handles loose pole screws, cut tape, food prep, and gear fixes. Keep it in your checked duffel, not your carry-on, when flying to Kathmandu and on to Lukla.
Repair Kit
A teahouse trek is not the place for a broken zipper or a leaking sleeping pad. A tiny repair kit weighs under 100g and saves your trek:
- Duct tape (wrap a metre around a trekking pole instead of carrying the roll)
- Tenacious Tape or gear patches (down jacket, sleeping bag, pad punctures)
- Spare buckle and a few safety pins
- Needle and strong thread (pack straps, torn seams)
- Spare boot laces
Pro Tip
The most useful repair item is duct tape, and the lightest way to carry it is to wind a metre or two around the shaft of each trekking pole or your water bottle. You will use it for blister taping, gear repair, and patching torn dry bags far more often than you expect.
Sun and Lighting Backups
- Spare headlamp batteries (lithium last longer in cold)
- Fire source for emergencies (a small lighter and a few stormproof matches)
- A whistle (often built into daypack sternum straps) for signalling
Toiletries and Personal Care
The Minimalist Toiletry Kit
Remember: You're trekking in the mountains, not staying at a hotel. Minimal, lightweight, multipurpose items are the goal.
Essential toiletries:
- Toothbrush and toothpaste (decant into small container)
- Biodegradable soap (multipurpose: body, hair, laundry)
- Sunscreen SPF 50+ (face and lips—critical at altitude)
- Lip balm with SPF (UV protection, prevents chapping)
- Toilet paper (half a roll, compressed)
- Hand sanitizer (alcohol-based, 60%+ alcohol)
- Quick-dry travel towel (microfiber, small size)
- Wet wipes or baby wipes (face/body cleaning when showers unavailable)
- Moisturizer (altitude air is extremely dry)
Optional but useful:
- Deodorant (small travel size, though you'll smell like a trekker anyway)
- Shampoo (small amount—many skip this entirely)
- Razor (if you shave—many skip shaving during treks)
- Nail clippers
- Tweezers (for splinters, blisters)
- Dental floss
- Contact lens supplies (if applicable)
Women-Specific Toiletries
Menstrual products:
- Bring adequate supply from home (limited selection in Nepal)
- Options: Tampons, pads, menstrual cup (cup is waste-free, recommended)
- Disposal: Pack out used products (bring ziplock bags for waste)
- Consider menstrual suppression if timing is problematic (consult your doctor)
Feminine hygiene:
- Feminine wipes (limited washing facilities)
- Spare underwear
- Pee funnel (Shewee, GoGirl—useful at high altitude where squatting is difficult)
See Women-Specific Considerations for more details.
Shower and Hygiene Reality
Shower availability:
- Lukla to Namche (2,800-3,400m): Hot showers usually available ($3-5)
- Namche to Dingboche (3,400-4,400m): Hot showers available but expensive ($5-7)
- Dingboche to Gorak Shep (4,400-5,164m): Very limited, expensive ($7-10), often cold
- Above 5,000m: Essentially unavailable
Hygiene strategy:
- Shower every 2-3 days at lower elevations
- Use wet wipes for face/body cleaning when showers unavailable
- Hand sanitizer is your constant companion
- Embrace the reality that you'll be dirty—everyone is
Washing clothes:
- Teahouses have washing facilities (often a bucket of cold water)
- Some offer laundry service (paid, slow drying at altitude)
- Quick-dry technical clothing dries overnight in dry seasons
- Avoid washing at high altitude (clothes won't dry, you'll need them)
Pro Tip
Many trekkers bring too many toiletries. You can function perfectly well with: soap, toothbrush/paste, sunscreen, lip balm, hand sanitizer, toilet paper, and wet wipes. Everything else is optional comfort. Decant liquids into small 50ml bottles or buy travel sizes.
Specific Product Recommendations
Sunscreen:
- SPF 50+ broad spectrum
- Small tube or bottle (100ml maximum)
- Apply face, neck, ears, hands daily
- Reapply every 2-3 hours
- Note: Very expensive to buy at altitude ($10-15 for small tubes)
Lip balm:
- SPF 30+ essential
- Bring 2-3 sticks (you'll use them constantly)
- Chapped lips at altitude are miserable
- Avoid flavored balms (you'll lick them off)
First Aid and Medications
A comprehensive first aid kit addresses common trekking ailments and minor injuries. Serious emergencies require evacuation, but proper medications handle 90% of issues you'll encounter.
Personal Medications
Essential prescription medications:
- Acetazolamide (Diamox) for altitude sickness prevention/treatment
- Dexamethasone for emergency HACE treatment (your guide may carry this)
- Nifedipine for HAPE prevention (if you have HAPE history)
- Any regular prescription medications you take (bring full supply + extra)
Over-the-counter essentials:
- Ibuprofen (400-600mg) for headache, muscle pain, inflammation
- Paracetamol/Acetaminophen for pain and fever
- Loperamide (Imodium) for diarrhea
- Oral rehydration salts (ORS) for diarrhea recovery
- Antihistamine (Benadryl, Claritin) for allergies
- Antacid tablets (Tums, Rolaids) for indigestion
Antibiotics:
- Ciprofloxacin or Azithromycin for bacterial diarrhea, respiratory infection
- Requires prescription—discuss with your doctor before trip
- Know when to use them vs when to descend/evacuate
Diamox (Acetazolamide) Essential Information
Diamox is the primary preventive medication for altitude sickness. Standard dosing: 125-250mg twice daily, starting 1-2 days before high altitude exposure. Common side effects: Tingling fingers/toes, frequent urination, altered taste (especially carbonated drinks). These are expected and not dangerous. Contraindications: Sulfa allergy, severe kidney disease. Obtain prescription from your doctor before travel. See Altitude Sickness Guide for complete information.
First Aid Supplies
Blister care (critical):
- Moleskin or blister bandages (Compeed)
- Leukotape (preventive taping for hot spots)
- Needle for draining blisters (sterilize with lighter)
- Antibiotic ointment (Neosporin)
Wound care:
- Adhesive bandages (Band-Aids) various sizes
- Sterile gauze pads (4x4 inch)
- Medical tape
- Antiseptic wipes or solution (alcohol, iodine)
- Antibiotic ointment
Other medical supplies:
- Elastic bandage (ACE wrap) for sprains
- Safety pins (gear repair, emergency bandage securing)
- Scissors (small, TSA-compliant for carry-on)
- Tweezers (splinters, ticks)
- Thermometer (monitor fever)
- Pulse oximeter (optional—monitors blood oxygen, useful at altitude)
Altitude-Specific Medications
For detailed altitude medication protocols, see the comprehensive Altitude Sickness Guide.
Basic medication summary:
| Medication | Use | Dosage | When to Take |
|---|---|---|---|
| Acetazolamide (Diamox) | AMS prevention | 125-250mg 2x/day | Start 1-2 days before altitude |
| Ibuprofen | Headache relief | 400-600mg as needed | For mild AMS headache |
| Dexamethasone | HACE emergency | 8mg, then 4mg q6h | Only for ataxia/confusion + descent |
| Nifedipine | HAPE treatment | 30mg ER q12h | Only for breathlessness at rest + descent |
Critical rule: Medications are supplements to descent, never replacements. If you have HACE or HAPE symptoms, you MUST descend immediately while taking medications.
Common Trekking Ailments and Treatments
Blisters:
- Prevention: Well-fitted boots, liner socks, address hot spots immediately with tape
- Treatment: Drain with sterilized needle, apply antibiotic ointment, cover with blister bandage
- Never ignore hot spots—they become blisters within hours
Diarrhea:
- Prevention: Hand washing, avoid raw vegetables, drink purified water only
- Treatment: Hydration (ORS), Imodium for temporary relief, ciprofloxacin if severe/bloody
- When to worry: Blood in stool, high fever, severe dehydration—consider evacuation
Upper respiratory infection (Khumbu cough):
- Common at altitude (dry air, dusty trails, weakened immune system)
- Treatment: Hydration, throat lozenges, rest, ibuprofen
- Prevention: Buff over mouth/nose to filter dust, adequate hydration
- When to worry: If it becomes bronchitis or pneumonia (HAPE risk)
Muscle soreness and joint pain:
- Extremely common (you're hiking 6-8 hours daily)
- Treatment: Ibuprofen, rest, stretching, massage
- Prevention: Proper stretching, trekking pole use, slow pace
Sunburn and chapped skin:
- Very common (UV intensity + reflection from snow)
- Treatment: Aloe gel, moisturizer, covering affected area
- Prevention: Sunscreen application 3-4x daily, lip balm constantly, buff/neck gaiter
Altitude-Specific Gear (Above 5,000m)
If your trek reaches extreme altitude (above 5,000m)—such as Everest Base Camp, Three Passes, Annapurna Circuit's Thorong La, or Manaslu's Larkya La—you'll need additional gear beyond the standard packing list.
When These Items Become Essential
3,000-4,000m: Standard gear sufficient 4,000-5,000m: Some altitude additions beneficial Above 5,000m: Altitude-specific gear essential Above 5,500m: All extreme-altitude gear required
Additional Clothing for Extreme Altitude
Insulated pants:
- For summit days, high passes, or extended time above 5,000m
- Down pants or synthetic insulated pants
- Worn over trekking pants and base layers
- Especially important for winter treks
Expedition-weight down jacket:
- If your standard down jacket is 400-600 fill, consider upgrading to 800+ fill
- Or bring a down vest to layer with your existing jacket
- For temperatures below -15°C
Warmer gloves:
- Your standard insulated gloves may not be warm enough
- Consider down mittens for extreme cold
- Or bring mitten shells to wear over gloves
Face protection:
- Balaclava or face mask (blocks wind on exposed passes)
- Ski goggles (if crossing passes in snow or high wind)
- Better sun protection for face
Specialized Equipment
Microspikes or crampons:
- Required if trekking in winter or early spring
- High passes may have ice (Thorong La, Cho La, Kongma La, Renjo La)
- Microspikes (lighter, easier) for trails
- Crampons only if technical ice climbing
Ice axe:
- Generally not needed for standard trekking routes
- Required only for technical passes in snow conditions or mountaineering ascents
- Your guide will advise if needed
Oxygen (emergency):
- Some agencies provide supplemental oxygen for emergencies
- Portable oxygen canisters available in Kathmandu
- Not typically needed for trekking (vs climbing Everest)
- Useful for emergency HAPE treatment while descending
Altitude Technology
Pulse oximeter:
- Measures blood oxygen saturation (SpO2) and heart rate
- Useful for tracking acclimatization trends
- Not a replacement for symptom assessment
- Normal at altitude: 75-90% SpO2 (vs 95-100% at sea level)
- Cost: $20-50, widely available
What it tells you:
- Your baseline acclimatization level
- Whether you're improving or worsening
- Comparative data (today vs yesterday)
What it doesn't tell you:
- Whether you have AMS (symptoms matter more than numbers)
- Whether you should ascend or descend (judgment call)
Recommendation: Optional but useful tool. Many trekkers and guides carry them.
Pro Tip
Take pulse oximeter readings at the same time each day (morning before trekking, evening before sleep) to track meaningful trends. A single reading means little—it's the pattern over days that reveals acclimatization status.
Season-Specific Packing Variations
Nepal has four distinct trekking seasons, each requiring different gear emphasis. Use the base packing list and add/modify based on your specific season.
Spring Season (March, April, May)
Weather characteristics:
- Temperatures warming throughout season
- March: Still cold at altitude (-10°C to 10°C)
- May: Warmer, pre-monsoon humidity increasing
- Rhododendrons blooming (spectacular)
- Afternoon clouds increasingly common
- Occasional rain showers
Packing modifications:
- Standard layering system works perfectly
- Bring rain jacket for afternoon showers
- Slightly lighter sleeping bag possible (but don't underestimate March cold)
- Sunscreen critical (strong sun, reflective snow melting)
What you can leave:
- Heavy-weight insulated pants (unless going above 5,500m)
- Expedition-weight down (unless early March)
What to emphasize:
- Sun protection (glasses, hat, sunscreen)
- Rain protection (jacket, pack cover)
- Allergy medication (if pollen affects you)
Autumn Season (September, October, November)
Weather characteristics:
- September: Tail end of monsoon, trails drying
- October: Perfect conditions, stable weather, best visibility
- November: Cooling rapidly, some snow possible at high passes
- Coldest nighttime temperatures
- Dry, stable weather (best trekking season)
Packing modifications:
- Standard layering system ideal
- Warmer sleeping bag than spring (especially November)
- Focus on cold-weather gear for November treks
- Minimal rain protection needed (October especially dry)
What you can leave:
- Heavy rain gear (light rain jacket sufficient)
- Monsoon-specific items
What to emphasize:
- Warm sleeping bag (-15°C to -20°C rating for November)
- Cold-weather clothing (November mornings brutally cold)
- Camera gear (visibility is spectacular)
Seasonal note: October is peak season. Expect crowds on popular routes like EBC and Annapurna Circuit. Book accommodations in advance or choose less-trafficked routes like Manaslu.
Winter Season (December, January, February)
Weather characteristics:
- Extremely cold temperatures (-20°C to -30°C at high altitude)
- Snow on high passes (some may close)
- Shorter days (limited trekking hours)
- Crystal clear visibility
- Some teahouses closed at higher elevations
- Far fewer trekkers
Packing modifications—ADD these items:
- Expedition-weight sleeping bag (-25°C to -30°C rating)
- Insulated pants (down or synthetic)
- Heavier down jacket (800+ fill power)
- Down mittens (in addition to gloves)
- Balaclava or face mask
- Warmer base layers (heavyweight merino)
- Microspikes or crampons (for icy trails)
- Ski goggles (for wind and snow protection)
- Extra warm socks
- Hand and foot warmers (chemical warmers)
Routes to avoid in winter:
- High passes often close: Thorong La, Cho La, Kongma La, Renjo La
- Annapurna Circuit challenging or impossible
- Three Passes extremely difficult
Routes suitable for winter:
- Everest Base Camp (doable with proper gear)
- Annapurna Base Camp (lower altitude)
- Langtang Valley (with caution)
- Poon Hill (excellent winter trek)
Winter Trekking Requires Experience
Winter trekking in Nepal is serious mountaineering. Temperatures are life-threatening, rescue is difficult, and many support services are unavailable. Only attempt winter high-altitude treks if you're experienced with extreme cold and have appropriate gear. First-time trekkers should stick to spring or autumn.
Monsoon Season (June, July, August)
Weather characteristics:
- Heavy rain daily (especially afternoons)
- Leeches at lower elevations
- Landslide risk
- Clouds obscure mountain views
- Trails muddy and slippery
- Flights frequently cancelled
- Few trekkers
Why most avoid monsoon:
- Poor visibility (you won't see the mountains)
- Dangerous trail conditions (landslides, flooding)
- Uncomfortable (wet, humid, leeches)
- Unreliable transportation
If you must trek during monsoon:
Packing modifications—ADD:
- High-quality waterproof rain jacket and pants
- Waterproof pack cover (essential)
- Dry bags for everything (clothes, sleeping bag, electronics)
- Extra ziplock bags
- Gaiters (keep legs/feet dry, prevent leech access)
- Quick-dry clothing exclusively
- Extra socks (feet will be wet)
- Waterproof boots or gaiters
- Leech socks or leech-repellent
- Synthetic sleeping bag (down useless when wet)
Routes marginally suitable for monsoon:
- Rain shadow areas: Upper Mustang, Dolpo (these get less rain)
- Lower altitude treks: Poon Hill
Routes to absolutely avoid:
- High passes (extremely dangerous in wet conditions)
- Areas prone to landslides
- Remote areas (rescue very difficult)
Recommendation: Unless you have a very specific reason (research, work, unique timing), avoid monsoon trekking. The experience is dramatically inferior to spring/autumn, and risks are significantly higher.
Weight Optimization Strategies
Carrying less weight makes trekking more enjoyable and reduces injury risk. Even with porter support, your daypack matters—6 kg feels very different from 10 kg over eight hours of daily trekking.
Target Weights
Daypack (what you carry daily):
- Optimal: 5-6 kg
- Acceptable: 6-8 kg
- Too heavy: Above 8 kg
Porter duffel (what porters carry):
- Maximum: 20 kg (15 kg your gear + 5 kg porter's own gear)
- Comfortable: 15-18 kg total
- Ideal: 12-15 kg (allows porter flexibility)
Lightweight Packing Principles
1. Multi-use items are your friends
Every item should serve multiple purposes:
- Buff: Sun protection, warmth, dust filter, headband
- Down jacket: Warmth while trekking, warmth at camp, pillow when stuffed
- Trekking pants: Trekking, sleeping, teahouse wear
- Phone: Camera, navigation, communication, entertainment, flashlight
2. Share gear with your trekking partner
If trekking with a companion:
- Share: First aid kit, toiletries (soap, sunscreen), repair kit, charging cables
- Don't share: Clothing, sleeping bag, critical safety items
Couples trekking together can save 2-3 kg by eliminating duplicate items.
3. Decant and repackage
- Transfer liquids to small bottles (30-50ml)
- Remove excess packaging
- Count out exact pills needed (plus 25% extra)
- Repackage into ziplock bags
4. Digital minimalism
- One device (phone) instead of phone + tablet + e-reader
- Download content before trek (books, movies, music, maps)
- Share charging cables with trekking partners
5. Embrace rental and purchase in Nepal
Items easily rented or bought in Kathmandu:
- Sleeping bag (rent)
- Down jacket (buy cheaply)
- Trekking poles (rent)
- Duffel bag (buy)
This saves carrying bulky items on international flights.
Specific Weight-Saving Swaps
| Heavy Item | Lightweight Alternative | Weight Saved |
|---|---|---|
| 2 pairs trekking pants | 1 pair + quick wash | 400g |
| Multiple books | E-reader or phone | 500-1,000g |
| Full toiletries | Decanted mini versions | 300-500g |
| Cotton towel | Microfiber travel towel | 400-600g |
| Heavy camera + lenses | Smartphone only | 1,000-2,000g |
| Multiple charging cables | One multi-cable | 100-200g |
| 4+ base layer sets | 2 sets, wash more often | 500g |
| Regular water bottles | Collapsible bottles | 200-300g |
Total potential savings: 3-6 kg
Pro Tip
The "Rule of Thirds" for weight distribution: Your pack should carry 1/3 weight in bottom (heavy items like water), 1/3 in middle against your back (dense items like clothes), and 1/3 in top and outside (light, frequently accessed items). This keeps the weight centered and comfortable.
What NOT to Cut
Never sacrifice these items for weight:
- Proper waterproof layers (rain jacket, rain pants)
- Adequate warm layers (down jacket, sleeping bag)
- First aid and medications
- Water purification
- Headlamp with spare batteries
- Sun protection
Saving 500g isn't worth hypothermia, dehydration, or emergency evacuation.
Buying vs Renting in Nepal
One of the smartest pre-trek decisions is understanding what to bring from home versus what to obtain in Nepal. Kathmandu and Pokhara offer extensive trekking gear at prices 40-70% lower than Western countries.
What to Buy in Nepal
Best purchases in Kathmandu (Thamel district):
| Item | Kathmandu Price | Western Price | Quality | Recommendation |
|---|---|---|---|---|
| Down jacket | $30-80 | $150-400 | Good to excellent | Strongly recommended |
| Sleeping bag | $60-150 | $200-500 | Good quality | Consider buying |
| Base layers | $10-25 | $40-80 | Good quality | Good purchase |
| Trekking pants | $15-35 | $60-120 | Decent | Worth buying |
| Duffel bag | $20-50 | $60-150 | Excellent durability | Definitely buy |
| Trekking poles | $15-40 | $80-200 | Basic to good | Rental better |
| Gloves/hat | $5-20 | $20-60 | Decent | Good purchase |
| Buff/neck gaiter | $3-8 | $15-30 | Good | Definitely buy |
Where to shop in Kathmandu:
- Thamel district (main tourist area, hundreds of shops)
- Shona's Alpine (high-quality gear, fair prices)
- North Face stores (official and "unofficial"—the copies are surprisingly good)
- Local markets for basic items
Shopping strategy:
- Arrive 2-3 days early in Kathmandu
- Make a list of what you need
- Visit multiple shops and compare (bargaining expected)
- Try everything on (sizing often runs small)
- Check zippers, seams, stitching quality
- Buy from established shops with good reviews
The North Face Copy Debate
Kathmandu is famous for North Face copies. These aren't exact replicas—they're locally made items with North Face branding. Quality varies enormously from excellent to terrible. If buying copies: check seams carefully, verify zippers work smoothly, ensure down filling is adequate, and buy from recommended shops. Many experienced trekkers use copy gear successfully for years.
What to Rent in Nepal
Best rental items:
| Item | Daily Rental Cost | 2-Week Cost | Buy New Cost | Recommendation |
|---|---|---|---|---|
| Sleeping bag | $3-5 | $40-70 | $200-500 | Rent if occasional trekker |
| Down jacket | $2-4 | $30-60 | $150-400 | Buy instead (cheap in Nepal) |
| Trekking poles | $1-2 | $15-30 | $80-200 | Rent |
| Duffel bag | $2-3 | $25-40 | $60-150 | Buy instead (cheap) |
| Crampon/microspikes | $3-5 | $40-70 | $80-150 | Rent (if needed) |
Rental considerations:
Pros:
- Save money on expensive gear you'll use once
- Save luggage space on international flights
- Don't worry about gear storage after trek
- Convenient pickup/return in Kathmandu
Cons:
- Unknown cleanliness (especially sleeping bags)
- Can't verify temperature ratings accurately
- Well-used gear may have hidden issues
- Must return to same city (limits itinerary flexibility)
Rental procedure:
- Visit rental shop in Kathmandu (many in Thamel)
- Provide passport copy and deposit (or credit card)
- Select gear, try it on, verify condition
- Sign rental agreement (daily rate, return deadline, damage policy)
- Return gear after trek, get deposit back
What You Must Bring From Home
Never buy these items in Nepal:
Trekking boots:
- Fit is absolutely critical and individual
- Breaking in new boots requires weeks
- Sizing often unreliable in Nepal
- Your feet's comfort determines trek success
Prescription medications:
- Diamox, personal prescriptions
- Pharmacy availability unreliable
- Medication authenticity concerns
Technical base layers (if you're particular):
- Sizes often too small for Western bodies
- Quality highly variable
Socks:
- Good socks are trekking essentials
- Quality in Nepal varies
Electronics:
- Phone, camera, batteries, power banks
- Reliability and warranty concerns
Prescription glasses/sunglasses:
- If you need specific prescriptions
- Quality sunglasses are cheaper in West
Budget Comparison: Buy at Home vs Nepal
Scenario: Complete gear for EBC trek
| Strategy | Total Cost | Notes |
|---|---|---|
| Buy everything at home (Western prices) | $800-1,500 | High quality, perfect fit, keep after trek |
| Buy essentials at home, rest in Nepal | $400-800 | Best balance of quality and value |
| Buy basics at home, rent major items | $300-600 | Minimal investment, good for one-time trekkers |
| Buy everything in Nepal | $200-500 | Cheapest, quality varies, fit can be problematic |
Recommendation: Buy boots, medications, and technical items at home. Buy down jacket, sleeping bag, duffel, and accessories in Nepal. Rent trekking poles and specialized items (crampons, etc.). This optimizes quality, cost, and convenience.
Budget Gear Recommendations
You don't need to spend $2,000 on gear to trek safely in Nepal. Here are three budget tiers with specific recommendations.
Budget Tier 1: Minimal Investment ($300-500)
Best for: One-time trekkers, lower-altitude routes (ABC, Poon Hill, Langtang)
Strategy: Buy essentials at home, purchase and rent everything else in Nepal
What to buy before departure:
- Trekking boots: $120-180 (essential to fit properly)
- Good socks (4 pairs): $40-60
- Base layers (2 sets): $50-80
- Rain jacket (decent quality): $60-100
- Basic first aid and medications: $30-50
What to buy in Kathmandu:
- Down jacket: $40-60
- Trekking pants: $20-30
- Fleece layer: $20-30
- Hat, gloves, buff: $15-25
- Duffel bag: $20-30
- Sunglasses: $10-20
What to rent in Kathmandu:
- Sleeping bag: $40-60 (2 weeks)
- Trekking poles: $15-25 (2 weeks)
Total: $380-550
Budget Tier 2: Quality Balance ($600-1,000)
Best for: Serious trekkers planning multiple trips, high-altitude routes (EBC, Manaslu)
Strategy: Invest in key items that affect safety and comfort, economize on the rest
What to buy before departure:
- Quality trekking boots: $180-280
- Good socks (5 pairs): $60-80
- Quality base layers (3 sets): $100-150
- Good rain jacket (Gore-Tex): $150-250
- Daypack (quality brand): $80-120
- Sleeping bag (own, not rent): $180-280
- First aid and medications: $50-80
- Headlamp (quality): $40-60
What to buy in Kathmandu:
- Down jacket (better quality): $60-100
- Trekking pants: $25-40
- Fleece layer: $30-50
- Down sleeping bag liner: $20-30
- Duffel bag: $30-50
- Accessories: $30-50
Total: $685-1,090
Budget Tier 3: Premium Gear ($1,200-2,000+)
Best for: Frequent trekkers, technical routes, winter trekking, gear enthusiasts
Strategy: Buy once, buy quality, use for years
Premium investments:
- Top-tier boots (La Sportiva, Scarpa, Salomon): $250-400
- Premium socks (Darn Tough, Smartwool): $100-150 (6-8 pairs)
- Merino base layers (Icebreaker, Smartwool): $200-350 (3-4 sets)
- Arc'teryx/Patagonia rain jacket: $300-500
- Quality daypack (Osprey, Gregory): $120-200
- Premium sleeping bag (Western Mountaineering, Feathered Friends): $400-600
- Expedition down jacket: $300-500
- Quality trekking poles (Black Diamond, Leki): $120-200
- Technical trekking pants: $100-150
- Premium fleece: $100-180
- High-end headlamp: $60-100
- Comprehensive first aid: $80-120
Total: $1,230-2,050+
When premium makes sense:
- You trek frequently (cost per use drops dramatically)
- You value comfort and performance highly
- You need gear for extreme conditions (winter, technical routes)
- You want gear that lasts 10+ years
Pro Tip
The "cost per use" calculation: A $400 sleeping bag used on 10 treks costs $40 per trek. A $60 rental for each of those 10 treks costs $600 total. If you plan 3+ high-altitude treks in your life, buying quality gear saves money long-term.
Where to Save vs Where to Splurge
Splurge on (affects safety/comfort significantly):
- Boots (blisters end treks)
- Sleeping bag (cold nights wreck acclimatization)
- Rain jacket (hypothermia risk if inadequate)
- Base layers (comfort and temperature regulation)
- Socks (blister prevention)
Save on (less critical performance differences):
- Trekking pants (mid-range performs like premium)
- Duffel bag (durability matters more than brand)
- Daypack (mid-range works fine for supported treks)
- Accessories (hat, gloves, buff)
- Camp shoes
Women-Specific Considerations
Women face unique challenges and considerations when packing for Nepal treks. This section addresses practical concerns often overlooked in generic packing guides.
Clothing Fit and Sizing
The Nepal sizing challenge:
- Most gear in Kathmandu is sized for smaller Asian frames
- Women with Western proportions often find:
- Jackets too short in torso
- Pants too short in inseam
- Shoulders too narrow
- Hip room inadequate
Solution:
- Buy fitted items (boots, base layers, pants) at home where you can ensure proper fit
- Purchase only non-fitted items (down jacket as outer layer, duffel bag) in Nepal
- Try everything on before purchasing in Nepal
- Don't assume "medium" means the same size across brands
Menstrual Management
Planning around your cycle:
- Consider timing your trek to avoid menstruation during difficult sections
- Discuss menstrual suppression with your doctor (birth control pills can be used to skip periods)
- Plan for the reality that high altitude and physical stress can affect cycle timing
What to bring:
- Full supply from home (limited availability in Nepal, especially remote areas)
- Tampons: Bring full supply (Kathmandu has limited selection, expensive)
- Pads: Available in Kathmandu but bring preferred brands
- Menstrual cup: Excellent zero-waste option, requires practice before trek
- Pain medication: Ibuprofen for cramps
- Ziplock bags: For used product disposal (pack-it-out ethic)
Hygiene management:
- Teahouse bathrooms often lack bins—pack out used products
- Hand washing facilities limited—hand sanitizer essential
- Privacy varies—buff or bandana useful for discretion when changing products
- Bring wet wipes for cleaning when showers unavailable
Urination Logistics
The squat reality:
- Most trail toilets are squat-style
- Outdoor urination necessary on many trail sections
- High altitude makes squatting difficult (altitude, bulk clothing, terrain)
Solutions:
- Female urination device (FUD): Shewee, GoGirl, or similar
- Practice at home before trek (seriously—there's a learning curve)
- Useful scenarios: Cold mornings (don't have to fully undress), crowded trails (more discrete), high altitude (difficult to squat)
- Not essential but significantly improves convenience
Toilet paper management:
- Bring adequate supply (1-2 rolls compressed)
- Pack-it-out in ziplock bags (burning or burying damages environment)
- Wet wipes useful but must be packed out (don't leave in nature)
Sports Bra and Undergarments
Sports bras:
- Bring 2-3 high-quality sports bras
- Technical fabric (not cotton)
- Consider front-closure for ease when wearing many layers
- Quick-dry essential (washing facilities limited)
Underwear:
- 4-5 pairs technical underwear
- Merino wool or synthetic (never cotton)
- Quick-dry capability critical
- Consider period-proof underwear (Thinx, Knix) as backup during menstruation
Safety Considerations
Solo female trekkers:
- Nepal is generally safe for solo women trekkers
- Major routes (EBC, ABC, Annapurna) have constant traffic and support
- Teahouses often have other solo trekkers—you won't be alone
- Consider hiring a guide for peace of mind (not safety necessity on popular routes)
Practical safety tips:
- Join trekker groups informally at teahouses
- Share room with other female trekkers (teahouses accommodate this)
- Keep guide/agency contact numbers accessible
- Trust your instincts—if a situation feels wrong, leave
Cultural considerations:
- Dress modestly in villages (covered shoulders, pants/skirts below knee)
- Trekking clothing (pants, layers) is acceptable on trails
- Remove shoes when entering temples or homes
- Ask before photographing local women
Pregnancy and Trekking
General guidance:
- Consult your doctor before any high-altitude trek while pregnant
- Most doctors advise against high altitude (above 3,000m) during pregnancy
- Risk factors: Altitude stress, limited medical care, strenuous activity
- Consider lower-altitude treks or postponing until after pregnancy
Recommended Women-Specific Brands
Best brands for women's fit:
- Outdoor Research: Excellent fit for Western proportions
- Arc'teryx: Premium quality, good women's specific designs
- Patagonia: Reliable women's sizing
- Smartwool/Icebreaker: Excellent base layers for women
- Prana: Great trekking pants for women
Photography Gear
For many trekkers, capturing Nepal's stunning landscapes is a primary goal. But photography gear adds significant weight and requires special care at altitude.
The Smartphone vs Camera Decision
Modern smartphones (iPhone 13+, flagship Android) can:
- Capture excellent photos in good light
- Shoot 4K video
- Function in cold weather (with battery management)
- Serve multiple purposes (navigation, communication, camera)
- Weigh minimal (200g)
Smartphones cannot:
- Match dedicated camera image quality
- Zoom effectively (digital zoom is poor)
- Perform well in extreme low light
- Capture fast action (wildlife, running water)
- Survive multiple battery cycles per day without charging
Dedicated cameras provide:
- Superior image quality (larger sensors)
- Optical zoom capabilities
- Better low-light performance
- Manual controls for creative photography
- Longer battery life per charge
Dedicated cameras require:
- Significant weight (500-2,000g+ depending on system)
- Protection from cold, dust, moisture
- Extra batteries (cold drains them fast)
- Storage (SD cards)
- Care and attention
Camera Options for Trekking
Option 1: Smartphone only (200g)
- Best for: Casual photographers, weight-conscious trekkers
- Limitations: Zoom, low-light, image quality
- Cost: $0 (already own phone)
Option 2: Compact camera (200-400g)
- Examples: Sony RX100 series, Canon G7X
- Benefits: Better quality than phone, pocketable, simple
- Limitations: Limited zoom, expensive for quality
- Cost: $400-1,200
Option 3: Mirrorless camera + 1-2 lenses (600-1,500g)
- Examples: Sony A7 series, Fuji X-T series, Olympus OM-D
- Benefits: Excellent quality, compact system, interchangeable lenses
- Limitations: Weight, expense, requires photography knowledge
- Cost: $800-3,000+ (body + lenses)
Option 4: DSLR + lenses (1,000-2,500g)
- Examples: Canon 5D/6D, Nikon D750/D850
- Benefits: Ultimate image quality, robust build
- Limitations: Heavy, bulky, expensive
- Cost: $1,500-5,000+ (body + lenses)
Recommended Lens Setup for Nepal
If bringing one lens only:
- 24-70mm f/2.8 or f/4 (or equivalent)
- Covers landscapes and closer subjects
- Good all-around performer
If bringing two lenses:
- Wide-angle: 16-35mm f/4 (landscapes, mountain vistas)
- Telephoto: 70-200mm f/4 (distant peaks, wildlife, people)
Ultralight setup:
- One prime lens: 35mm f/1.8 or 50mm f/1.8
- Minimal weight, excellent image quality
- Forces compositional creativity
- Limitation: No zoom capability
Pro Tip
Many serious trekker-photographers use a "two-body" system: A flagship smartphone for snapshots, quick shots, and sharing, plus a mirrorless camera with one quality lens for serious photography. This balances convenience and quality.
Photography Accessories
Essential:
- Extra batteries (minimum 2 extra, cold drains batteries fast)
- SD cards (multiple smaller cards safer than one huge card)
- Lens cloth (dust is constant)
- Camera rain cover or waterproof bag
Useful:
- Small tripod or Gorillapod (sunrise/sunset, long exposures)
- Polarizing filter (reduces glare, enhances skies)
- Neutral density filter (for waterfalls, clouds)
- Lens hoods (reduce flare, protect lens)
Probably unnecessary:
- Large tripod (too heavy for most trekkers)
- Flash (natural light is spectacular)
- Multiple lens filters
- Drone (regulations complex, battery life poor at altitude, often restricted)
Protecting Camera Gear
Cold weather challenges:
- Batteries drain 2-3x faster in cold
- LCD screens become sluggish
- Condensation when moving between cold and warm
Solutions:
- Keep spare batteries warm (inside jacket pocket against body)
- Swap batteries frequently
- When entering warm teahouse, keep camera in bag for 15-20 min to avoid condensation
- Use camera only when needed (don't keep it out in -15°C continuously)
Dust protection:
- Trails are dusty, especially in dry season
- Keep camera in bag when not shooting
- Change lenses inside bag or in protected area
- Clean sensor before and after trek
Moisture protection:
- Use waterproof camera bag or dry bag
- Pack rain cover accessible in daypack
- Silica gel packets absorb moisture
Photography Strategy for Trekking
Best lighting:
- Dawn: 30 minutes before to 1 hour after sunrise (golden light)
- Dusk: 1 hour before to 30 minutes after sunset (golden light, alpenglow)
- Midday: Harsh light, least interesting (rest time, not photo time)
What to photograph:
- Mountain landscapes (obvious, but time it right for best light)
- Prayer flags and stupas (cultural elements)
- Local people (always ask permission first)
- Teahouse life (your daily reality)
- Wildlife if fortunate (yaks, musk deer, Himalayan tahr, birds)
- Your trekking experience (document the journey)
Composition tips for mountains:
- Include foreground elements (prayer flags, rocks, people) for scale and depth
- Photograph early/late for best light and fewer clouds
- Use polarizing filter to enhance sky and reduce haze
- Capture the journey, not just summits (teahouses, bridges, your feet on trail)
Charging Camera Batteries
Charging availability:
- Same as phone charging—decreases with altitude
- Some teahouses charge per device, others per hour
- Above 4,500m, charging expensive and unreliable
Strategy:
- Bring 3-4 batteries total
- Charge all batteries at lower villages (cheaper, more reliable)
- Ration shots at high altitude
- Turn off image review, reduce LCD brightness to save battery
Backup and Storage
Don't lose your photos:
- Use multiple smaller SD cards instead of one large card (if one fails, you don't lose everything)
- Back up photos to phone or tablet if you have one
- Back up to cloud when WiFi available (slow but secure)
- Consider bringing small portable hard drive for serious photographers
Storage needs:
- RAW photos: 25-50 MB each
- JPG photos: 5-15 MB each
- Video: Gigabytes per minute (4K drains storage fast)
- Plan for 500-2,000 photos over 2 weeks (10-100 GB depending on format)
What NOT to Bring
Learning what to leave at home is as important as knowing what to pack. These items are commonly over-packed but rarely used.
Clothing You Don't Need
Multiple trekking pants:
- One pair is sufficient
- You'll wear the same pants daily (designed for it)
- Laundry facilities exist
Cotton clothing of any kind:
- T-shirts, jeans, cotton socks, cotton underwear
- Cotton absorbs moisture, stays wet, makes you cold
- Dangerous at altitude
Fashion clothing:
- You're trekking, not attending dinner parties
- One set of casual clothes for Kathmandu is plenty
- Mountain Instagram photos don't require special outfits
Excessive underwear/socks:
- 4-5 pairs maximum needed
- You'll wash and reuse
- More just adds weight
Gear That Sounds Useful But Isn't
Full-size towel:
- Teahouses provide towels (usually)
- Microfiber travel towel sufficient
- You won't shower that often anyway
Pillow:
- Teahouses provide pillows
- Your down jacket stuffed in a stuff sack works perfectly
- An inflatable camp pillow weighs 100g if you really want one
Tent and camping gear:
- Nepal trekking is teahouse-based
- Carrying camping gear adds 5-10 kg for zero benefit
- Only relevant for very remote routes or climbing expeditions
Camp stove and cooking gear:
- Teahouses serve all meals
- No need to cook
- Exception: Ultra-remote routes without teahouses
Water filter AND purification tablets AND UV sterilizer:
- Pick one method (or two for backup)
- Three is redundant
Excessive electronics:
- Tablet + phone + e-reader + laptop = unnecessary
- Pick one or two maximum
- You'll be too tired to use multiple devices
Toiletries You Don't Need Much Of
Full-size bottles of anything:
- Decant into 50ml bottles
- You can refill if needed in Kathmandu
Excessive skincare/makeup:
- You'll be dirty and tired
- Basic sun protection and moisturizer sufficient
- Your skin will suffer at altitude regardless
Hair styling tools:
- No reliable electricity for hair dryers, curling irons, etc.
- Embrace the trekker aesthetic
Comfort Items That Add Weight
Books (physical):
- E-reader or phone sufficient
- Teahouses often have book exchanges
- You'll be too tired to read much
Journal and pen:
- Phone notes work fine
- If you want to journal physically, bring a small notebook
Luxury camp chair:
- Teahouses have seating
- Unnecessary weight
Excessive snacks from home:
- Teahouses provide snacks
- Trail villages sell energy bars, chocolate, etc.
- Bring a few favorite snacks, not weeks' worth
Safety Gear You Probably Don't Need
Bear spray:
- No dangerous wildlife on Nepal trekking routes
- Bears are not a threat
Weapons or self-defense items:
- Nepal is safe
- Carrying weapons likely illegal
Satellite phone:
- Your guide has one if needed
- Cell service exists on major routes
- Sat phones are expensive and heavy
Emergency shelter/bivy:
- Teahouses are never more than a day apart on major routes
- Emergency shelter unnecessary for standard treks
The Final Over-Packing Test
Before finalizing your pack:
- Lay out everything you plan to bring
- Remove 25% of clothing items
- Question every "just in case" item
- If you can't articulate exactly when/why you'll use something, leave it
- Remember: Porter weight limits are real—overpacking isn't an option
Respect Porter Weight Limits
Porters are limited to 20-25 kg total load (including their own gear of ~5 kg). Overpacking isn't just inconvenient—it's unethical. Porters are often small-framed individuals carrying loads at extreme altitude. Your "extra just-in-case items" are a burden on their backs, knees, and health. Pack responsibly.
Final Printable Checklist
Use this comprehensive checklist when packing. Check items off as you pack them.
Documents and Money
- Passport (valid 6+ months)
- Visa (obtain on arrival or e-visa)
- Travel insurance documents (with emergency contact numbers)
- Trekking permits (TIMS, National Park, local municipality)
- Passport photos (4-6 copies for permits)
- Cash (USD for visa, NPR for trek, emergency USD)
- Credit/debit cards (backup)
- Photocopies of all important documents
Clothing - Base Layers
- 2-3 long-sleeve technical shirts
- 2-3 thermal base layer bottoms
- 3-4 technical underwear (not cotton)
- 1-2 sports bras (women, non-cotton)
Clothing - Mid Layers
- 1 lightweight fleece or synthetic jacket
- 1 down jacket (600+ fill) or heavy synthetic puffy
- 1-2 trekking pants (quick-dry, stretch)
- 1 casual shirt/sweater (teahouse wear)
Clothing - Outer Layers
- 1 waterproof rain jacket with hood
- 1 waterproof rain pants
- 1 insulated pants (if winter or above 5,500m)
Clothing - Accessories
- 1 sun hat or baseball cap
- 1 warm beanie
- 1 buff or neck gaiter
- 1 balaclava (optional, high altitude)
- 1 pair liner gloves
- 1 pair insulated waterproof gloves/mittens
- Sunglasses (100% UV, category 3-4)
- Ski goggles (optional, winter/high passes)
Footwear
- 1 pair trekking boots (broken in!)
- 1 pair camp shoes/sandals
- 4-5 pairs trekking socks
- 2-3 pairs liner socks
- 1-2 pairs thick thermal socks (sleeping)
- Gaiters (optional, winter/monsoon)
Bags
- Daypack (25-35L)
- Porter duffel bag (60-90L)
- 2-3 waterproof stuff sacks
- 1-2 dry bags
- Compression sack for sleeping bag
- Multiple ziplock bags (various sizes)
- Daypack rain cover
Sleeping
- Sleeping bag (appropriate temperature rating)
- Sleeping bag liner (silk or synthetic)
- Sleeping pad (optional)
- Inflatable pillow (optional)
Trekking Equipment
- Trekking poles (2, adjustable)
- Water bottles (2x 1L) or hydration bladder (2-3L)
- Water purification (tablets, filter, or UV)
- Headlamp with spare batteries
- Sunscreen SPF 50+
- Lip balm with SPF
- Insect repellent (lower elevations)
Navigation, Tools and Repair
- Offline maps downloaded to phone
- Paper trekking map (backup)
- Compass (optional, high passes)
- Multitool or pocket knife
- Duct tape (wrapped around trekking pole)
- Gear patches (Tenacious Tape)
- Needle and thread, spare buckle
- Spare boot laces
- Small lighter and stormproof matches
- Whistle
Electronics
- Smartphone
- Camera (if bringing)
- Extra camera batteries
- SD cards
- Power bank (20,000+ mAh)
- Charging cables
- Multi-device charging hub
- Universal adapter (Type C/D/M for Nepal)
- Waterproof case/dry bag for electronics
Toiletries
- Toothbrush and toothpaste
- Biodegradable soap (multipurpose)
- Hand sanitizer
- Toilet paper (half roll compressed)
- Wet wipes/baby wipes
- Moisturizer
- Quick-dry travel towel
- Nail clippers
- Tweezers
Women-Specific (if applicable)
- Menstrual products (full supply)
- Feminine wipes
- Pee funnel (optional)
- Extra ziplock bags (for waste)
First Aid and Medications
- Prescription medications (full supply + extra)
- Acetazolamide/Diamox (altitude sickness)
- Ibuprofen (pain, headache)
- Paracetamol (pain, fever)
- Loperamide (diarrhea)
- Oral rehydration salts (ORS)
- Antihistamine
- Antacid tablets
- Antibiotic (ciprofloxacin or azithromycin)
- Altitude sickness emergency meds (dexamethasone, nifedipine)
- Blister care (moleskin, Compeed, leukotape)
- Adhesive bandages (various sizes)
- Gauze pads and medical tape
- Antiseptic wipes or solution
- Antibiotic ointment
- Elastic bandage (ACE wrap)
- Safety pins
- Small scissors
- Thermometer
- Pulse oximeter (optional)
Altitude-Specific (if above 5,000m)
- Warmer sleeping bag (-20°C to -30°C rating)
- Insulated pants
- Heavier down jacket or down vest
- Down mittens
- Face mask or balaclava
- Hand/foot warmers (chemical)
- Microspikes or crampons (if ice/snow expected)
Optional Items
- Book or e-reader
- Small notebook and pen
- Playing cards
- Earplugs (teahouse walls are thin)
- Eye mask (for sleep)
- Duct tape (wrapped around trekking pole)
- Sewing kit (basic repairs)
- Paracord (repairs, laundry line)
- Carabiners (2-3, for organizing gear)
Before You Leave Home
- Break in boots (50-100 km)
- Test all gear on practice hikes
- Download offline maps (Maps.me)
- Download entertainment (books, music, movies)
- Verify travel insurance covers altitude evacuation
- Get necessary vaccinations
- Inform bank of travel dates
- Make copies of all documents
- Share itinerary with family/friends
- Charge all devices and power banks fully
Frequently Asked Questions
Key Takeaways
Smart packing for Nepal treks balances safety, comfort, and weight. Here's what matters most:
Packing philosophy:
- Bring everything you need for safety (altitude gear, first aid, proper layers)
- Bring less than you think for comfort (you'll survive with fewer clothes)
- Choose multi-purpose items over single-use gear
- Test everything on practice hikes before departure
Critical don't-compromise items:
- Properly fitted, broken-in trekking boots
- Appropriate sleeping bag for your trek's altitude and season
- Complete layering system (base, mid, shell)
- Medications (especially Diamox for altitude)
- Sun protection (sunglasses, sunscreen, lip balm)
- Headlamp with spare batteries
- Water purification method
Smart money-saving strategies:
- Buy boots, medications, and fit-critical items at home
- Purchase down jackets, sleeping bags, and accessories in Kathmandu (40-60% savings)
- Rent trekking poles and specialized items
- Arrive in Nepal 2-3 days early for shopping and testing gear
Season-specific essentials:
- Spring/Autumn: Standard layering system works perfectly
- Winter: Upgrade to expedition-weight sleeping bag, insulated pants, warmer layers
- Monsoon: Avoid if possible; if not, prioritize waterproofing everything
Weight optimization:
- Target 6-8 kg daypack, 15-18 kg porter duffel
- Eliminate duplicate items (one trekking pants, not three)
- Share gear with trekking partners
- Decant toiletries into small containers
Women-specific priorities:
- Bring full menstrual supply from home
- Consider pee funnel for convenience at altitude
- Ensure proper fit on clothing (Nepal sizing often too small)
- Pack out all hygiene waste (respect environment)
The best-packed bag isn't the lightest or the most expensive—it's the one that brings exactly what you need, nothing you don't, and keeps you safe, warm, and comfortable throughout your Nepal trekking adventure.
Related Resources
Route-Specific Guides
- Everest Base Camp Trek Complete Guide
- Annapurna Circuit Trek Guide
- Annapurna Base Camp Trek Guide
- Manaslu Circuit Trek Guide
- Three Passes Trek Guide
- Langtang Valley Trek Guide
- Gokyo Lakes Trek Guide
Essential Planning Resources
- Altitude Sickness Signs and Turnaround Rules
- Nepal Trekking Permits Explained
- Best Time to Trek Everest Region
Region Overviews
Do I Need a Packing List for Nepal Trekking?
Yes. Nepal trekking demands specific gear that varies by altitude, season, and route. Without a structured packing list, trekkers either overpack (exceeding the 15kg porter weight limit and paying excess baggage fees) or underpack (arriving at 5,000m without adequate insulation). This list covers every item you need for routes from Poon Hill to Everest Base Camp, with altitude-specific and season-specific adjustments. Use it alongside our complete gear list for detailed brand recommendations and our rent vs buy guide for cost-saving strategies in Kathmandu.
What Should I Pack for Everest Base Camp?
The EBC trek requires all Priority 1 essentials: broken-in trekking boots, a full layering system including a down jacket, a sleeping bag rated to -15 degrees Celsius minimum, trekking poles, water purification, a power bank of 20,000mAh, camp shoes for tea house evenings, and everything organized in dry bags inside a duffel. Add gaiters if crossing snow above Lobuche. For the Three Passes extension, add crampon-compatible boots and full gaiters.
This guide to the essential items for Nepal trekking reflects current best practices as of June 2026, based on input from experienced trekkers, Himalayan guides, and gear specialists. Specific product recommendations may change as new gear becomes available. Always verify current Nepal regulations and requirements before your trek.
For corrections, updates, or specific gear questions not addressed in this guide, contact our editorial team.